Category: Fall

  • 7+ Printable Football Pumpkin Stencils

    7+ Printable Football Pumpkin Stencils

    If your family loves football season as much as Halloween, these Football Printable Pumpkin Stencils are the perfect way to combine the two!

    Whether you’re a fan of Friday night lights, college football Saturdays, or cheering for your favorite NFL team on Sunday, these stencils let you carve or decorate pumpkins with football-themed designs everyone will love.

    Personalized Football Pumpkin Stencil

    Football Season Pumpkin Stencil

    Football Pumpkin Stencil

    Football Pumpkin Stencils (Set of 3)

    Football Player Pumpkin Stencil

    Football Player Pumpkin Stencil

    Football Pumpkin Stencil

    NFL Teams Pumpkin Stencil Set #1

    NFL Teams Pumpkin Stencil Set #2

    NFL Teams Pumpkin Stencil Set #3

    Eagles Pumpkin Stencil Set

    Looking for more ideas? Check out 100+ Printable Pumpkin Stencils.

    From footballs and helmets to goalposts and team logos, these football pumpkin carving templates make it easy to create fun, sporty pumpkins that celebrate your team spirit.

    They’re simple enough for beginners but detailed enough to impress your neighbors — making them a must-have for any football-loving family this fall.

    When to Use Football Pumpkin Stencils

    These stencils are perfect during football season, especially in October when tailgating, watch parties, and Halloween decorating all overlap.

    Use them for carving pumpkins before a big game, decorating for a tailgate party, or adding a football twist to your Halloween porch display.

    They also make great fall craft activities for kids or themed parties during football season.

    Where to Use Football Pumpkin Stencils

    You can use these printable football pumpkin stencils anywhere — at home, in classrooms, or even at tailgate parties. They’re perfect for:

    • Front porch pumpkin displays
    • Game day party décor
    • Classroom sports themes
    • Community fall festivals
    • Kids’ carving contests

    You can also use the printable templates for no-carve pumpkins — just trace and paint your design instead of carving. They make great centerpieces for game day tables, too!

    How to Use the Stencils

    1. Pick your favorite football stencil design.
    2. Print it on regular printer paper.
    3. Tape it to your pumpkin and trace it using a carving tool, pencil, or push pins.
    4. Carefully carve along the traced lines.
    5. Add a candle or LED light inside for a glowing touchdown-worthy effect.

    Prefer not to carve? Paint the design on your pumpkin for a clean and sporty look — great for younger kids or quick decorating.

    Why You’ll Love These Football Pumpkin Stencils

    These football pumpkin carving printables are perfect for families who love fall, football, and festive decorations.

    They’re easy to use, affordable, and let you show off your team pride in a creative way. You can carve your favorite team’s logo, create a simple football shape, or even make a “Go Team!” pumpkin for game day.

    They’re also great for kids who want to join in on pumpkin decorating without getting too spooky. It’s a fun, family-friendly way to celebrate two fall favorites — football and Halloween!

    What You Can Use These Football Pumpkin Stencils For:

    • Football-themed pumpkin carving nights
    • Game day decorations or tailgates
    • School or team spirit week crafts
    • Family Halloween decorating
    • Sports-themed fall parties
    • Classroom or youth group activities

    Great if You’re Looking For:

    • Football pumpkin stencils printable
    • Football pumpkin carving templates
    • NFL team pumpkin stencils printable
    • College football pumpkin carving patterns
    • Football helmet pumpkin stencil
    • Easy football pumpkin carving ideas
    • Touchdown pumpkin designs
    • Tailgate pumpkin decorating ideas
    • Sports pumpkin stencil printables
    • Football logo pumpkin templates
    • Family football pumpkin carving activities
    • Fall football decorations for porch or party
  • Halloween Ghost Pops

    Halloween Ghost Pops

    Do you have kids who love Halloween?

    Then they’re going to love this easy Halloween Ghosts Pop craft! It’s simple enough for even the youngest of kids to do, and it’s a fun way to get into the Halloween spirit.

    Plus, it’s a great way to use up any extra lollipops you might have lying around.

    Ready to get started? Let’s go!

    You may also like:

    Halloween Ghost Pops

    Supplies:

    • Lollipops or suckers
    • facial tissue
    • Halloween ribbon
    • scissors
    • black Sharpie marker
    • paper cups (for displaying)

    Directions:

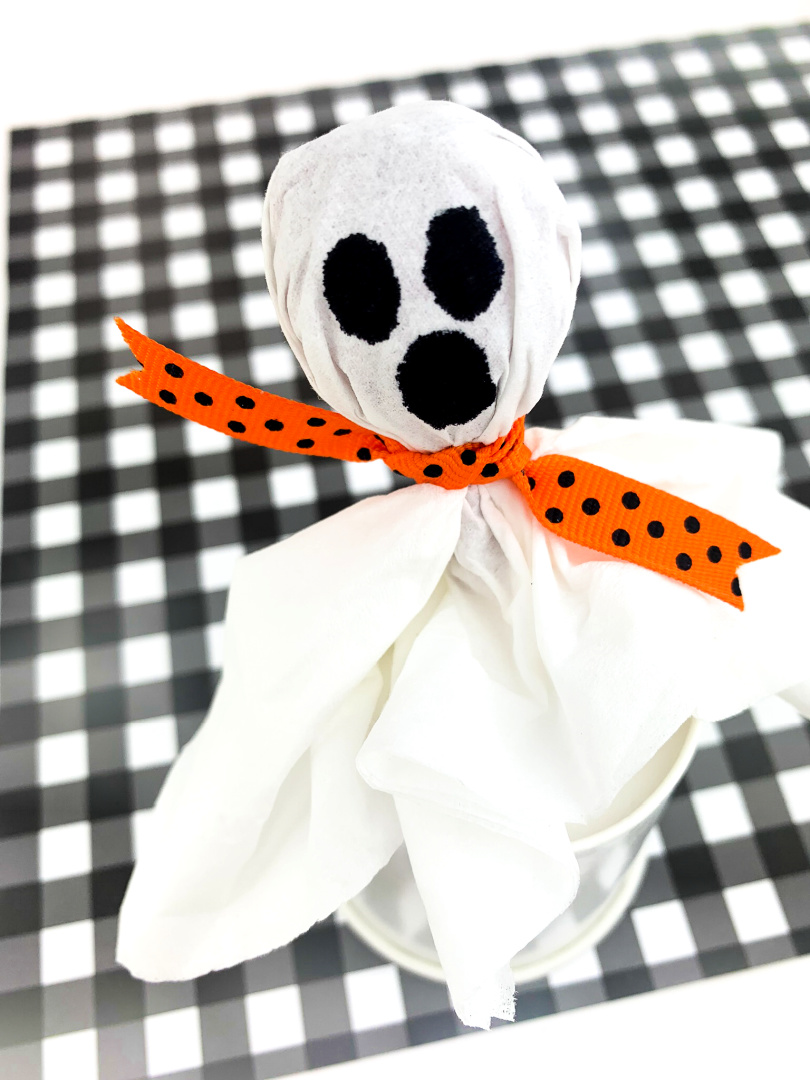
    Wrap a tissue around the lollipop. Try to place it around the pop as smooth as possible (this will make it easier to draw a face on it.)

    Bring the tissue together where the pop meets the stick and tie a ribbon tightly around the tissue to form the ghost. Cut the ribbon down to desired length.

    Using the Sharpie marker, draw a ghost face on the tissue. Get creative with ghost faces! Use these ghost faces for ideas if needed.

    If you’d like a way to display your ghost, turn over a paper cup and poke a hole in the cup, large enough to be able to place the lollipop stick in. This will hold the ghost up.

    Halloween Ghost Pops

    Halloween Ghost Pops

    Materials

    • Tootsie Pops
    • Tissue (Kleenex)
    • Ribbon
    • Scissors
    • Black Sharpie Marker
    • (Optional: paper cup(s) for displaying)

    Instructions

    Wrap a tissue around the Tootsie pop. Try to place it around the pop as smooth as
    possible (this will make it easier to draw a face on it.)

    Bring the tissue together where the pop meets the stick and tie a ribbon tightly around the tissue to form the ghost. Cut the ribbon down to desired length.

    Using the Sharpie marker, draw a ghost face on the tissue. Get creative with ghost faces!

    If you’d like a way to display your ghost, turn over a paper cup and poke a hole in the
    cup, large enough to be able to place the Tootsie pop stick in. This will hold
    the ghost up.

  • Paper Bag Ghost Luminaries

    Paper Bag Ghost Luminaries

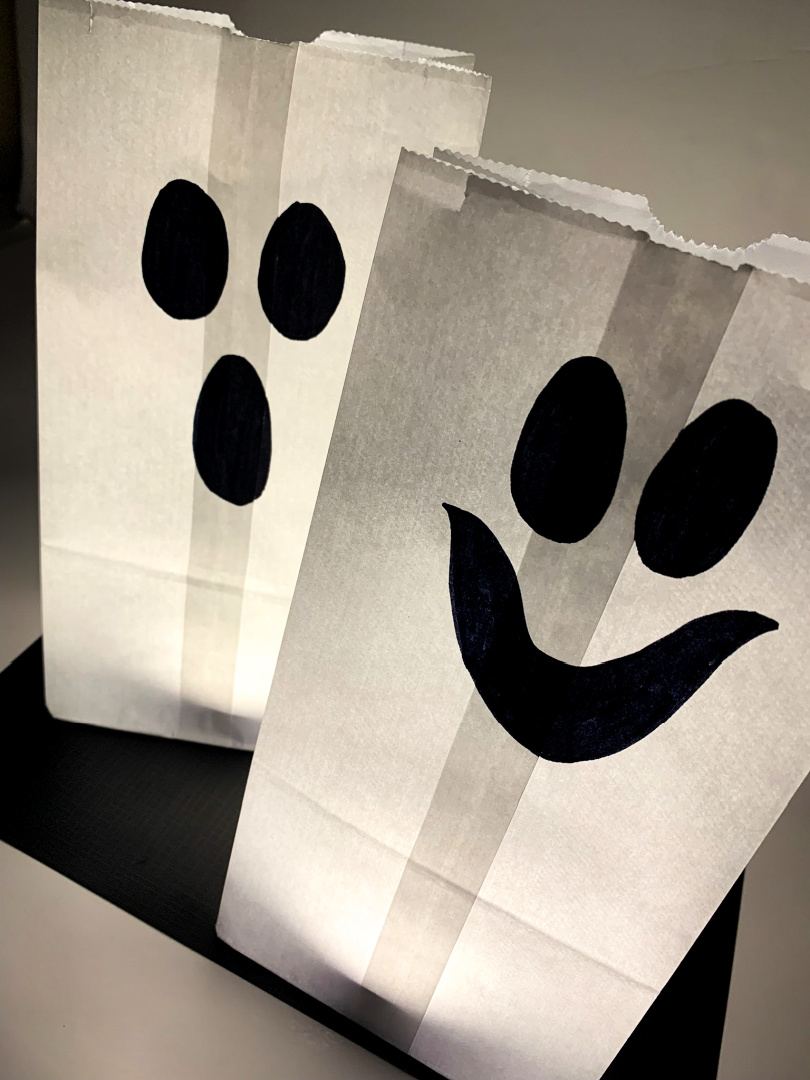
    Looking for a fun, easy Halloween decoration that your kids can help make? Try these Paper Bag Ghost Luminaries! They’re simple to make and look spooky in the dark.

    Plus, they provide a soft light that’s perfect for Trick-or-Treating or parties.

    Read on for instructions on how to create these adorable ghosts!

    Paper Bag Ghost Luminaries

    Milk Jug Ghosts

    Ghost Crafts for Halloween

    Ghost Faces

    Paper Bag Ghost Luminaries

    Supplies:

    Paper Bag Ghost Luminaries supplies

    Directions: 

    Draw ghost faces on each bag using the black marker. 

    Paper Bag Ghost Luminaries supplies
    Paper Bag Ghost Luminaries

    Open the bag. 

    Place the lighting inside. 

    paper bag ghost luminaries

    Display! 

    paper bag ghost luminaries
    paper bag ghost luminaries

    Paper Bag Ghost Luminaries

    Paper Bag Ghost Luminaries

    Materials

    • white paper lunch bags
    • black marker
    • flameless lighting (led touch lights/candles)

    Instructions

    Draw ghost faces on each bag using the black marker. 

    Open the bag. 

    Place the lighting inside. 

    Display!

  • Halloween Sight Words Activity

    Halloween Sight Words Activity

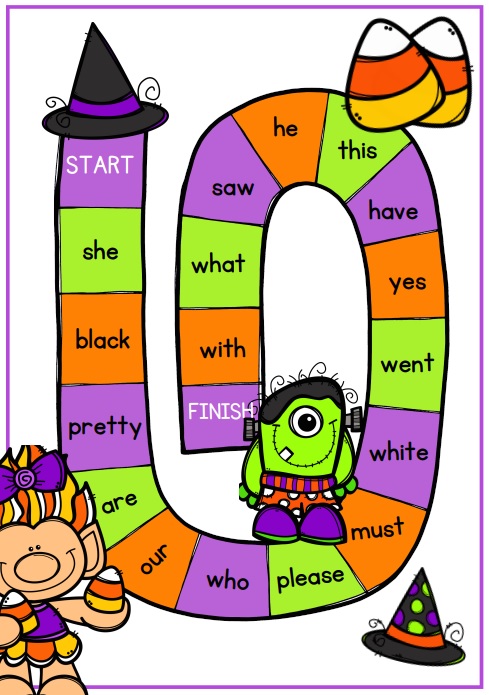
    Are you looking for a fun way to teach sight words during the month of October? Play this fun Halloween Sight Words Activity!

    You’ll get access to a FREE 3 page game that includes a Halloween themed sight word game board, spinner, and a sight words recording sheet.

    The following 17 sight words are used for this game: she, are, what, please, went, this, black, our, with, he, yes, must, pretty, who, saw, have, and white.

    Object of the game: The students will use a token or a game piece to play this game. They will take turns playing. Use the customized spinner that is included as a free printable, or they can roll a dice.

    As they play, write the sight words using the sight words recording sheet. Repeat the game the desired amount of times.

    Have fun!

    Tip: Laminate your game board, game spinner, and recording sheet so that your game will last longer! Use a dry erase marker on the recording sheet and wipe off when the game is finished.

    Halloween Sight Words Activity

    >> CLICK HERE TO SIGN UP FOR MY EMAIL LIST AND GET ACCESS TO THIS FREE PRINTABLE SIGHT WORDS ACTIVITY!

    >> CLICK HERE TO SIGN UP FOR MY EMAIL LIST AND GET ACCESS TO THIS FREE PRINTABLE SIGHT WORDS ACTIVITY!

    More Halloween Sight Word Activities:

    Halloween Cookie Sight Words
    Halloween Cookie Sight Words


    Halloween Sight Words Flash Cards
    Halloween Sight Words Flash Cards


  • Mason Jar Pumpkin Craft

    Mason Jar Pumpkin Craft

    Create this easy Mason Jar Pumpkin Craft to display around your home this fall season! Kids can help make this, too!

    Are you looking for DIY fall crafts to work on this fall season? Grab your paint supplies and a mason jar or any jar that you can recycle and create this light up mason jar pumpkin craft!

    All you have to do is paint the jar and the lid, add the stem and vines, add the light and display!

    Mason Jar crafts are very popular during the fall months. You can create so many crafts with mason jars. Check out our Snowman Mason Jar Gift idea, too while you are here.

    Mason Jar Pumpkin Craft

    Supplies:

    • Glass or plastic jar with lid
    • Orange craft paint
    • Green craft paint
    • Paint brush
    • Paper plate
    • Green pipe cleaner
    • Wooden stem 
    • Flameless LED votive candles 

    Directions:

    Set up your work space. *We used a paper plate to paint on. 

    Paint one coat of orange paint on the jar. Set aside. Allow to dry.  

    Paint one to two more coats of orange paint on the jar until the jar is completely covered. Allow to dry.

    Paint the lid and ring green. Allow to dry. Give the lid and ring one more coat of paint if needed. 

    Screw on the lid and ring to the jar. 

    Using the hot glue gun, squirt a small amount of glue in the center of the lid. Attach the stem. 

    Cut the pipe cleaner into (2) 3-4 inch pieces. Curl the pipe cleaners around your finger. Remove. These will be the vine pieces of the pumpkin.

    Use the glue gun to place two drops of glue behind the stem. Attach the vines. 

    Turn on the flameless candle and place inside the jar.  

    Your pumpkin is ready to display! 

  • Pipe Cleaner Spider Craft for Kids

    Pipe Cleaner Spider Craft for Kids

    Create this easy and simple Pipe Cleaner Spider Craft with the kids this Halloween!

    Pipe Cleaner Spider Craft

    Halloween is just around the corner!

    I love the month of October. There’s always several family friendly activities to take advantage of during the month of October including fall festivals, corn mazes, pumpkin patches, hay rides, trunk-or-treating, trick-or-treating, haunted houses, and more.

    My calendar stays pretty full during October, but I love this time of year and love participating in these fun activities with my family.

    Spider Paper Plate Craft

    Pine Cone Spider Craft

    Cutest Little Spider Handprint Art Halloween Craft for Kids
    Cutest Little Spider Handprint Art Halloween Craft for Kids


    My girls enjoy helping decorate for the holidays. This year, we are focusing on spiders for Halloween.

    We ended up finding a gigantic furry spider decoration with red eyes, glow-in-the-dark fake spider web, and small glittery spiders. We also found two large bags of Hershey’s candy to use with these decorations at our Halloween party this year.

    We are set our spooky decor in our entry way area of our home during the month of October.

    To create our spooky decor, we used all of our items from Walmart and set them on our entry way table with a white background. The furry spider, small sparkly spiders, fake spider web, Halloween candy bowl, and the Hershey candy made this one spooky scene and will definitely spook a few of our guests!

    Spider Printable Craft Halloween Craft Preschool Activity
    Spider Printable Craft Halloween Craft Preschool Activity


    The spider is hovering over the candy bowl to add a special effect as if he’s watching over his candy and doesn’t want anything or anybody to get it! I dare you to take a piece! 😉

    Hershey Candy at Walmart

    With a focus on spiders this year, we made our own spiders, too.

    These DIY Halloween Spiders are a great addition to your Halloween decor and they are fun and super easy to make. We purchased the items we needed for this craft at Walmart in the craft section.

    Life Cycle of a Spider Foldable Kids' Craft  A4 and
    Life Cycle of a Spider Foldable Kids’ Craft


    Pipe Cleaner Spider Craft

    Here’s what you’ll need:

    *If you can’t find adhesive googly eyes, you can use regular googly eyes and attach them using a hot glue gun.

    DIY Spider Craft

    Step 1: Set your pipe cleaners on a clean area as pictured below. Using only one pipe cleaner to secure all pipe cleaners, you’ll need to bend the top pipe cleaner around completely one time. Do this for the other side of the same pipe cleaner. When you bend them around in a full circle around, it will secure all of the pipe cleaners together well.

    DIY Spider Craft

    Step 2: When all pipe are secured, pull 4 ends to one side and 4 ends to the other side to make the spiders legs.

    DIY Spider Craft

    Step 3: Bend each of the spiders legs in a zig zag pattern until all 8 legs are complete.

    DIY Spider Craft

    This is what your spider should look like once all legs are complete.

    DIY Spider Craft

    Step 4: Pick your spider up with your hand and bend his legs down so that they touch the surface. Add two adhesive eyes to the body (the middle) of the spider. Your completely spider should look something like this:

    These DIY spiders around perfect to set around your home this Halloween season!

    SPIDER Unit Study Life Cycle Anatomy Nature Study Science
    Spider Unit Study


    Hershey Candy at Walmart

    Don’t forget to have plenty of Hershey candy around, too! You can find an exclusive Halloween orange Reese’s featuring the message “Boo” at your local Walmart this year to add some extra fun to your Halloween decor and trick-or-treating experience!

    What is your favorite kind of Hershey Halloween candy?

  • Construction Paper Ghost

    Create this simple and spooky Construction Paper Ghost to display in your home or classroom this Halloween!

    It’s almost Halloween, and that means it is time to start creating some spooky crafts for the little ones in your life.

    This construction paper ghost craft is a simple and easy project that kids will love. In addition to being fun, this project also teaches your children about different colors of construction paper and how they can be used as well as what tools are needed to create a finished product.

    Ghost Crafts for Halloween

    Follow these step-by-step instructions with your kids or grandkids on any day leading up to Halloween!

    Construction Paper Ghost

    Supplies: 

    Directions:

    Draw a ghost shape on the white construction paper with a pencil. (A pencil is best so that you can erase mistakes during the process.) The shape of the ghost can vary. The bottom of the ghost can be straight, wavy, or shaped like it’s flying. Feel free to get creative with this part if desired. 

    Cut out the ghost. 

    Glue the googly eyes onto the ghost face. Add the ‘eyebrows.’

    Draw the mouth with a black marker. You can make the mouth an o shape, circle shape, or an oval shape. 

    Glue the ghost to the black paper. 

    Display!