Category: DIY

  • Pine Cone Christmas Tree

    Create this festive and colorful Pine Cone Christmas Tree and display this fun craft in your home or classroom this holiday season!

    Pine cone Christmas trees are a cute, natural way to decorate your home for the holidays.

    This tutorial will show you how to make one using just a few materials. Plus, it’s easy enough for kids to help with!

    Need to purchase pine cones in bulk? Purchase natural pine cones in bulk from Amazon!

    Why are pine cones associated with Christmas?

    Pine cones have been associated with Christmas for centuries.

    Some believe that the pine cone symbolizes fertility and new life, making it a perfect symbol for the holiday season.

    Others believe that pine cones represent the evergreen trees that are often used as Christmas trees, and thus are a reminder of the holiday season.

    Whatever the reason, pine cones have become a staple of Christmas decoration, and can be found adorning everything from wreaths to mantles.

    So if you’re ever wondering why pine cones are associated with Christmas, now you know!

    Do you have to clean pine cones for crafts?

    You don’t necessarily have to clean pine cones before using them for crafts, but it can help to remove any dirt or debris.

    If you’re using pine cones for a project like pine cone painting, for example, you’ll want to make sure they’re as clean as possible.

    You can clean pine cones by giving them a quick rinse with water, or by wiping them down with a damp cloth.

    Once they’re clean, you’re ready to get crafting!

    Do you need to bake pine cones before crafting?

    There’s no need to bake pine cones before crafting with them, although you may want to give them a light toast beforehand to help release their oils and make them more fragrant.

    If you’re working with pine cones that are particularly fresh or resinous, baking can also help to prevent any sap from seeping out and making a mess.

    Pine Cone Christmas Tree

    How Do You Make a Pine Cone Christmas Tree

    Supplies:

    Pine Cone Christmas Tree

    Directions:

    Set the pine cone on a paper plate. 

    Pour a small amount of green paint in the cup.

    Paint the pine cone green. Set aside to dry. If needed, add another coat. 

    Glue the pom poms around the pine cone. Allow to dry.

    Glue the white pom pom on the top of the pine cone. Allow to dry.

    (You may be able to set the pom pom in between top of the pine cone and one of the pine cone seeds to help it stay in place.) 

    Display this holiday season!

    Pine Cone Christmas Tree

    Pine Cone Christmas Tree

    Pine Cone Christmas Tree

    Materials

    • Pine cone
    • Green craft paint
    • Paintbrush
    • Small to medium size sparkly/glitter pom poms (different colors)
    • 1 white pom pom (for the star)
    • Glue or hot glue gun
    • Paper plate
    • Small disposable cup

    Instructions

    Set the pine cone on a paper plate. 

    Pour a small amount of green paint in the cup.

    Paint the pine cone green. Set aside to dry. If needed, add another coat. 

    Glue the pom poms around the pine cone. Allow to dry.

    Glue the white pom pom on the top of the pine cone. Allow to dry.

    (You may be able to set the pom pom in between top of the pine cone and one of the pine cone seeds to help it stay in place.) 

    Display this holiday season!

  • Reindeer Christmas Ornament

    Reindeer Christmas Ornament

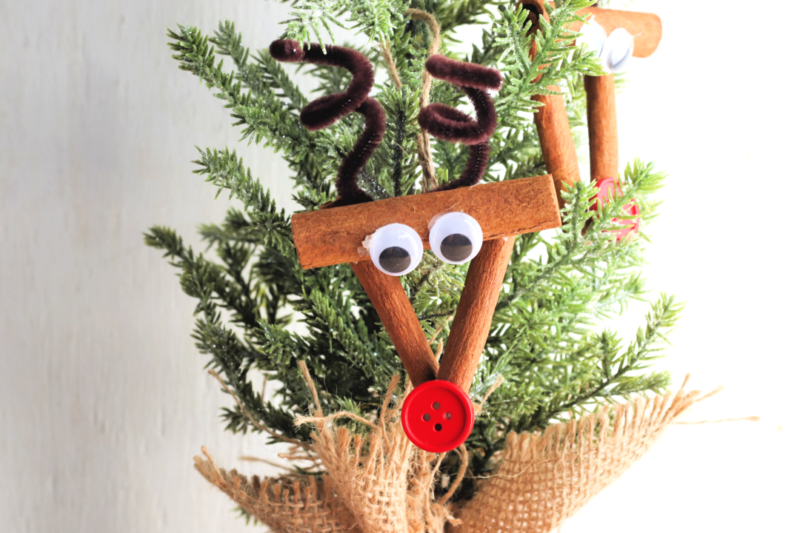
    Create this adorable Reindeer Christmas Ornament to display on your Christmas tree this year!

    The countdown to Christmas is here! Christmas will be here before we know it!

    Do you have plans to decorate the Christmas tree this year?

    There’s always a great debate on what time everyone decides to put a Christmas tree up. Many say they put it up before Thanksgiving. There are others that put the Christmas tree up the day after Thanksgiving. And then there are some that wait until December to put their tree up!

    Reindeer Sandwich Art

    Whatever you decide is completely your choice! We usually wait until after Thanksgiving to display our tree.

    This year, when you get ready to display your Christmas tree, consider adding a few of your own DIY ornaments to the tree! Making ornaments during the holiday season with kids is always a fun activity to work on together as a family!

    Plus, you can save these ornaments for years to come and display them year after year.

    Check out my Pine Cone Reindeer craft while you are here!

    Reindeer Christmas Ornament

    Supplies:

    Cinnamon sticks
    Red buttons
    Googly eyes
    Twine
    hot glue gun or glue

    *Parent supervision recommended when using glue gun!

    Instructions:

    Using the hot glue gun, glue two cinnamon sticks together to form a V shape, then glue a third stick on top to create a triangle.

    Bend a pipe cleaner in half and twist each end around your finger to create antlers. Glue the antlers to the back of the triangle.

    Glue a button nose on the bottom of the triangle.

    Glue two googly eyes on the top part of the triangle.

    Cut a short piece of twine and form a loop. Glue the ends of the loop to the back of the ornament to hang it on the tree.

    Reindeer Christmas Ornament

    Reindeer Christmas Ornament

    Materials

    • Cinnamon sticks
    • Red buttons
    • Googly eyes
    • Twine
    • hot glue gun
    • glue sticks

    Instructions

    Glue two cinnamon sticks together to form a V shape, then glue a third stick on top to create a triangle.

    Bend a pipe cleaner in half and twist each end around your finger to create antlers. Glue the antlers to the back of the triangle.

    Glue a button nose on the bottom of the triangle.

    Glue two googly eyes on the top part of the triangle.

    Cut a short piece of twine and form a loop. Glue the ends of the loop to the back of the ornament to hang it on the tree.


  • Pine Cone Reindeer

    Pine Cone Reindeer

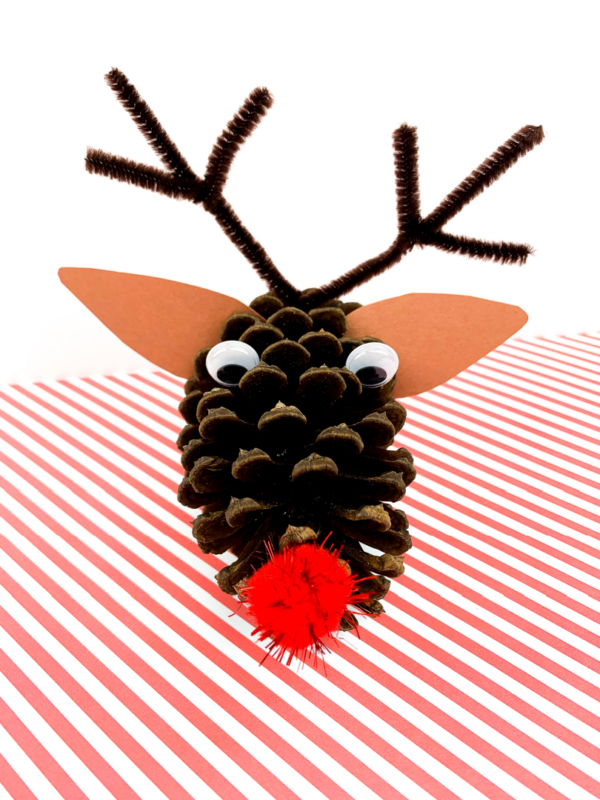
    Create this adorable Pine Cone Reindeer craft with the kids this holiday season! Display in your home for Christmas.

    Pine Cone Reindeer

    Pine cone crafts are fun to make! You can turn a pine cone into so many cute crafts this year.

    When you are out on your next walk with the kids, find a few pine cones in good shape. Bring them home, clean them well and create crafts with them!

    Toilet Paper Roll Reindeer

    Reindeer Paper Bag Craft

    Milk Jug Reindeer

    This holiday season, I wanted to share this cute Pine Cone Reindeer craft that you can make and display at home. The kids will love making this reindeer!

    Pine Cone Reindeer

    Supplies:

    Pine Cone Reindeer supplies

    Directions:

    Glue the pom pom nose on the point of the pine cone. If you want to make a pine cone Rudolph reindeer, use a red pom pom. For a regular reindeer, use a brown or black nose.

    pine cone nose

    Glue the googly eyes toward the center of the pine cone.

    pine cone face

    Cut out two brown ears from the brown construction paper. You can round off the tips of the ears if desired.

    pine cone ears
    pine cone antlers

    Cut one pipe cleaner in half, then cut two pieces from one half. Bend the uncut pipe cleaner in half to form a V shape.

    brown pipe cleaners

    Use these two smaller pieces to wrap around the top of the antlers. Twist until the the pipe cleaner is secure.

    pipe cleaner antlers
    pine cone antlers

    Insert the V shaped pipe cleaner antlers from the bottom on the back side of the pine cone. Wrap it around at the top, twist, and spread out the pipe cleaner.

    Add glue and insert the ears towards the back of the pine cone.

    pine cone reindeer

    Pine Cone Reindeer

    Pine Cone Reindeer

    Materials

    • pine cone
    • 2 brown pipe cleaners
    • googly eyes
    • red, black, or brown pom pom
    • brown construction paper
    • scissors
    • optional: glue gun and glue stick

    Instructions

    Glue the pom pom nose on the point of the pine cone. If you want to make a pine cone Rudolph reindeer, use a red pom pom. For a regular reindeer, use a brown or black nose.

    Glue the googly eyes toward the center of the pine cone.

    Cut out two brown ears from the brown construction paper. You can round off the tips of the ears if desired.

    Cut one pipe cleaner in half, then cut two pieces from one half. Bend the uncut pipe cleaner in half to form a V shape.

    Use these two smaller pieces to wrap around the top of the antlers. Twist until the the pipe cleaner is secure.

    Insert the V shaped pipe cleaner antlers from the bottom on the back side of the pine cone. Wrap it around at the top, twist, and spread out the pipe cleaner.

    Add glue and insert the ears towards the back of the pine cone.

    More reindeer activities to enjoy:

    Christmas Coloring Pages  40 Printable Christmas Coloring
    Christmas Coloring Pages 40 Printable Christmas Coloring


    Cute Christmas Reindeer Coloring Pages Kids and Adults will
    Cute Christmas Reindeer Coloring Pages Kids and Adults will


    Christmas Coloring Pages: snowman reindeer Christmas tree
    Christmas Coloring Pages: snowman reindeer Christmas tree


    Christmas Reindeer Coloring Sheet for Adults and Kids
    Christmas Reindeer Coloring Sheet for Adults and Kids


    Coloring pages for adults. Deer. Flowers. Adult coloring
    Coloring pages for adults. Deer. Flowers. Adult coloring


    Winter Deer  Christmas coloring pages for kids printable
    Winter Deer Christmas coloring pages for kids printable


    Christmas Coloring Pages  5 Printable Coloring Pages for
    Christmas Coloring Pages 5 Printable Coloring Pages for


    Christmas Reindeer Gift Tags to Color printable digital
    Christmas Reindeer Gift Tags to Color printable digital


    Santa and his reindeers PDF coloring page Father Christmas
    Santa and his reindeers PDF coloring page Father Christmas


    Reindeer Activities: Craft Book and Writing/ Printable/ Fun
    Reindeer Activities: Craft Book and Writing/ Printable/ Fun


    Reindeer Sucker Lollipop Holder Instant Download & Print
    Reindeer Sucker Lollipop Holder Instant Download & Print


  • How to Make Pumpkin Pie Slime

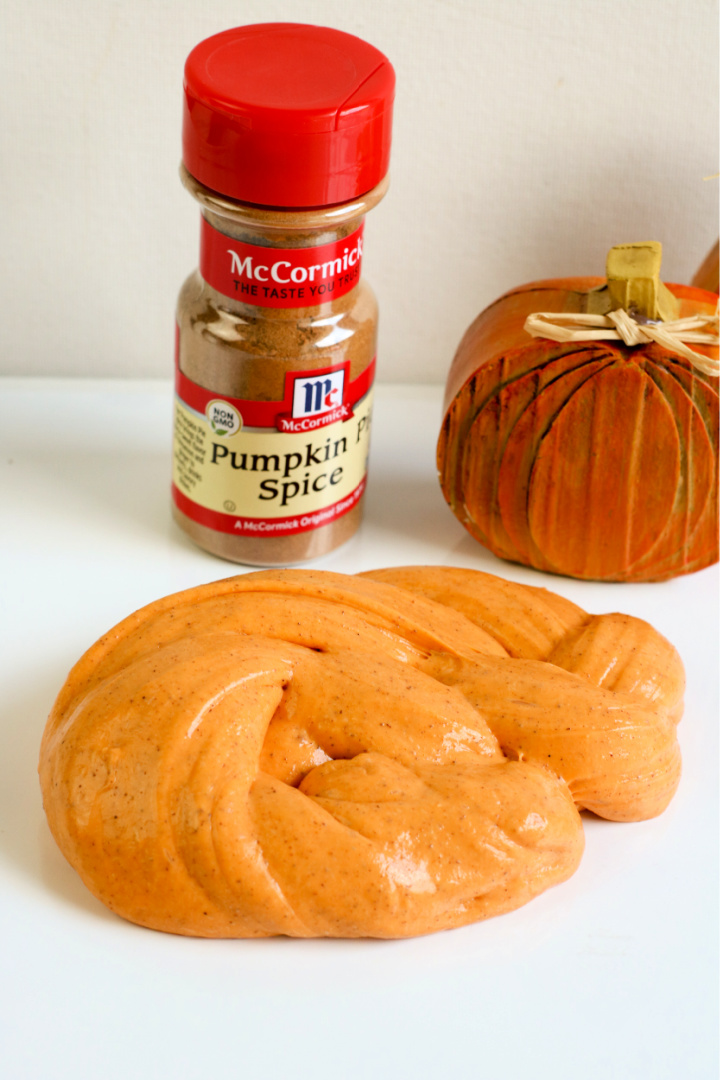
    Learn how to make pumpkin pie slime! This is a fun, non-edible recipe for the kids to enjoy this fall season.

    How to Make Pumpkin Pie Slime

    ***IMPORTANT NOTE: This is a non-edible recipe!

    The Perfect Holiday Craft: Pumpkin Pie Slime for Busy Moms and Little Hands

    As the holidays approach, we’re always on the lookout for fun, creative, and simple activities to enjoy with our little ones.

    Whether you’re juggling work, household chores, or preparing for the festive season, finding ways to connect and engage with your kids is so important.

    Fall Playdough Kits

    Fall Sensory Bins

    Today, I have just the treat for you – and it doesn’t involve any baking or long hours in the kitchen.

    Introducing… Pumpkin Pie Slime!

    Not only is this delightful concoction a nod to everyone’s favorite fall dessert, but it’s also a sensory wonderland for kids.

    With the season’s signature pumpkin spice scent and an inviting orange hue, it’s as close as you can get to pie without the calories!

    IMPORTANT NOTE: This is a non-edible recipe!

    Why Pumpkin Pie Slime?

    Before we get to the how-to, let’s address the why. What makes this slime so perfect for busy moms?

    • Quick and Easy: With just a few ingredients you probably already have at home, it’s a breeze to whip up.
    • Holiday Fun: Beyond the initial creation, this slime offers hours of entertainment. It can be stretched, squished, rolled, and more.
    • Sensory Play: Slime can help kids develop hand-eye coordination, fine motor skills, and even concentration. Plus, the lovely pumpkin spice scent provides olfactory engagement too!

    Let’s roll up our sleeves (literally and figuratively!) and dive into the world of gooey fun.

    How to Make Pumpkin Pie Slime

    Ingredients:

    How to Make Pumpkin Pie Slime

    Directions:

    Empty the glue into a large bowl.

    Fill the empty glue bottle about ⅓ full with warm water (about ¼ cup) and seal with the lid. Shake well to combine the remaining glue with the water. Pour into bowl with glue and stir to combine.

    Stir the food coloring into the glue mixture before adding the contact lens solution.

    Add the baking soda and pumpkin spice to the glue and stir to mix thoroughly.

    pumpkin pie slime ingredients

    Add contact lens solution to the glue mixture and stir well.

    Note: Regular glue will require less contact lens solution than glitter glue. Add the contact lens solution slowly, mixing between additions, and add only enough to bring the glue together into a soft ball.

    Remove the slime from the bowl. The slime will be sticky.

    Begin to play with the slime, stretching or kneading it as you would bread dough, to bring the slime together.

    The slime is ready when it is no longer sticky.

    Best if stored in an airtight container in the refrigerator when not in use.

    How to Make Pumpkin Pie Slime

    The holidays are a time of joy, laughter, and making memories.

    This Pumpkin Pie Slime is more than just a craft; it’s an experience—a blend of sensory exploration and festive celebration.

    For us busy moms, it’s a simple way to bring a touch of holiday magic into our homes.

    So, the next time you find a quiet afternoon or want to surprise your little ones with a fun activity, remember this recipe.

    Happy crafting, and even happier holidays!

    Frequently Asked Questions (FAQs) about Pumpkin Pie Slime:

    Is this slime edible?

    No, this slime is not edible. Even though it smells delicious thanks to the pumpkin spice seasoning, it should never be ingested. Always supervise kids during play.

    My slime is too sticky. What can I do?

    If your slime is too sticky, try adding a tiny bit more contact lens solution and knead it in. This will usually reduce the stickiness.

    Can I use any other glue instead of Elmer’s?

    Elmer’s Glue is recommended because it gives the best consistency for slime. However, white school glue from other brands may also work. It’s always a good idea to do a small test batch first.

    The color is too pale. Can I add more food coloring?

    Adjust the color to your liking by adding more drops of food coloring. Mix thoroughly to get an even hue.

    How long does the pumpkin pie slime last?

    If stored properly in an airtight container in the refrigerator, the slime can last for up to a month. Always check its texture and smell before use to ensure it hasn’t gone bad.

    Can I add glitter or other decorations to my slime?

    You can add glitter, confetti, or any other safe-for-slime decorations. Just ensure they’re mixed in well to avoid them falling out during play.

    My child has sensitive skin. Can they play with this slime?

    While the ingredients are generally safe, if your child has sensitive skin, always do a patch test first. Let them play with the slime for a short time and check for any reactions. If there’s any redness or irritation, it’s best to avoid extended play.

    The slime has lost its stretchiness. What can I do?

    Over time, slime can lose its stretch. To revive it, place it in a bowl and add a few drops of warm water. Knead the water into the slime until it regains its stretchy consistency.

    Can I make this slime in larger batches for a group activity?

    Definitely! Just multiply the ingredients according to the number of batches you need. It’s a great activity for playdates or classroom crafts.

    I don’t have pumpkin spice seasoning. Can I use something else for scent?

    While pumpkin spice gives it the festive touch, you can use vanilla extract, cocoa powder, or even essential oils for different scents. Just ensure whatever you use is safe and non-toxic.

    Pumpkin Pie Slime

    Pumpkin Pie Slime

    Materials

    • 1 (6 ounce) bottles Elmer’s Glue
    • About ½ cup warm water
    • ½ teaspoon baking soda
    • 1 tablespoon contact lens solution (containing boric acid), for each batch
    • 1 teaspoon pumpkin spice seasoning blend
    • Orange food coloring

    Instructions

  • Empty the glue into a large bowl.
  • Fill the empty glue bottle about ⅓ full with warm water (about ¼ cup) and seal with the lid. Shake well to combine the remaining glue with the water. Pour into bowl with glue and stir to combine.
  • Add the baking soda to the glue and stir to mix thoroughly.
  • If you are adding additional glitter, food coloring, scents, or confetti, stir into the glue mixture before adding the contact lens solution.
  • Add contact lens solution to the glue mixture and stir well. (Note: regular glue will require less contact lens solution than glitter glue. Add the contact lens solution slowly, mixing between additions, and add only enough to bring the glue together into a soft ball.)
  • Remove the slime from the bowl. The slime will be sticky. Begin to play with the slime, stretching or kneading it as you would bread dough, to bring the slime together. The slime is ready when it is no longer sticky.
  • Best if stored in an airtight container in the refrigerator when not in use.


  • Reindeer Paper Bag Craft

    With Christmas around the corner, it’s time to start thinking about fun holiday crafts!

    This Reindeer Paper Bag Craft is perfect for kids of all ages and is a great way to get into the holiday spirit.

    Plus, it’s a super cute decoration for your home or office!

    Why not add a reindeer paper bag craft to your holiday decor this year?

    It’s quick and easy to make, and you probably already have all the supplies you need. Plus, it’s a great way to recycle an old paper bag.

    So why not try something new and get into the holiday spirit with this fun and festive craft!

    This reindeer paper bag craft is perfect for kids of all ages. It’s a fun and easy way to make your own Christmas decorations.

    Pine Cone Reindeer

    Toilet Paper Roll Reindeer

    Milk Jug Reindeer

    Reindeer Paper Bag Craft

    Supplies:

    Directions:

    Paint the clothespins brown. Set aside to dry. 

    Glue the googly eyes on the center of the paper bag. 

    Glue the pom pom on under the eyes. Set aside to dry.

    Draw a mouth using a black marker.

    Add the tissue paper in the bag. If you’d like, you can fill the bag with treats, candy, or small toys. 

    Close the bag and fold the top of the bag over. Clip the clothespins on the bag for the reindeer antlers. 

    String jingle bells on the ribbon. Tie the ribbon around the bag. 

    Display!

  • 7+ Turkey Crafts for Kids

    Are you looking for ways to keep your little ones busy during Thanksgiving? Here are my favorite Turkey Crafts to enjoy!

    turkey crafts

    It’s that time of year when we start thinking about Thanksgiving and all the cooking and baking to do.

    Printable Turkey Coloring Pages

    I’m sure you’re looking for some fun activities with your kids to keep them busy while you get everything ready.

    We know how important it is to take a break from time-to-time, so here are different ways to make turkey crafts with your little ones this Thanksgiving!

    Turkey Crafts

    Fall Leaf Turkey Craft

    Pine Cone Turkey Craft

    Toilet Paper Roll Turkey Craft

    Paper Bag Turkey Craft

    Turkey Feathers Coloring Matching Game

    Edible Apple Turkey Craft

    “I am Thankful For” Turkey Headband Craft

    Buy now on Etsy | Teachers Pay Teachers

    Turkey Handprint Art

    Buy now on Etsy | Teachers Pay Teachers

    Cute Turkey Coloring Pages

    Buy Now on Etsy | Teachers Pay Teachers

    Thanksgiving Turkey Coloring Pages

    Buy now on Etsy | Teachers Pay Teachers

    “I am Thankful For” Turkey

    Buy now on: Etsy | Teachers Pay Teachers

    Disguise a Turkey Project Pack

    Buy now on Etsy | Teachers Pay Teachers

    Disguise a Turkey Crafts

    100+ Disguise a Turkey Ideas

    Disguise a Turkey Popcorn

    Disguise a Turkey Mermaid

    Disguise a Turkey Dog

    Disguise a Turkey Cotton Candy

    Disguise a Turkey Fancy Nancy

    Disguise a Turkey Hulk

    Disguise a Turkey Spiderman

    Disguise a Turkey Ninja

    Disguise a Turkey Pikachu

    Disguise a Turkey Sonic

    Disguise a Turkey Unicorn

    Disguise a Turkey Flamingo

    Disguise a Turkey Gumball Machine

    Disguise a Turkey Cheerleader

    Disguise a Turkey Elsa

    Disguise a Turkey Princess

    Disguise a Turkey Pirate

    Disguise a Turkey Farmer

    Disguise a Turkey Dinosaur

    Disguise a Turkey Chase

    Disguise a Turkey Mario

    Disguise a Turkey Football Player

  • Disguise a Turkey Popcorn

    Have fun with this Disguise a Turkey Popcorn craft for kids this Thanksgiving this year! Kids can enjoy eating the leftover popcorn as a snack.

    Disguise a Turkey Popcorn

    The festive season is upon us, and that means it’s time for one of the cutest school projects around – the Disguise-a-Turkey challenge!

    Disguise a Turkey Project Printable Pack #1

    Buy now on Etsy | Teachers Pay Teachers

    Disguise a Turkey Project Printable Pack #2

    Buy now on Etsy | Teachers Pay Teachers

    If you’re swamped with work, preparations, and the endless mom-tasks that come with the holiday season, and you’re seeking an easy, quick, yet super creative idea, then you’ve landed in the right spot.

    Have you ever disguised a turkey? There are several different ways to disguise your turkey! Today we are going to focus on the Disguise a Turkey Popcorn idea.

    100+ Disguise a Turkey Ideas 

    The Disguise a Turkey idea comes from the book, Turkey Trouble.

    Turkey is in trouble. Bad trouble. The kind of trouble where it’s almost Thanksgiving . . . and you’re the main course. But Turkey has an idea–what if he doesn’t look like a turkey? What if he looks like another animal instead? After many hilarious attempts, Turkey comes up with the perfect disguise to make this Thanksgiving the best ever!

    Here’s why disguising your turkey as a popcorn bucket should be your go-to choice this year:

    Effortless and Time-Saving

    No need to hunt for myriad supplies or spend hours brainstorming. With the popcorn disguise, all you need is some popcorn and red and white striped paper. Or, you can choose the easy printable pack below and just some scissors and glue. Easy peasy!

    Super Engaging for Kids

    Which kid doesn’t love popcorn? The relatability of the theme means they’ll be excited to jump in and help, making it a fun-filled family activity.

    Unique & Memorable

    While other turkeys might come disguised as superheroes or animals, your popcorn turkey will stand out, making it a memorable project that teachers and classmates will talk about.

    Multipurpose

    The project doesn’t just serve the purpose of the disguise. It also helps in improving your child’s fine motor skills as they cut, paste, and design their popcorn turkey.

    Shareable Moments

    It’s an Instagram-worthy project! Share your child’s creation on social media, and watch the compliments roll in.

    Quality Time Together

    Take this as an opportunity to bond with your child. Discuss the funniest places the turkey could hide or the silliest disguises it could wear. It’s a great way to fuel their imagination.

    Do you need a Disguise a Turkey Project Printable pack? Get yours now in the shop!

    Disguise a Turkey Project Printable Pack

    Buy now on Etsy | Teachers Pay Teachers

    Want to use printable popcorn pieces instead of real pieces of popcorn for your Disguise a Turkey project? Consider this printable set below! You can cut out the pieces and glue them around your turkey.

    Here’s how to make the turkey using real popcorn!

    Disguise a Turkey Popcorn

    Supplies:

    • printable turkey template
    • pack of microwaveable popcorn (or popcorn bag)
    • red and white striped scrapbook paper
    • school glue
    • Crayons

    Directions:

    Print the turkey template.

    Cut out the turkey. Color if desired.

    Cut out a ‘bucket of popcorn’ using the red and white scrapbook paper. Glue at the bottom of the turkey. You can use a paper popcorn bag also.

    Glue popped popcorn around the feathers of the turkey. Set aside and allow to dry.

    Allow kids to eat leftover popcorn from this craft if desired.

    Display your turkey!

    Disguise a Turkey Popcorn