Category: Fall

  • Best Fall Cookie Decorating Kits

    Decorating cookies is a lot of fun! Order your Fall Cookie Decorating Kits this holiday season and have fun decorating cookies with the kids!

    Are you too busy to plan fun fall activities for the kids this holiday season? Don’t have the time to get out and shop or worried about heading out?

    Are you looking for a fun activity for the kids while you are cooking Thanksgiving dinner?

    Consider these Fall Cookie Decorating Kits today! I think these kits are such a cute idea. I know my three kids will love their kit!

    Halloween Cookie Decorating Kits

    Thanksgiving Cookie Decorating Kits

    Christmas Cookie Decorating Kits

    Best Cookie Decorating Kits (so many adorable designs to choose from!)

    Most of these kits come with everything you need – baked cookies, icing, sprinkles, and more. Find the kit that is right for you. You’ll find cookies shaped like leaves, turkeys, mugs, pumpkins, donuts, pumpkin pie, and more!

    You can order cookie kits for the fall season, Halloween, or Thanksgiving!

    Order your kit today! Or, stock up on supplies to make your own cookies to decorate.

    Fall Cookie Decorating Kits

    Fall Cookie Decorating Kit INCLUDES 24 ITEMS Zoom Party
    Fall Cookie Decorating Kit


    Fall Cookie Decorating Kit Fall DIY Decorating Cookies Kit
    Fall Cookie Decorating Kit


    Fall Cookie Kit Pumpkin Coffee Shop extra Large Cookies
    Fall Cookie Decorating Kit


    Fall Cookie Decorating Kit Fall DIY Cookie Kit INCLUDES
    Fall Cookie Decorating Kit


    Fall Cookie Decorating Kit INCLUDES 24 ITEMS large
    Fall Cookie Decorating Kit


    Fall Cookie Decorating Kit Coffee Shop DIY Cookie Kit large
    Fall Cookie Decorating Kit


    Fall Cookie Decorating Kit Fall DIY Cookies Kit large
    Fall Cookie Decorating Kit


    DIY Fall Pie Fall Cookie Decorating Kit INCLUDES 24 ITEMS
    Fall Pie Fall Cookie Decorating Kit


    Apple Harvest Cookie Decorating Kit DIY Decorating Cookies
    Apple Harvest Cookie Decorating Kit


    Happy Fall DIY Cookie Kit  Decorate Your Own  Pumpkin Spice
    Happy Fall DIY Cookie Kit


    Stacked Pumpkin DIY Cookie Kit  Decorate Your Own  Fall
    Stacked Pumpkin DIY Cookie Kit


    1 Dozfall/autumn Cookie Boxdecorate Your Own Cookiefall
    Decorate Your Own Cookie Kit for Fall


  • 250+ Fall Adult Coloring Pages

    Adults love coloring, too! Print and color these beautiful Fall Adult Coloring Pages.

    I know, you’re probably thinking that coloring books are just for kids.

    But I’m here to tell you that adult coloring is a growing trend and it’s really great for your mental health!

    Fall Coloring Pages for Kids

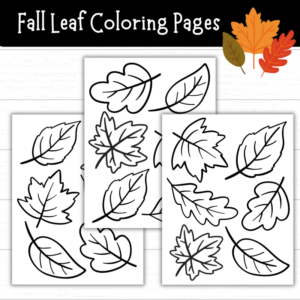
    Fall Leaves Coloring Pages

    Some of the benefits include stress relief, anxiety relief, increased creativity and focus. And there are so many amazing patterns to choose from whether they be mandalas or animals.

    Do you remember coloring with crayons as a kid? It was so much fun to color, and it’s even more fun now that we are adults.

    Fall is in the air and what better way to celebrate than by coloring! I have some really great fall-themed coloring pages for adults to share with you below.

    Take a look at them!

    Check out these links below to find fall coloring pages that you’d like to try.

    Fall Adult Coloring Pages

    120 Autumn Coloring Pages Fall Coloring Stress Relief
    120 Autumn Coloring Pages for Fall


    Minimalist Autumn Coloring Book Fall Coloring Pages for Adults
    Minimalist Autumn Coloring Book for Adults


    100 Fall Bundle Coloring Book Printable Fall Pumpkin Scenes
    100 Fall Bundle Coloring Book Printable


    60 Autumn Charm Grayscale Coloring Pages JPEG/PDF Format
    60 Autumn Charm Coloring Pages for Adults


    Printable Digital Coloring Book for Grownups HELLO AUTUMN
    Fall Printable Digital Coloring Book for Adults


    100 Easy Autumn Coloring Book  Digital Coloring Page  Easy
    100 Printable Easy Autumn Coloring Pages


    40 Fall Coloring Pages for Kids  Autumn Coloring Pages for
    40 Fall Coloring Pages


    Fall Coloring Assortment DIGITAL DOWNLOAD Autumn Coloring
    Fall Coloring Pages


    Printable Autumn Kids Coloring Sheets Pumpkin Spice Season
    Printable Autumn Coloring Pages


    INSTANT DOWNLOAD Coloring Page  Autumn / Fall Coloring Pack
    Fall Adult Coloring Pages


    Printable Fall Coloring Pages for Kids or Adults Autumn
    Printable Fall Coloring Pages


    Autumn Coloring Pages for Kids Printable Fall Classroom
    Autumn Coloring Pages


    Autumn Themed Coloring Pages Pack of 10  Digital Download
    Autumn Themed Coloring Pages Pack of 10


    Gratitude Coloring Page Autumn Pumpkins Instant Download
    Gratitude Coloring Page


    Pumpkin Coloring Page for Adults  Fall Adult Coloring Page
    Pumpkin Coloring Page for Adults


    Fall Coloring Page Bundle Printable Activity
    Fall Coloring Page Bundle


    Fall Harvest 15 Page Coloring Book  Adult Coloring Book
    Fall Harvest 15 Page Coloring Book


    Fall Coloring Pages  5 Pages  Coloring Pages  Fall Activity
    Fall Coloring Pages


    Fall flowers and pumpkins digital coloring page Thanksgiving
    Fall Thanksgiving Pumpkin Coloring Page


    5 Pages Fabulous Fall Digital Downloads to Color Punpkins
    Fall Digital Downloads to Color for Adults – 5 Pages


    Pumpkin Patch-Fall Time Printable-Adult Coloring Book Page-For
    Pumpkin Patch-Fall Time Printable-Adult Coloring Book Page


    Fall and Thanksgiving Coloring Pages  Instant Download  PDF
    Fall and Thanksgiving Coloring Pages


    Blessed and grateful PDF coloring page. Fall coloring
    Blessed and Grateful Coloring Page


    Set of 12  Fall Printable Coloring Pages for Adults and
    Set of 12 Fall Printable Coloring Pages for Adults


    Pumpkin and Scarecrow Set of Three 8 1/2 x 11 Printable
    Pumpkin and Scarecrow Set of Three


    The Colors of Fall Set 1: Five 8 1/2 x 11 Printable Instant
    The Colors of Fall Set 1


    Fall Leaves  PDF Coloring Page
    Fall Leaves Coloring Page


    Fall Coloring Pages Sunflower Coloring Pages Printable
    Sunflower Coloring Page


  • Pine Cone Apple Tree Craft for Kids

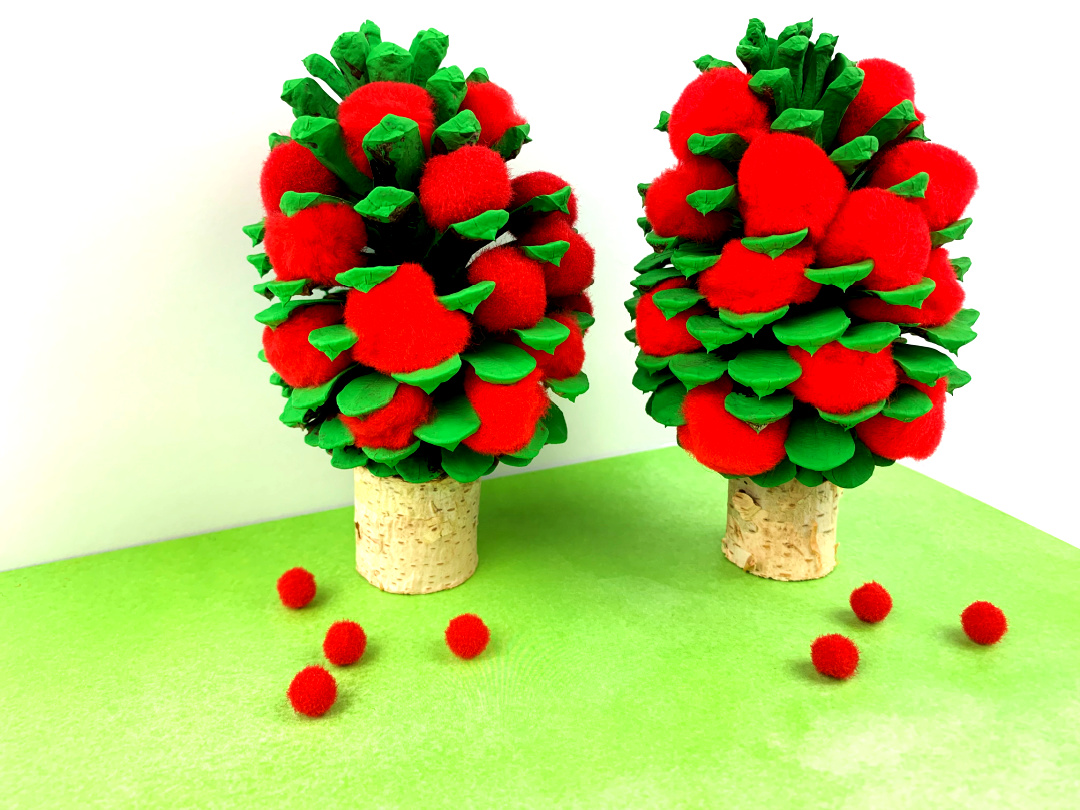
    Pine Cone Apple Tree Craft for Kids

    Grab a few pine cones on your next nature walk! This Pine Cone Apple Tree craft for kids is super easy and fun to make.

    Pine Cone Apple Tree

    When I was a little girl, it was a dream of mine to pick apples from a real apple tree! My dad grew one of the biggest and best gardens that I can remember.

    In this garden, I remember that he could grow just about anything. However, apple trees just didn’t grow very well where I lived in Texas.

    Fast forward to my mid 30s. I moved to Washington State. My dream of seeing and picking real apples from an apple tree came true! We had apple trees that grew around us in our neighborhood.

    You may also like:

    Printable Apple Activity Packs

    We didn’t even have to seek out orchards to pick apples. I was so excited that I was finally able to pick fresh apples (my favorite fruit!) from the trees around the area.

    This year, I created a cute craft to share with you that’s simple to make with the kids! Create a Pine Cone Apple Tree using pine cones that you can find on your next nature walk around your area!

    Create an entire apple orchard from pine cones if you’d like! For this craft, I made two apple trees to share with you.

    While you are here, enjoy this free printable apple activity pack below!

    Pine Cone Apple Tree

    Pine Cone Apple Tree

    Supplies:

    • Pine Cones
    • Green Craft Paint
    • Red Pom Poms
    • Mini Logs
    • Paint Brush
    • Paper Plate
    • Hot Glue Gun and glue sticks

    Directions:

    Prepare your pine cones. If you are creating this craft indoors, it’s best (but optional) to prepare your pine cones before crafting.

    Washing the pine cones can remove dirt and other debris, bugs and other little critters, mold or mildew, spider webs, and more.

    You can wash the pine cones in water. Just remember, pine cones do like to close when wet.

    After washing your pine cones, place the pine cones back in a warm or hot location and wait for the pine cones to open back up.

    You can also bake your pine cones for about 20-30 minutes at 200 degrees fahrenheit.

    Paint the pine cones with the green craft paint. Set the pine cones aside to dry completely.

    Place the red pom poms (apples) inside the pine cone. Leave a little space between the pom poms.

    Glue is not necessary, but you can use glue if your pom poms are loose.

    The pom poms below stay inside the pine cones I chose with no issues.

    Use the glue from the hot glue gun to attach the mini logs at the bottom of the painted pine cones.

    Your apple trees are ready to display around your home or classroom this fall season!

  • Apple Cinnamon Roll Cups

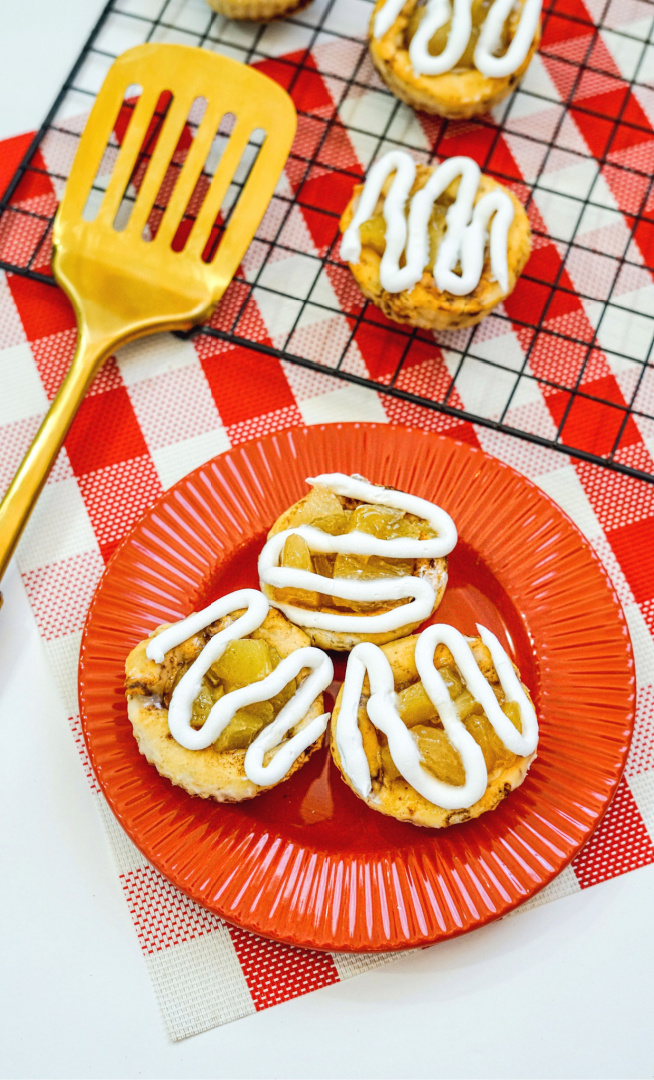
    Apple Cinnamon Roll Cups

    These simple and easy to make Apple Cinnamon Roll Cups are the perfect treat to serve during the fall season!

    Apple Cinnamon Roll Cups

    Do you love apples? Do you love cinnamon rolls? If you said yes, this recipe is for you!

    If you are making apple desserts this fall season, add this yummy recipe to your list! This Cinnamon Apple Pie Cups recipe only requires a few simple ingredients.

    10+ Easy Apple Desserts for Fall

    Apple Cinnamon Roll Pie

    When you’re short on time and in need of a sweet treat, these apple cinnamon roll cups are the perfect solution. The prep work is minimal, and they can be whipped up in just 15 minutes!

    They have all of the flavor of your favorite fall dish without any of the hassle. Once you try this recipe, we know that it will become an instant family favorite. What’s not to love?

    This tasty treat tastes like an apple pie but in a cup form!

    The best part is they’re ready in less than 10 minutes – no rolling or cutting required. It’s the perfect on-the-go breakfast idea for busy mornings. Plus you can put them in resealable containers to save for later!

    Give the kids an apron and let them help you create these Apple Cinnamon Roll Cups. Kids love to get involved in the baking process!

    Apple Cinnamon Roll Cups

    Ingredients:

    • 1 can cinnamon rolls with icing
    • 15oz can apple pie filling
    • cupcake liners
    Apple Cinnamon Roll Cups

    Directions:

    Pre-heat the oven 350 degrees.

    Place cupcake liners into a muffin pan.

    Take a cinnamon roll and flatten it as much as you can. Then stick it into the cupcake liner shaping into a cup.

    apple cinnamon roll cups
    apple cinnamon roll cups

    Place cinnamon roll cups in the oven and bake for 8 minutes.

    Remove from oven.

    Add the apple filling into each cup.

    apple cinnamon roll cups

    Bake for an additional 3-5 minutes.

    Remove from oven.

    Use the icing that came with the cinnamon rolls to spread on the top.

    Serve while warm & enjoy! 

    Apple Cinnamon Roll Cups
    Apple Cinnamon Roll Cups

    Apple Cinnamon Roll Cups

    Apple Cinnamon Roll Cups

    Ingredients

    • 1 can cinnamon rolls
    • 15oz can apple pie filling
    • cupcake liners

    Instructions

    Pre-heat oven 350 degrees.

    Place cupcake liners into a muffin pan.

    Take a cinnamon roll and flatten it as much as you can. Then stick it into the cupcake liner shaping into a cup.

    Bake for 8 minutes.

    Remove from oven. If any of your cups have lost their cup shape, use a shot glass to fix your cups.

    Add apple filling into each cup.

    Bake for an additional 3-5 minutes.

    Remove from oven and ice using the icing that came with the cinnamon rolls.

    Serve while warm & enjoy! 

  • Melted Bead Suncatcher Apple Craft

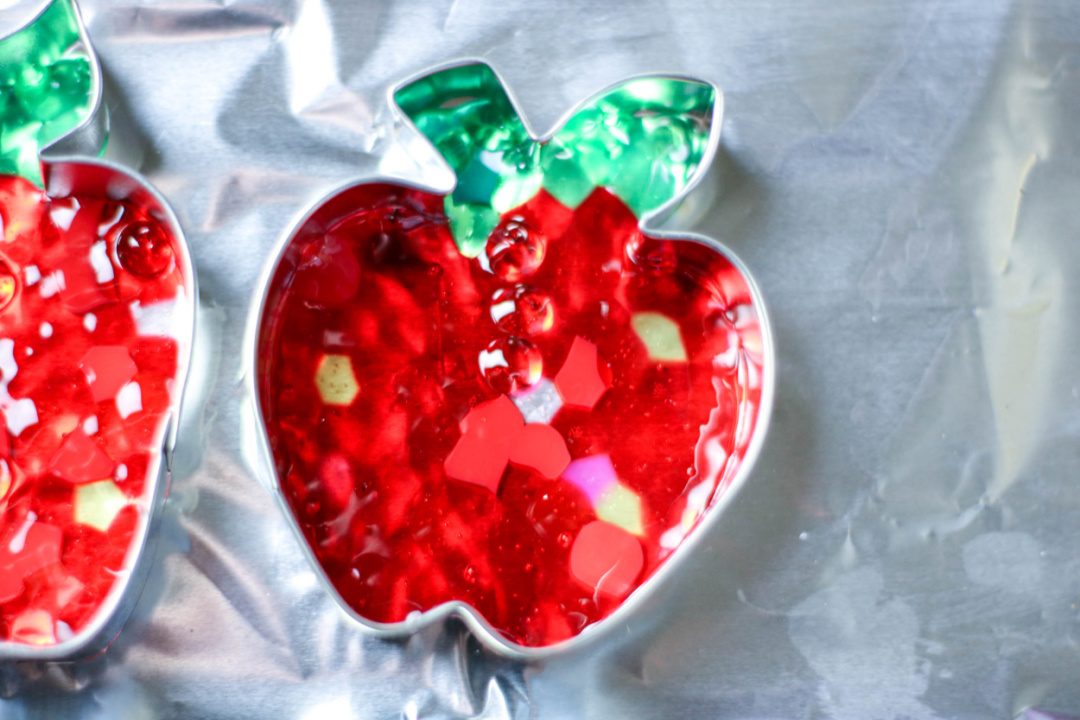
    Melted Bead Suncatcher Apple Craft

    Create this Melted Bead Suncatcher Apple Craft from melted beads and display it in your home or classroom for the fall or back to school season!

    Apple Suncatcher Craft

    There are a lot of fun ways to use pony beads! Many kids love to string them to make jewelry, friendship bracelets, or keychains. You can also use them to create pony bead animals with elastic string or cord.

    More apple crafts:

    If you are looking for an apple craft to make for the fall or back to school season, create these apple suncatchers made with melted beads! This is just another fun way to use pony beads.

    These bright and beautiful suncatchers are perfect to display in a window in your home where the sun shines through to catch a glimpse of it’s red and green colors!

    You may also like:

    Printable Apple Activity Packs

    Melted Bead Suncatcher Apple Craft

    Supplies:

    • Plastic pony beads
    • Apple shaped metal cookie cutters
    • Baking pan
    • Aluminum foil
    • Drill fitted with ⅛ inch drill bit, optional

    Note: Please be aware that the beads do release plastic smells/fumes as they melt. To avoid the smell, you can use a toaster oven outside.

    Directions:

    Preheat oven to 400 degrees.

    Line baking pan with aluminum foil to protect the pan and make it easier for the ornaments to release from the pan.

    Place cookie cutters on aluminum foil in baking pan. Fill each ornament with a single layer of beads. Use a toothpick or bamboo skewer to arrange the beads.

    Carefully put the baking sheet in the oven and melt the beads. The time can vary based on the type of bead. Begin checking at 5 minutes. (My ornaments took 15 minutes to melt.) The ornaments are ready when the beads are melted and the hole in each bead has disappeared.

    Remove from oven and allow to cool completely prior to removing from the cookie cutters. To remove the ornaments, gently pull the sides of the cookie cutter away from the ornament.

    If desired, use the drill to create a small hole in each ornament for hanging.

    Melted Bead Suncatcher Apple Craft

    Melted Bead Suncatcher Apple Craft

    Materials

    • Plastic pony beads
    • Metal cookie or clay cutters
    • Baking pan
    • Aluminum foil
    • Drill fitted with ⅛ inch drill bit, optional

    Instructions

    Note: Please be aware that the beads do release plastic smells/fumes as they melt. To avoid the smell, you can use a toaster oven outside.

    Preheat oven to 400 degrees.

    Line baking pan with aluminum foil to protect the pan and make it easier for the ornaments to release from the pan.

    Place cookie cutters on aluminum foil in baking pan. Fill each ornament with a single
    layer of beads. Use a toothpick or bamboo skewer to arrange the beads.

    Carefully put the baking sheet in the oven and melt the beads. The time can vary based on the type of bead. Begin checking at 5 minutes. (My ornaments took 15 minutes to melt.) The ornaments are ready when the beads are melted and the hole in each bead has disappeared.

    Remove from oven and allow to cool completely prior to removing from the cookie
    cutters. To remove the ornaments, gently pull the sides of the cookie cutter away from the ornament.

    If desired, use the drill to create a small hole in each ornament for hanging.


  • Paper Bag Pumpkin

    Paper Bag Pumpkin

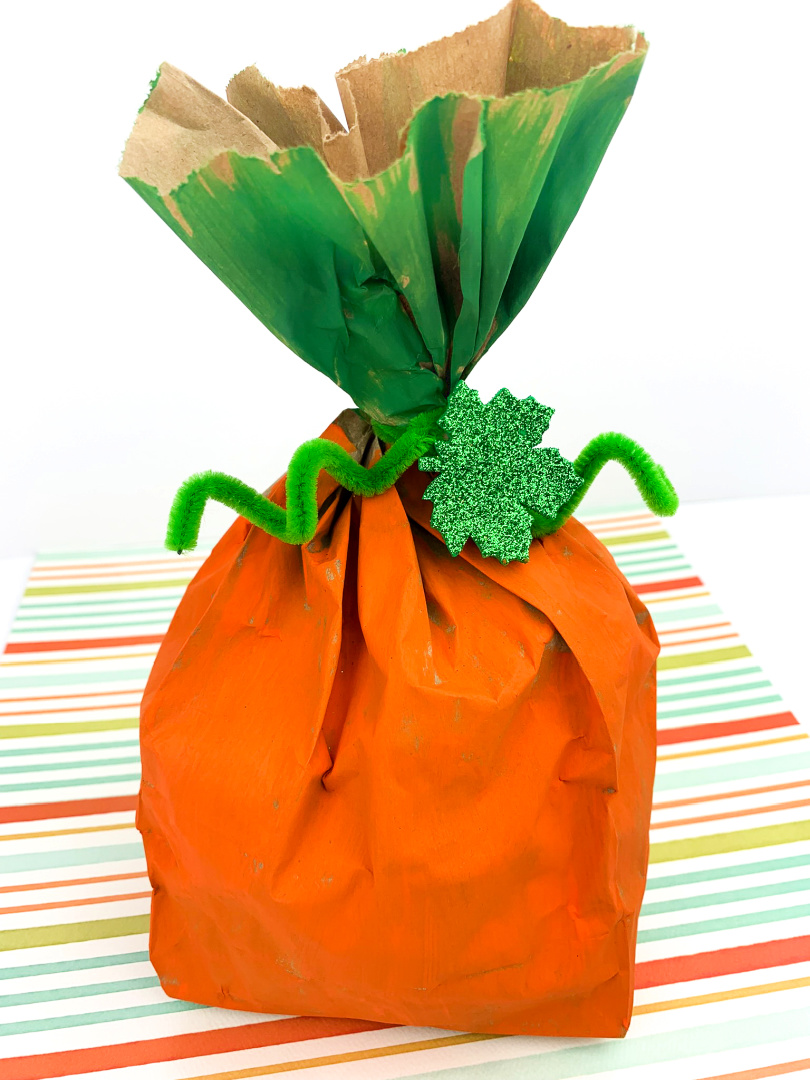
    Looking for an adorable, easy pumpkin craft that doesn’t require any carving? Look no further than the Paper Bag Pumpkin!

    This is a great project for kids of all ages and can be made in just a few simple steps.

    Plus, it’s perfect for decorating your home this fall. Gather up some supplies and get started today!

    How do you make a pumpkin out of a paper bag?

    If you want to make a pumpkin out of a paper bag, there are a few things you’ll need to do. First, open the paper bag.

    Once you’ve done that, you’ll need to put some newspaper or other filling material inside the bag to give it shape.

    Finally, you’ll need to decorate the outside of the bag to make it look like a pumpkin. You can use paint, markers, glitter, or anything else you can think of!

    Keep reading below to learn how to make your pumpkin out of a paper bag.

    Pumpkin Crafts

    Apple Paper Bag Craft

    How do you decorate a paper bag pumpkin?

    Assuming you want to know how to decorate a paper bag pumpkin, here are some tips!

    You’ll need some supplies first: paint, markers, glitter, glue, and anything else you might want to use to decorate.

    Once you have your supplies ready, start by painting the pumpkin. You can either paint it one solid color, or get creative with stripes or patterns.

    Once the paint is dry, it’s time to add the details! Use the markers and glitter to create whatever design you like.

    You could make a jack-o-lantern face, or keep it simple with just a few dots or lines. Get creative and have fun!

    Finally, once you’re satisfied with your design, glue or tape everything in place. And that’s it! Your paper bag pumpkin is now ready to be displayed.

    Paper Bag Pumpkin

    Supplies:

    Directions: 

    Crumple up the paper.

    Open the paper bag. Place the crumpled paper into the bag and fill the bag about halfway down. 

    Close the bag. Twist the section that doesn’t have any paper around until you get a stem for the pumpkin. 

    Paint the bottom part of the pumpkin orange. Set aside to dry.

    Paint the pumpkin stem green. Set aside to dry.

    Use the green pipe cleaner to twist around the top of the bag to secure the bag. This will be the “pumpkin vines.”

    Use a thin marker or pencil and twist the pipe cleaner around the marker to give it the twirly shape.

    Attach the leaf sticker to the front of the bag where the vine is located. 

    Display the pumpkin!

    Paper Bag Pumpkin

    Paper Bag Pumpkin

    Materials

    • Brown paper bag
    • Orange craft paint
    • Green craft paint
    • Green pipe cleaner
    • Green foam leaf sticker
    • Paper
    • scissors
    • marker or pencil

    Instructions

    Crumple up the paper.

    Open the paper bag. Place the crumpled paper into the bag about halfway down in the bag. 

    Close the bag. Twist the section that doesn’t have any paper around until you get a stem for the pumpkin. 

    Paint the bottom part of the pumpkin orange. Set aside to dry.

    Paint the pumpkin stem green. Set aside to dry.

    Use the green pipe cleaner to twist around the top of the bag to secure the bag. This will be the “pumpkin vines.” Use a thin marker or pencil and twist the pipe cleaner around the marker to give it the twirly shape.

    Attach the leaf sticker to the front of the bag where the vine is located. 

    Display the pumpkin!