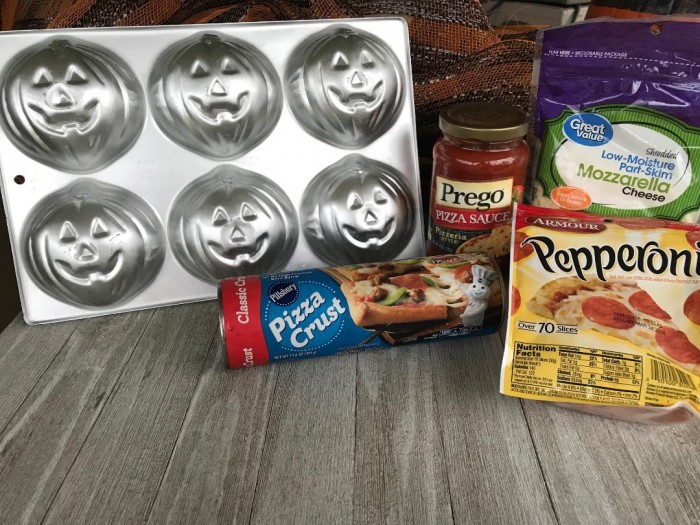
I am always looking for ways to get my girls involved in the kitchen. It helps me out and they love being mini chefs! I just remind myself that we’re not making a mess, we’re making memories. So the other day, I was making some pumpkin shaped cakes for my daughters class (she decorated them of course) and I nonchalantly started thinking about our dinner menu for the rest of the week and had the most perfect idea! Are you ready for this?! Pumpkin pizza pockets!!! How fun does that sound?! They were super simple to make and took no time at all for my girls to make. I’m not sure if my girls loved them so much because they were so stinkin’ cute or because they love pizza that much!!
One of the things I love most about this recipe is that you can be so creative with it…trees for Christmas, bunnies for Easter, flowers for spring, bats for Halloween, etc. Your options really are limitless!
Do you need a simple and quick meal time solution? I have an idea for you! If you love mashed potatoes, you’ll LOVE these Easy Cheesy Potato Pancakes!
Mashed potatoes are on our menu plan on a regular basis throughout the month. We enjoy eating mashed potatoes paired with chicken fried steak, green beans, and rolls!
If you are looking for a fun spin on mashed potatoes, or if you have mashed potatoes left over after dinner, did you know that you can make potato pancakes with them?
Yes, you can – and they are super tasty and delicious!
Below, you’ll learn how to make Easy Cheesy Potato Pancakes to serve for your next family meal!
These potato pancakes can be served as a side dish to your favorite meal, or as an appetizer paired with your favorite sauce.
Easy Cheesy Potato Pancakes
Ingredients:
vegetable oil, for frying
2 1/2 cup mashed potatoes
1/2 cup shredded cheddar cheese
1 large egg, beaten
1 tbsp. finely chopped parsley
1/2 tsp. salt
all-purpose flour (optional)
sour cream, ketchup, or hot sauce for serving
Directions:
Over medium heat, add vegetable oil to a large skillet to cover at least half of the pancake.
In a bowl, mix together the mashed potatoes.
Add beaten egg, cheese, and salt.
If your mashed potatoes are a little thin, add flour 1 TBSP a time so they stay together while cooking in the skillet. Mix together.
Take a scoop of each mixture, then flatten.
Cook on one side until golden brown (about 2 minutes), then flip to cook the other side (another 2 minutes).
Once done cooking, place on a paper towel to allow the oil to soak up from the pancake.
Serve with sour cream, ketchup, hot sauce, or it is delicious on its own! Enjoy!
Easy Cheesy Potato Pancakes
Ingredients
Vegetable oil, for frying
2 1/2 cup mashed potatoes
1/2 cup shredded cheddar
1 large egg, beaten
1 TBSP finely chopped parsley
1/2 tsp salt
All-purpose flour (optional)
Sour cream, for serving
Instructions
Over medium heat, add vegetable oil to a large skillet to cover at least half of the pancake. In a bowl, mix together the mashed potatoes. Add beaten egg, cheese, and salt. If your mashed potatoes are a little thin, add flour 1 TBSP a time so they stay together while cooking in the skillet. Mix together. Take a scoop of each mixture, then flatten. Cook on one side until golden brown (about 2 minutes), then flip to cook the other side (another 2 minutes). Once done cooking, place on a paper towel to allow the oil to soak up from the pancake. Serve with sour cream, ketchup, hot sauce, or it is delicious on its own! Enjoy!
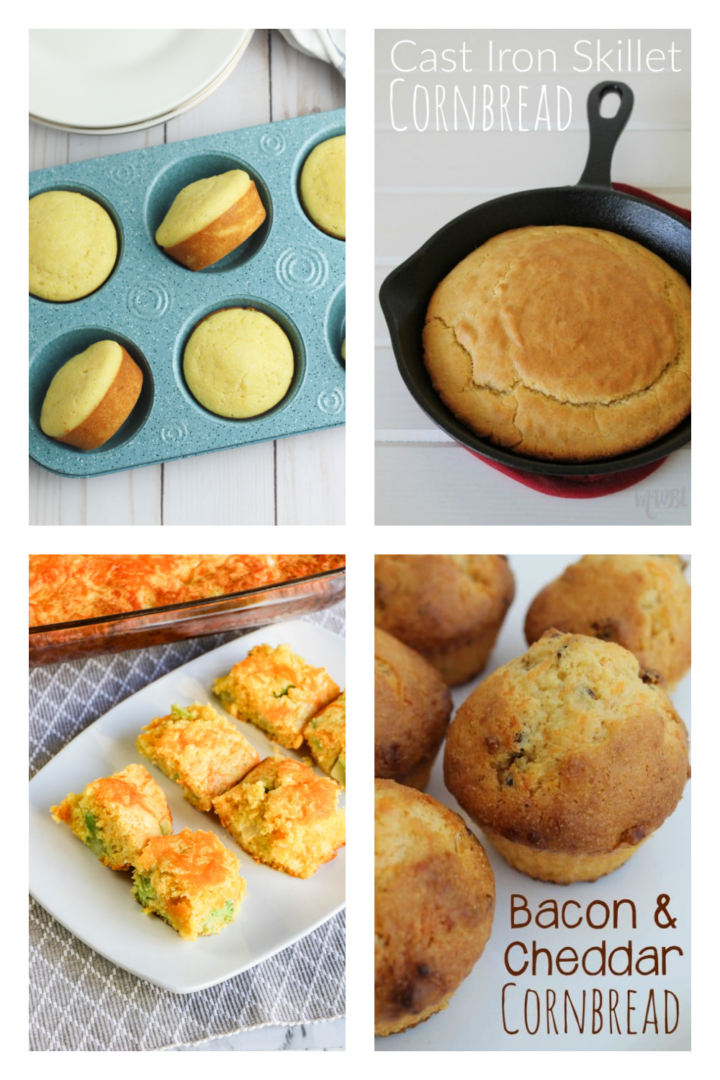
If you are looking for Cornbread Recipes to serve your family for dinner this week, here are several great options to choose from!
Hey moms, what’s your favorite side dish to serve with dinner?
Do you love cornbread? I know I do! That delicious, sweet bread is perfect for any meal and it’s one of my favorite comfort foods. The best part about cornbread is that it can be made in so many different ways – from savory to sweet.
You can make a traditional version with butter and honey or try out some new flavors like pineapple or jalapeño. There are so many options, which one will you choose?
I like to serve cornbread with recipes like chili or smoked meats!
Do you like it soft and moist or crunchy and dry? I personally prefer a hearty cornbread that is rich in butter, sugar, eggs, buttermilk and salt!
If you are looking for a cornbread recipe to serve with dinner this week, these recipes are for you!
Mexican Rigatoni is a dish that I’ve been cooking for a while. The recipe is simple and easy to make, but it’s always a crowd pleaser. You can’t go wrong with this one!
This blog post will be about how to cook Mexican rigatoni for yourself or your family and friends.
It may sound complicated at first, but don’t worry – I’ll teach you all the steps so you can have delicious food in no time!
Mexican Rigatoni is a dish that has been served for generations and has so many variations. It’s quick to make, tasty, and perfect for all the Mexican food lovers out there!
One of my favorite variations is with chorizo, onions, garlic powder, and chili powder.
What variation do you like the best? Let me know in the comments below!
What is Rigatoni Pasta?
Rigatoni pasta is an Italian dish made with large tubes of pasta that are scooped out by hand or machine.
The name translates to “large ropes” in English which gives insight into the shape of the noodles themselves. It is typically served with tomato sauce, meatballs, sausage, and more.
Mexican Rigatoni
Ingredients:
4 cups dry rigatoni
8 oz chorizo
½ cup yellow onion, chopped
1 poblano pepper, chopped
3 tablespoons butter
3 tablespoons flour
1 teaspoon chili powder
½ teaspoon cumin
½ teaspoon garlic powder
2 ½ cups milk
2 cups Monterey jack cheese, shredded
1 can black beans drained and rinsed
Sour cream, lime slices, and pico de gallo for garnish, if desired
Directions:
Preheat oven to 350 degrees and prep a 13×9 baking dish with nonstick spray.
Cook pasta per package directions, drain, and set aside in large bowl.
In a skillet cook chorizo, onion, and poblano over medium heat for about 5 minutes, drain if needed and pour over pasta.
In same skillet melt butter then whisk in flour, chili powder, cumin, and garlic powder – cook for 2 minutes.
Whisk in milk and cook till thick and bubbly.
Stir in cheese until melted and pour over pasta.
Stir in beans and spoon mixture into baking dish. Top with extra cheese.
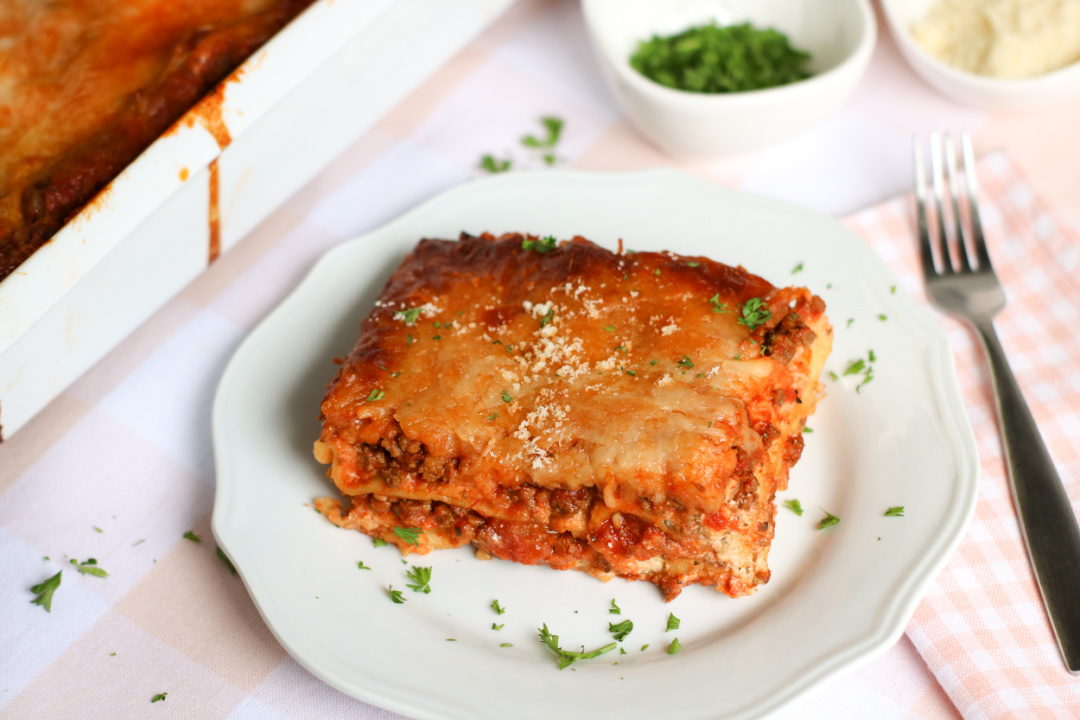
Serve this Easy Cheesy Meat Lasagna any day of the week during the year for the family!
Pasta recipes are my go-to recipes for my family! Pasta recipes are typically easy to prepare.
The best part about preparing pasta recipes is that we tend to have leftovers to pack up for school lunches for the next day! As a work at home mom, I also know that I’ll have leftovers waiting for me to enjoy for lunch the next day, too!
Lasagna is a family favorite here at my house. I serve a yummy side salad and breadsticks with our lasagna. Corn on the cob is another great side to serve, too!
Today, I’ll be sharing my delicious meat lasagna recipe with you to add to your weekly meal plan!
Easy Cheesy Meat Lasagna
Ingredients:
Note: This recipe uses uncooked, regular lasagna noodles but requires refrigeration overnight. If baking immediately, lasagna noodles should be cooked according to package directions prior to assembling the lasagna. You can also choose oven-ready or no-boil lasagna noodles.
Place the covered casserole in a cold oven. Set oven to 350 degrees. Bake for 45 minutes. Remove aluminum foil and top with remaining cheese. Return to oven and bake uncovered for an additional 15 to 25 minutes or until the cheese has melted and the edges are bubbly.
For best results when slicing the lasagna, allow the casserole to rest prior to cutting and serving.
Easy Cheesy Meat Lasagna
Ingredients
1 (16 ounce) package uncooked lasagna noodles
2 pounds ground chuck, browned and drained
2 (24 ounce) cans prepared pasta sauce or 6 cups homemade pasta sauce
1 (15 ounce) container ricotta cheese
1 egg, slightly beaten
½ teaspoon garlic powder
2 teaspoons Italian seasoning (or an equal blend of dried basil, dried oregano, and thyme leaves)
1 cup grated parmesan cheese
4 cups shredded mozzarella cheese
1 cup water
Instructions
Spray a 9×13 baking dish with non-stick cooking spray.
In a large skillet, combine pasta sauce and browned ground chuck. Bring to a simmer and heat through.
In a medium bowl, combine ricotta cheese, egg, garlic powder, Italian seasoning, and parmesan cheese. Stir together well.
Pour approximately 1 cup of meat sauce into baking dish. Add water and combine with a spoon or fork. Add a layer of lasagna noodles. Do not overlap as the noodles will expand overnight.
Add rounded spoonfuls of the ricotta mixture over the noodles and spread evenly.
Add about ¾ cup of mozzarella cheese over ricotta. Top with about 1 cup of meat sauce.
Begin a new layer of noodles and repeat as above, ending with remaining meat sauce.
Save any remaining mozzarella cheese in an airtight container in the refrigerator.
Cover with aluminum foil and refrigerate overnight.
Place the covered casserole in a cold oven.
Set oven to 350 degrees. Bake for 45 minutes. Remove aluminum foil and top with remaining cheese. Return to oven and bake uncovered for an additional 15 to 25 minutes or until the cheese has melted and the edges are bubbly.
For best results when slicing the lasagna, allow the casserole to rest prior to cutting and serving.
For busy moms, having a recipe that’s both quick and satisfying is key.
With minimal prep and cook time, these Instant Pot enchiladas are perfect for those nights when time is short, but you still want to put a hearty meal on the table.
The hands-off cooking method frees up time to focus on homework, after-school activities, or simply catching your breath.
Plus, using an Instant Pot means less clean-up, so you can move on to other priorities without lingering over dishes.
When and Where to Serve
This recipe fits right into your weeknight dinner rotation but can also shine for more than just family dinners.
Hosting a casual weekend get-together? These cheesy beef enchiladas are perfect for feeding a crowd with ease.
They can also be a great option for meal prepping lunches for the week. Make a batch, portion them out, and you’ve got ready-to-go meals that reheat beautifully.
They also make a comforting dish to bring to potlucks, family gatherings, or even a neighbor in need of a homemade meal.
The Instant Pot simplifies the process, so you don’t need to spend hours in the kitchen—ideal for moms balancing work, kids, and everything in between.
Kid-Friendly and Customizable
If you’re feeding picky eaters, these enchiladas are highly customizable. You can easily swap the ground beef for ground turkey, shredded chicken, or even a plant-based meat substitute.
Want to sneak in more veggies?
Add in some finely diced bell peppers or spinach to the beef mixture. The cheesy goodness and flavorful sauce will keep the kids coming back for more.
Pro Tip for Busy Moms
If you find yourself short on time in the mornings, prepare the filling the night before.
When dinner time rolls around, all you have to do is assemble the enchiladas, and your Instant Pot will take care of the rest.
You’ll feel like a dinner superhero without breaking a sweat.
Incorporating meals like these Instant Pot Cheesy Beef Enchiladas into your weekly menu not only saves time but also guarantees that your family is enjoying a warm, home-cooked meal, even on your busiest days.
Whether it’s a midweek dinner or part of a larger family celebration, these enchiladas will quickly become a go-to favorite.
Instant Pot Easy Cheesy Beef Enchiladas
Ingredients:
1 pound ground beef
1 packet taco seasoning (1-1.25 ounce size)
1 can green chilies, undrained (4 ounces)
2 cups cheese of your choice, shredded
12 small flour tortillas
1 can red enchilada sauce (28 ounces)
2 cups Mexican cheese mixture, shredded
Directions:
Set the pressure cooker to sauté. Add the beef and taco seasoning.
Brown the beef, then drain the grease. (This will take about 7 minutes.)
Turn pressure cooker to Sauté – High. Add 1 cup of enchilada sauce. Add the can of green chilies.
Heat for an additional 5 minutes, or until the sauce has cooked down.
Remove from heat and set aside. Wipe down insert once cooled and grease lightly with oil or spray.
Warm up the tortillas in microwave slightly (wrap entire stack in a paper towel and heat on high for 30 seconds).
Open the tortillas one by one.
Add just over 1/8 cup beef mixture and 1 heaping tablespoon of shredded cheese.
Roll up tightly.
Place each filled and rolled tortilla back into the instant pot.
Pour the remaining enchilada sauce on top.
Top with Mexican cheese. Close and lock the lid.
Set the pressure cooker to Pressure Cook – High for 7 minutes.
Allow to natural release for 2-3 minutes, then manually release the rest of the pressure.
Once pin has dropped and pressure is fully released, open lid and serve.
Cut into pieces and serve, or using tongs, remove enchiladas individually and scoop sauce from bottom of insert.
Instant Pot Easy Cheesy Beef Enchiladas
Ingredients
1 pound ground beef
1 packet taco seasoning (1-1.25 ounce size)
1 can green chilies, undrained (4 ounces)
2 cups cheese of your choice, shredded
12 small flour tortillas
1 can red enchilada sauce (28 ounces)
2 cups Mexican cheese mixture, shredded
Instructions
Set the pressure cooker to sauté. Add the beef and taco seasoning.
Brown the beef, then drain the grease. (This will take about 7 minutes.)
Turn pressure cooker to Sauté – High. Add 1 cup of enchilada sauce. Add the can of green chilies.
Heat for an additional 5 minutes, or until the sauce has cooked down.
Remove from heat and set aside. Wipe down insert once cooled and grease lightly with oil or spray.
Warm up the tortillas in microwave slightly (wrap entire stack in a paper towel and heat on high for 30 seconds).
Open the tortillas one by one.
Add just over 1/8 cup beef mixture and 1 heaping tablespoon of shredded cheese.
Roll up tightly.
Place each filled and rolled tortilla back into the instant pot.
Pour the remaining enchilada sauce on top.
Top with Mexican cheese. Close and lock the lid.
Set the pressure cooker to Pressure Cook – High for 7 minutes.
Allow to natural release for 2-3 minutes, then manually release the rest of the pressure.
Once pin has dropped and pressure is fully released, open lid and serve.
Cut into pieces and serve, or using tongs, remove enchiladas individually and scoop sauce from bottom of insert.
Frequently Asked Questions
Can I use corn tortillas instead of flour tortillas?
Yes, you can substitute corn tortillas for flour tortillas. Just warm them up slightly before rolling to prevent them from cracking.
How can I prevent the enchiladas from getting soggy?
Warming the tortillas before filling and rolling helps prevent sogginess. Also, avoid overfilling the Instant Pot with too much sauce.
Can I make this recipe ahead of time?
Yes, you can prepare the beef filling in advance and store it in the refrigerator. When ready to serve, assemble the enchiladas and cook them in the Instant Pot.
What toppings go well with cheesy beef enchiladas?
Great toppings include sour cream, chopped cilantro, diced tomatoes, avocado slices, and a squeeze of lime for extra flavor.
Can I freeze the enchiladas?
Yes, you can freeze the rolled, uncooked enchiladas. Simply assemble them in a freezer-safe dish, cover, and freeze. When ready to cook, thaw and follow the cooking instructions.
What kind of cheese works best for this recipe?
A blend of Mexican cheese or cheddar works great, but you can also use Monterey Jack or a mix of your favorites for extra flavor.
How do I reheat leftover enchiladas?
You can reheat them in the microwave for a few minutes or in the oven at 350°F until heated through. If reheating in the oven, cover them with foil to prevent them from drying out.
Can I add beans or veggies to the filling?
Yes, black beans, pinto beans, or sautéed vegetables like bell peppers and onions can be added to the filling for extra flavor and texture.
How many servings does this recipe make?
This recipe yields 6 servings, with two enchiladas per serving. If you’re feeding a larger crowd, you can easily double the recipe.
Can I make this recipe if I don’t have an Instant Pot?
Yes, you can bake the enchiladas in the oven. Simply assemble them in a baking dish, cover with enchilada sauce and cheese, and bake at 350°F for about 20 minutes or until the cheese is melted and bubbly.
This website uses cookies to improve your experience. We'll assume you're ok with this, but you can opt-out if you wish.AcceptRejectRead More
Privacy & Cookies Policy
Privacy Overview
This website uses cookies to improve your experience while you navigate through the website. Out of these, the cookies that are categorized as necessary are stored on your browser as they are essential for the working of basic functionalities of the website. We also use third-party cookies that help us analyze and understand how you use this website. These cookies will be stored in your browser only with your consent. You also have the option to opt-out of these cookies. But opting out of some of these cookies may affect your browsing experience.
Necessary cookies are absolutely essential for the website to function properly. This category only includes cookies that ensures basic functionalities and security features of the website. These cookies do not store any personal information.
Any cookies that may not be particularly necessary for the website to function and is used specifically to collect user personal data via analytics, ads, other embedded contents are termed as non-necessary cookies. It is mandatory to procure user consent prior to running these cookies on your website.