Category: Fall

  • Printable Fall Bucket Lists

    Printable Fall Bucket Lists

    As the summer fades and the crisp autumn air starts to set in, it’s the perfect time to start thinking about how we can make the most of this enchanting season with our families.

    Enter the ‘Fall Bucket List’ – a checklist of fun, family-friendly activities to embark on during these golden months.

    But first, for those of you new to the concept, let’s dive into what a fall bucket list is and why it’s such a fun idea.

    What is a Fall Bucket List?

    A fall bucket list is a curated list of activities and experiences that you aim to achieve during the fall season.

    Think of it as a festive to-do list filled with all the delightful things that make autumn so special.

    Whether it’s relishing the fall foliage, getting spooked in a corn maze, or sipping on a pumpkin-spiced latte, this list serves as a guide to help you make the most out of autumn.

    Why a Fall Bucket List?

    With our lives running at 100mph and countless tasks to juggle, it’s all too easy for days to blend into each other.

    A bucket list breaks that monotony, giving families a reason to spend quality time together, create memories, and embrace the magic of the season.

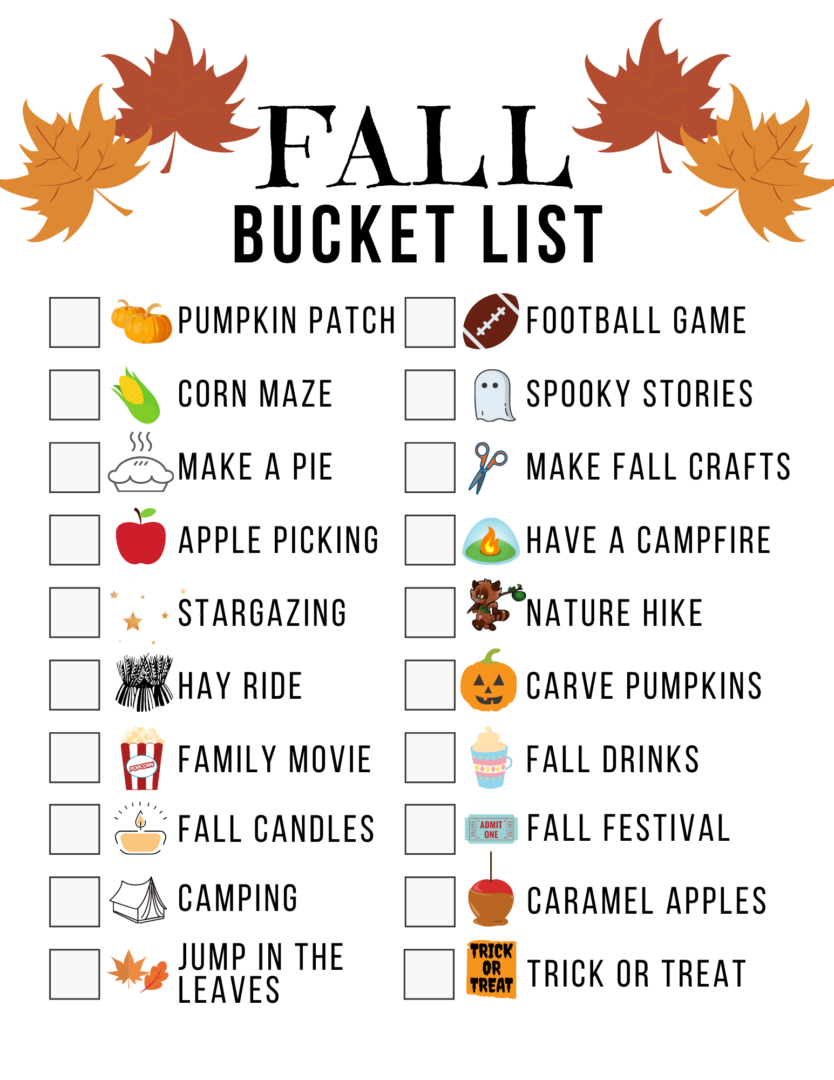
    Printable Fall Bucket List

    Buy now on: Etsy | Teachers Pay Teachers

    This list includes a mix of classic and fresh activities that are bound to make this fall memorable.

    You can print it out, pin it on your fridge or family board, and start checking off those exciting adventures as you complete them.

    You may also be interested in this fall bucket list, too!

    Get this free fall bucket list printable!

      We respect your privacy. Unsubscribe at anytime.

      Featured Fall Bucket List Activities:

      1. Pumpkin Patch: Start the season by picking the perfect pumpkin. It’s not just about the pumpkin, but the memories you create while on the hunt!
      2. Corn Maze: Get lost and have a blast navigating through twisty pathways.
      3. Make a Pie: Apple or pumpkin? Maybe both! There’s something therapeutic about baking with the family.
      4. Apple Picking: Fill your basket with the juiciest apples and enjoy the orchard’s beauty.
      5. Stargazing: The clear fall nights are perfect for spotting constellations.
      6. Hay Ride: A cozy ride through a farm or forest, absorbing the autumn scenes.
      7. Family Movie Night: Opt for a classic fall-themed film or a spooky Halloween special.
      8. Fall Candles: Fill your home with the soothing scents of autumn.
      9. Camping: Experience nature, cooler weather, and maybe a spooky campfire story or two.
      10. Jumping in Leaves: Because no fall is complete without this age-old joy.
      11. and many more!

      Frequently Asked Questions

      What if we can’t complete all the activities?

      That’s perfectly okay! The Fall Bucket List is meant to be a fun guide, not a strict rulebook. Enjoy the activities you can do, and remember it’s all about the memories and time spent together.

      How can I download the printable bucket list?

      Simply click on the link provided at the end of this post. It’s free and ready to be printed!

      Can I add my activities to the list?

      Absolutely! Make this bucket list your own. Add or modify based on what your family loves.

      Is this suitable for all ages?

      Yes! The list has been curated to ensure family-friendly activities that can be enjoyed by both toddlers and teenagers alike.

      Autumn is more than just a season. It’s a feeling, a vibe, an experience. Embrace its warmth, savor the unique flavors, and immerse yourself in its golden hues.

      With this Fall Bucket List, you have the perfect roadmap to guide you through the heart of autumn.

      So, grab your scarves, your favorite fall drinks, and your loved ones, and embark on this delightful journey.

    • Paper Plate Pumpkin Wreath

      Create this Paper Plate Pumpkin Wreath with the kids this fall season to display in your home or classroom!

      Fall is a season filled with colorful foliage, pumpkin patches, and cozy vibes.

      It’s the perfect time to engage in fun and creative activities with your kids.

      One exciting craft project that will spark their creativity and add a touch of autumnal charm to your home is the Paper Plate Pumpkin Wreath!

      Pumpkin Crafts

      Aluminum Can Pumpkin Craft

      Pumpkin Popsicle Stick Craft

      Pumpkin Melted Bead Suncatcher

      With just a few supplies and simple directions, you and your little ones can create a festive and adorable decoration that celebrates the spirit of the season.

      Get ready for some crafty fun as we guide you through the steps and explore various ways to display your masterpiece!

      How to Display Your Paper Plate Pumpkin Wreath

      Front Door Delight

      Hang your Paper Plate Pumpkin Wreath on your front door to welcome guests with a touch of festive charm.

      Use a wreath hanger or attach a colorful ribbon to the top of the wreath and tie it securely to your door knocker.

      Every time you and your family come home, the cheerful pumpkins will greet you, setting the autumn mood.

      Wall Decor Wonder

      Find a prominent spot on your wall to display your pumpkin wreath as wall decor.

      Use adhesive hooks or picture hangers to secure the wreath to the wall.

      It can be a great addition to your living room, hallway, or even the kids’ playroom.

      Your little ones will be proud to showcase their artistic creation to family and friends.

      Mantel Magic

      If you have a fireplace mantel, adorn it with your Paper Plate Pumpkin Wreath as a centerpiece.

      Place the wreath in the center and arrange other fall-themed decorations around it.

      Add some miniature pumpkins, artificial fall leaves, and even some cozy LED candles to create a warm and inviting atmosphere.

      Window Wonderland

      Let your Paper Plate Pumpkin Wreath catch the attention of passersby by hanging it in a window.

      Attach a suction cup hook to the windowpane and secure the wreath to it using the ribbon or a piece of string.

      The sunlight filtering through the pumpkins will create a beautiful display of colors.

      Tabletop Treat

      Transform your dining or coffee table into a fall-themed oasis by using your Paper Plate Pumpkin Wreath as a centerpiece.

      Place it in the middle of the table and arrange additional fall elements, such as acorns, pinecones, or faux fall foliage, around the wreath.

      It’s a wonderful way to infuse your meals or coffee time with the cozy ambiance of the season.

      Classroom Creativity

      If you’re a teacher or your kids attend school, consider bringing the Paper Plate Pumpkin Wreath to the classroom.

      Hang it on a bulletin board or display it in the classroom for all to admire.

      It will inspire creativity and celebrate the season, creating a warm and festive learning environment.

      Get started on your Paper Plate Pumpkin Wreath!

      Crafting with your kids not only strengthens the bond between you but also sparks their imagination and fosters their creativity.

      The Paper Plate Pumpkin Wreath is a perfect craft project for fall, allowing your little ones to explore colors, shapes, and the joy of making something special.

      Once completed, choose the display option that suits your style and home best.

      Whether on the front door, wall, mantel, window, table, or classroom, your Paper Plate Pumpkin Wreath will bring the spirit of fall to life and fill your surroundings with a touch of handmade charm.

      Paper Plate Pumpkin Wreath

      Supplies:

      Get your free printable pumpkin template!

        We respect your privacy. Unsubscribe at anytime.

        Directions:

        Print the pumpkin template on cardstock and cut it apart. The free template above will serve as a guide for creating your pumpkin shapes.

        Trace the pumpkin shapes onto colored construction paper using a pencil or marker.

        Choose various shades of orange to give your wreath dimension and visual appeal. Let your kids’ imagination run wild with different color combinations!

        Cut out the pumpkin shapes along the traced lines. This step allows your little ones to practice their scissor skills and contribute to the craft.

        Take the white dinner-size paper plate and remove the center circle, leaving only the outer ring. This will create the wreath shape for your pumpkin masterpiece.

        Attach the pumpkin shapes to the paper plate wreath using glue dots or glue.

        Encourage your kids to arrange the pumpkins creatively, overlapping them and alternating colors to add depth and visual interest.

        Use the hole punch to punch a hole in the paper plate.

        Tie the ribbon to the paper plate. hand and display!

        Paper Plate Pumpkin Wreath

        Paper Plate Pumpkin Wreath

        Materials

        • Cardstock or construction paper in various shades of orange
        • Glue dots or glue
        • White dinner-size paper plate
        • Scissors
        • Pumpkin template printed on cardstock

        Instructions

        Print the pumpkin template on cardstock and cut apart.

        Trace pumpkin shapes onto colored construction paper. Cut the pumpkins.

        From the paper plate, remove the center circle to create the wreath shape.

        Attach the pumpkins to the paper plate wreath using glue dots.


      • Pumpkin Counting from 1-10 Activity

        Pumpkin Counting from 1-10 Activity

        Enjoy this fun fall Pumpkin Counting from 1-10 Activity for kids! This activity includes a free printable pumpkin template with numbers 1-10.

        The fall season is the perfect season to take advantage of fun and unique learning games with the kids!

        This Pumpkin Counting Activity for Kids is simple and easy to create and highly engaging for toddlers learning how to count from 1 to 10!

        Printable Pumpkin Activities

        Set these counting cups up in a learning center at school or homeschool!

        If you children are learning virtually this year, this activity would be a great supplemental activity to complete with your counting lessons.

        Pumpkin Counting from 1-10 Activity

        Supplies:

        Pumpkin Counting Activity

        Directions:

        Print the Counting Pumpkins PDF Template.

        Cut the numbers out with a pair of scissors. You can follow the outline of the pumpkin or you may cut the number in a square or rectangle shape.

        Pumpkin Counting Activity

        Take each number square and place a dot of glue each each corner. Paste each number to a different cup.

        Get the popsicle sticks and get ready to start practice counting.

        Add the amount of sticks to match the number on each cup starting at 1. Complete this step until your child has placed the right amount of sticks in each cup.

        When the child completes the activity, feel free to start over, counting down from 10 to 1.

        Children can practice color sorting with the sticks if they wish, too. For example, add 5 blue popsicle sticks to the number 5 cup or 7 green popsicle sticks to the number 7 cup and so on.

        Get the free printable counting pumpkins!

          We respect your privacy. Unsubscribe at anytime.

          Enjoy this FREE Printable Pumpkin Activity Pack!

          Pin to Pinterest:

        • Apple Paper Bag Craft

          Apple Paper Bag Craft

          This Apple Paper Bag Craft is the perfect activity to work on during the fall or back to school season! Learn how to make this simple craft today!

          Apple Paper Bag Craft

          When I think of the fall or back to school season, I think of apples! There are so many options for apple crafts and activities during this time of year.

          Today I am sharing a simple paper bag apple craft with you to create with the kids! This is a cute craft to display in your home or classroom this season.

          More Apple Activities:

          You may also like:

          Printable Apple Activity Packs

          Apple Paper Bag Craft

          Supplies:

          • Brown paper lunch bag
          • Clean plastic shopping bags
          • Red craft paint
          • Paint brush
          • Green construction paper
          • Glue
          • Scissors

          Directions:

          Cut leaf shapes from green construction paper.

          Open the brown paper bag and stuff about half way with clean, plastic shopping bags. Twist the top of the bag tightly to close and form the stem.

          Paint the rounded part of the bag and allow to dry completely.

          Use glue to attach leaf shapes to the stem.

          Apple Paper Bag Craft

          Apple Paper Bag Craft

          Apple Paper Bag Craft

          Materials

          • Brown paper bag
          • Clean plastic shopping bags
          • Red washable paint
          • Paint brush
          • Green construction paper
          • Glue
          • Scissors

          Instructions

          Cut leaf shapes from green construction paper.

          Open the brown paper bag and stuff about half way with clean, plastic shopping bags. Twist the top of the bag tightly to close and form the stem.

          Paint the rounded part of the bag and allow to dry completely.

          Use glue to attach leaf shapes to the stem.


        • Paper Bag Turkey Craft

          Paper Bag Turkey Craft

          Is your Thanksgiving Day planned yet?

          If you are still looking for ideas, we’ve got one that is easy and fun for the kids – a Paper Bag Turkey Craft! With just a few supplies, you can have this project ready in no time.

          The best part is that the kids can get creative and make their turkeys look however they want. So why not give it a try? Scroll down to see how it’s done.

          Paper Bag Turkey Craft

          Making paper bag crafts can have benefits for children. It can help with their fine motor skills, color recognition, and creativity.

          They can also be a great way to recycle paper bags that would otherwise end up in the trash.

          Turkey Crafts for Kids

          Paper Bag Puppets

          Turkey Craft Thanksgiving Printable Template and Directions
          Turkey Craft Thanksgiving Printable Template and Directions


          Thanksgiving Turkey Craft  What I Am Thankful for Activity
          Printable Build-A-Turkey Thanksgiving Craft


          How do you make a paper bag turkey out of a lunch bag?

          Gather the craft supplies below to make this easy paper bag turkey!

          Paper Bag Turkey Craft

          Supplies:

          Paper Bag Turkey Craft

          Directions:

          Place the bag on the side without the flap. The opening of the bag should be at the bottom. 

          Glue the feathers at the top of the bag. Set aside and allow time to dry. 

          Paper Bag Turkey Craft
          Paper Bag Turkey Craft

          Turn the bag over. 

          Glue the googly eyes towards the middle of the paper bag flap.

          Using the orange construction paper, cut out a beak.

          Using the red construction paper, cut out a waddle. 

          Glue the beak and waddle on under the googly eyes. 

          Set aside and allow time to dry. 

          Pair this activity with the book: There Was an Old Lady that Swallowed a Turkey

          Thankful Turkey Thankful Turkey Printable I Am Thankful For
          Thankful Turkey Printable


          Thanksgiving Coloring Pages Printable Coloring Pages
          Printable Thanksgiving Coloring Pages


          Paper Bag Turkey

          Paper Bag Turkey

          Tools

          • Brown paper bag
          • Feathers
          • Googly eyes
          • Orange and red construction paper
          • scissors
          • glue
          • Book: There Was an Old Lady that Swallowed a Turkey

          Instructions

          Place the bag on the side without the flap. The opening of the bag should be at the bottom. 

          Glue the feathers at the top of the bag. Set aside and allow time to dry. 

          Turn the bag over. 

          Glue the googly eyes towards the middle of the paper bag flap.

          Using the orange construction paper, cut out a beak.

          Using the red construction paper, cut out a waddle. 

          Glue the beak and waddle on under the googly eyes. 

          Set aside and allow time to dry. 

          Pair this activity with the book: There Was an Old Lady that Swallowed a Turkey

        • Pine Cone Turkey Craft

          Pine Cone Turkey Craft

          Pine cone crafts are fun to make! Get creative this fall with pine cones and create this adorable Pine Cone Turkey Craft!

          Pine Cone Turkey

          Did you know that you can create a variety of pine cone crafts with the pine cones you find laying around in your own neighborhood?

          Follow along as I plan to create a variety of fun pine cone animal crafts and other themed pine cone crafts this year!

          If you can’t find pine cones near you, you can find crafting pine cones here.

          Toilet Paper Roll Turkey

          Paper Bag Turkey Craft

          Fall Leaf Turkey Craft

          Edible Apple Turkey

          Turkey Feather Color Matching Game

          The next time you are out on a nature walk with your kids, select a few of your favorite pine cones and create this turkey craft to display this year.

          Today I’m sharing how to make this colorful and adorable pine cone turkey.

          This craft is a great way to celebrate the fall season. It’s also a great activity for the kids to put together while you are busy in the kitchen putting the Thanksgiving meal together!

          I hope you enjoy making this fall pine cone turkey craft with your family!

          Pine Cone Turkey

          Pine Cone Turkey Craft

          Supplies:

          Directions:

          How to prepare your pine cones for the turkey craft:

          After you select your favorite pine cones, simply wash off the pine cones to remove dirt and other debris (and small critters, too!) Set aside to dry.

          Once washed and dried, you can bake your pine cones in the oven on a lined baking sheet on 200 degrees Fahrenheit for about 20-30 minutes. Allow time to cool.

          **This is important if you are bringing pine cones indoors, as you do not want to bring any bugs into your home that can cause problems! (This is always an optional step based on your personal preference.)

          If you prefer to skip this step, you can consider purchasing craft pine cones.

          Now it’s time to make your pine cone turkey craft!

          Turn the pine cone on it’s side.

          Insert the turkey’s tail feathers into the pine cone scales located close to the bottom of the pine cone. There’s no need for glue unless you’d like to use glue to attach the feathers more securely. I did not use glue to attach the feathers for this turkey craft.

          pine cone turkey supplies

          Continue adding the desired amount of tail feathers. I like to give add extra feathers for a full tail feather effect!

          Using the hot glue gun, place a drop of hot glue onto the back of the large pom pom. Attach the pom pom onto the top of the pine cone (the pointiest part of the pine cone!)

          If you need to remove the stem of the pine cone for the pom pom to stick better, you can remove it. The stem should break off easily.

          pine cone turkey craft supplies

          Using the foam sheets of paper, cut a waddle and a beak. I didn’t use any patterns for this. You may use my example below for what it can look like.

          Apply hot glue to the back of the googly eyes, beak, and waddle and attach to the pom pom as seen below.

          pine cone turkey head

          Your Pine Cone Turkey is now ready for display! Set your turkey out as a Thanksgiving decoration this year.

          pine cone turkey

          Here are a few turkey themed books to add to your home or classroom library this year:

          More Pine Cone Related Crafts and Activities:

          Pine Cone Spider

          Pine Cone Bird Feeder

          More Turkey Related Crafts and Activities:

          Turkey Feathers Color Matching Game (FREE Printable Turkeys Included)

          Edible Apple Turkey Craft

        • Toilet Paper Roll Turkey Craft

          Toilet Paper Roll Turkey Craft

          Looking for a fun and easy Thanksgiving craft project that kids can help with? Try making a Toilet Paper Roll Turkey Craft!

          Toilet Paper Roll Turkey Craft

          This is a great way to use up leftover rolls of toilet paper, and the finished project is adorable. Kids will love putting on the finishing touches, like feathers and googly eyes.

          Gather your supplies and get started – your little ones are going to love this one!

          Turkey Crafts for Kids

          Build A Turkey Activities

          Turkey Coloring Pages

          Toilet Paper Roll Turkey Craft

          Supplies:

          Toilet Paper Roll Turkey Craft

          Directions:

          Glue the desired amount of feathers on the back of the toilet paper roll. (3-6 feathers is a recommendation.) Set aside to dry. 

          Toilet Paper Roll Turkey Craft

          Glue the googly eyes onto the front of the toilet paper roll.

          Cut out a beak from the orange construction paper. Glue on under the googly eyes. 

          Cut out a red (wattle) and glue under the beak. Allow plenty of time to dry.

          Toilet Paper Roll Turkey Craft

          Display!  

          Toilet Paper Roll Turkey Craft
          Toilet Paper Roll Turkey Craft
          Thanksgiving Turkey Craft  What I Am Thankful for Activity
          Thanksgiving Turkey Craft


          Thanksgiving Coloring Pages Printable Coloring Pages
          Printable Thanksgiving Coloring Pages


          Turkey Coloring Page Turkey Coloring Sheet Thanksgiving
          Turkey Coloring Page


          Thankful Turkey Activity  Cut and Paste  Thanksgiving Craft
          Thankful Turkey Activity


          Toilet Paper Roll Turkey

          Toilet Paper Roll Turkey

          Materials

          • Toilet paper rolls
          • Googly eyes
          • Feathers
          • Red and orange construction paper
          • Glue
          • Scissors

          Instructions

          Glue the desired amount of feathers on the back of the toilet paper roll. (3-6 feathers is a recommendation.) Set aside to dry. 

          Glue the googly eyes onto the front of the toilet paper roll.

          Cut out a beak from the orange construction paper. Glue on under the googly eyes. 

          Cut out a red (wattle) and glue under the beak. Allow plenty of time to dry.

          Display!