Category: DIY

  • St. Patrick’s Day Shamrock Sensory Bottle

    St. Patrick’s Day Shamrock Sensory Bottle

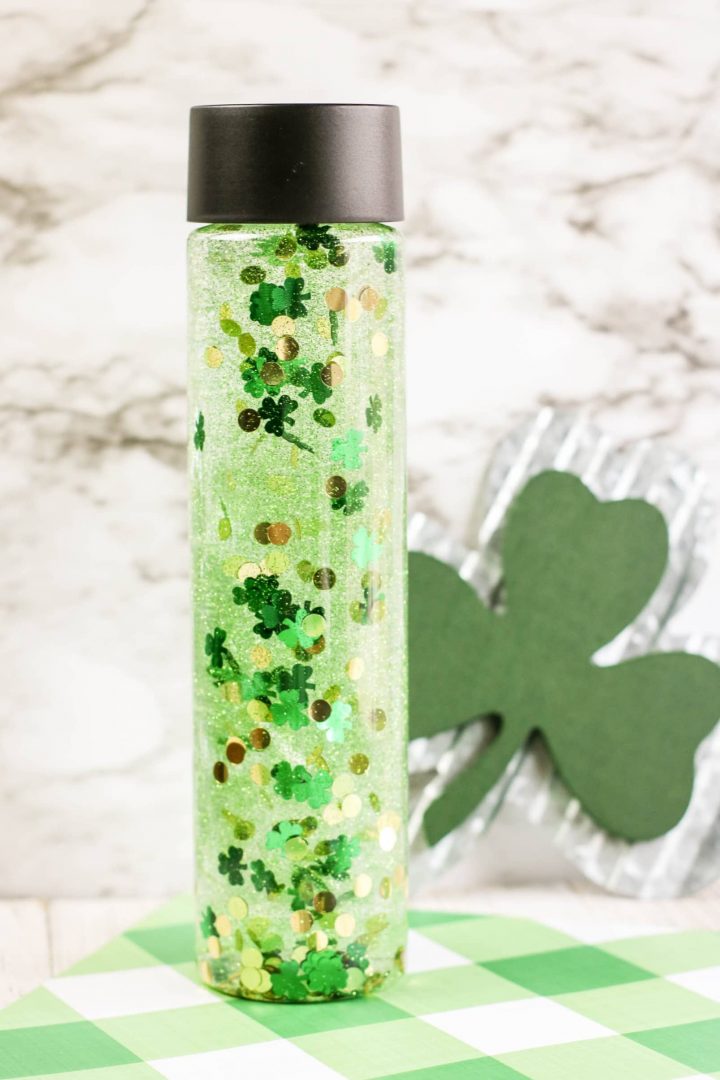
    This super cool St. Patrick’s Day Shamrock Sensory Bottle is entertaining for children!

    The glitter and confetti gives this bottle a fun effect. Create your bottle today!

    St. Patrick's Day Sensory Bottle for Kids

    St. Patrick’s Day is March 17! To celebrate, create a fun sensory bottle!

    This St. Patrick’s Day sensory bottle for kids is a fun, easy way to celebrate this special day with your little ones!

    Not only do they get to experience the holiday in an engaging and tactile way, but they also get to create their own unique St. Patrick’s day themed bottle.

    St. Patrick’s Day Sensory Bin

    St. Patrick’s Day Play Dough Kit

    All you need are a few simple materials, such as green glitter, shamrocks confetti, and some of your favorite St. Patrick’s day goodies.

    Just fill the bottle with these items and add water – voila! Your St. Patrick’s day sensory bottle is ready.

    Kids will love shaking it up and watching the contents swirl around. It’s sure to be a festive activity for this fun holiday!

    So get your kids involved in the fun and let them create their own St. Patrick’s Day sensory bottle – they’ll love it!

    How to Make Rainbow Rice (for Sensory Bins)

    View our full collection of sensory bottles here.

    Benefits of Sensory Bottles

    Here’s our St. Patrick’s Day Sensory Bottle for kids to make during the month of March!

    St. Patrick’s Day Shamrock Sensory Bottle

    Supplies:

    • 1 (13.6 to 16 ounce) clear sensory bottle
    • 2 to 3 (6 ounce) bottles clear Elmer’s Glue
    • about 1 cup warm water
    • about 1 tablespoon glitter or confetti (if desired)
    • toy coins (optional)
    • shamrock confetti
    • gold dot confetti
    • lime green glitter
    St. Patrick's Day Sensory Bottle for Kids

    Directions:

    Empty the contents of one bottle of glue into the bottle. 

    Fill the empty glue bottle about half full with warm water (about ¼ cup) and seal with the lid.

    Shake well to combine the remaining glue with the water. Pour into the bottle with glue and shake or stir to combine.

    If you are adding glitter or toys, add part of the glitter and toys into the glue mixture.

    Seal the jar and shake well.

    Note: If the glitter or confetti does not move easily, add more warm water. If the glitter or confetti moves too quickly, add additional glue. Continuing adding in layers with the glitter and toys until you achieve your desired effect.

    When the contents of the bottle move according to your preference, seal the bottle and glue the lid closed to avoid spills.

    If desired, cover the lid with duct tape or additional decorations.

    Your St. Patrick’s Day Sensory Bottle is complete and ready for play time!


    St. Patrick's Day Sensory Bottle for Kids

    St. Patrick's Day Sensory Bottle

    St. Patrick's Day Sensory Bottle

    Materials

    • 1 (13.6 to 16 ounce) clear sensory bottle
    • 2 to 3 (6 ounce) bottles clear Elmer’s Glue
    • about 1 cup warm water
    • about 1 tablespoon glitter or confetti (if desired)
    • toy coins (optional)
    • shamrock confetti
    • gold dot confetti
    • lime green glitter

    Instructions

    Empty the contents of one bottle of glue into the bottle. 

    Fill the empty glue bottle about half full with warm water (about ¼ cup) and seal with the lid.

    Shake well to combine the remaining glue with the water. Pour into the bottle with glue and shake or stir to combine.

    If you are adding glitter or toys, add part of the glitter and toys into the glue mixture.

    Seal the jar and shake well.

    Note: If the glitter or confetti does not move easily, add more warm water. If the glitter or confetti moves too quickly, add additional glue. Continuing adding in layers with the glitter and toys until you achieve your desired effect.

    When the contents of the bottle move according to your preference, seal the bottle and glue the lid closed to avoid spills.

    If desired, cover the lid with duct tape or additional decorations.

    Your St. Patrick's Day Sensory Bottle is complete and ready for play time!

  • Yellow Chick Paper Plate Craft

    Yellow Chick Paper Plate Craft

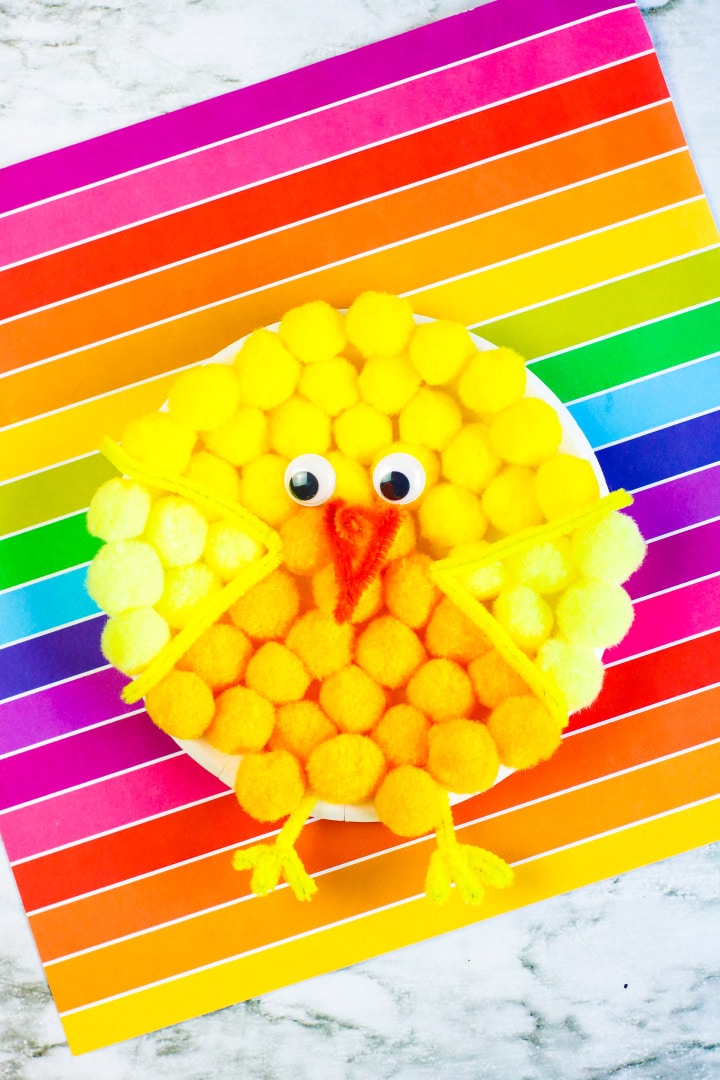
    This adorable Yellow Chick Paper Plate Craft is the perfect craft to make this spring season!

    I LOVE the spring season! It’s my favorite season (right there next to fall!) The spring season is a time to start over.

    Trees and flowers are in bloom and baby animals are being born or hatched!

    This yellow chick craft below is easy and fun to make with your kids this spring season. All you need are yellow pom poms, pipe cleaners, glue, wiggly eyes, and a small paper dessert plate.

    The bright yellow color is what makes this adorable chick stand out!

    More Crafts:

    And now on to the super cute craft you came here for. Enjoy!

    Yellow Chick Paper Plate Craft

    Supplies:

    • dessert size paper plate
    • yellow pom poms (in 3 shades if available)
    • 2 googly eyes
    • 2 yellow pipe cleaners
    • 1 orange pipe cleaner
    • quick dry tacky glue or school glue

    Directions:

    Glue the pom poms to the paper plate. If using 3 shades of yellow as pictured, start with the wings first, then the breast area, and finally the top.

    Cut one yellow pipe cleaner in half. Twist each half into bird feet. Glue into place.

    With the remaining yellow pipe cleaner, cut in half and shape into wings. Glue into place.

    Twist the orange pipe cleaner into a beak shape. Glue into place.

    Glue the wiggly eyes to each side of the beak.

    yellow chick pom pom craft

  • Pot of Gold Rainbow Popsicle Stick Craft

    Pot of Gold Rainbow Popsicle Stick Craft

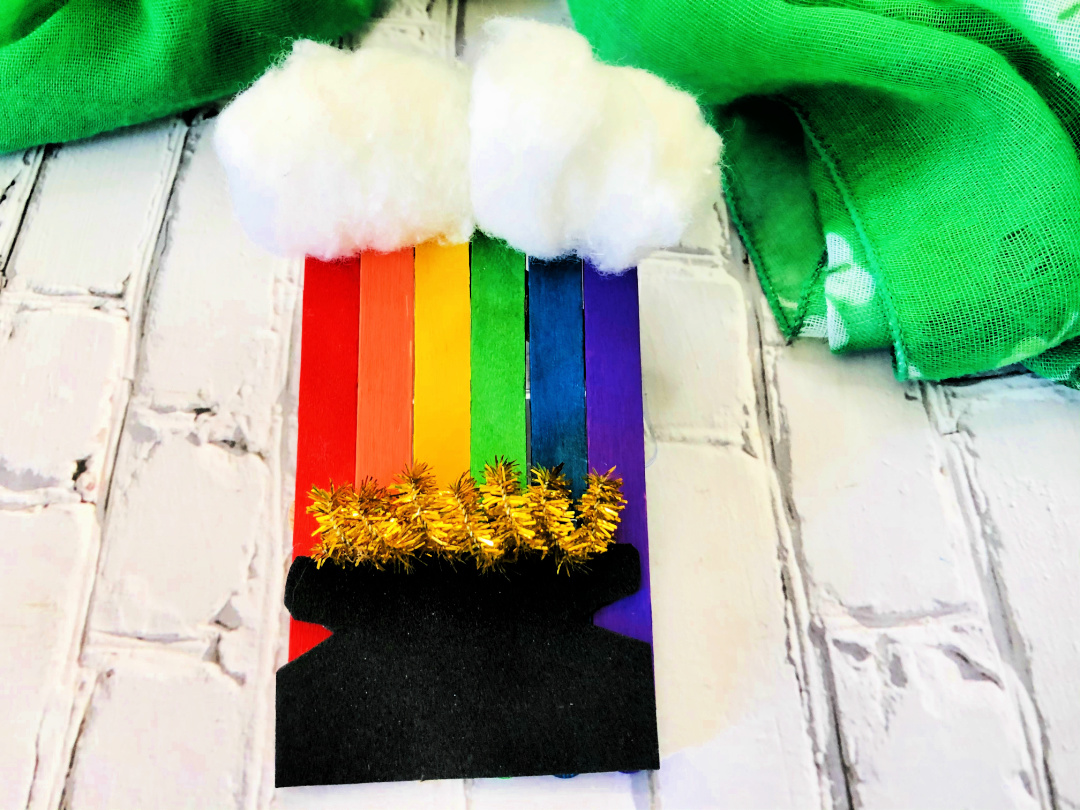
    Create this fun and festive Pot of Gold Rainbow Popsicle Stick Craft for St. Patrick’s Day this year!

    St. Patrick’s Day is approaching! St. Patrick’s Day 2023 falls on a Friday this year.

    Get out your craft supplies and plan to make a variety of fun crafts to celebrate!

    Here’s a list of fun St. Patrick’s Day activities for you to enjoy while you are visiting today:

    Rainbow crafts are a great way to bring in the St. Patrick’s Day holiday. This popsicle stick craft below is simple and easy to make with the kids. It includes a pot of gold for extra fun!

    Build a Pot of Gold Printable Craft  St. Patrick's Day
    Build a Pot of Gold Printable Craft


    St Patricks Day Handprint & Footprint Art BUNDLE  PRINTABLE
    St. Patrick’s Day Handprint Art Bundle


    I hope you enjoy making this craft with your kids or students. Be sure to display your craft around your home or classroom to brighten up the room!

    Pot of Gold Rainbow Popsicle Stick Craft

    Supplies:

    St. Patrick's Day Preschool Pack Preschool Pack Learning
    St. Patrick’s Day Preschool Pack


    KIDS St. Patrick's Day Craft Coloring Sheets for
    Printable St. Patrick’s Day Activity Pack


    Instructions:

    Line up colored craft sticks in the following order: red, orange, yellow, green, blue, and purple.

    Run a line of hot glue across the sticks near the top and press on one of the small sticks as shown.

    Repeat the process along the bottom. 

    Position the rainbow vertically with the red on the left.

    Glue the cotton balls on the top portion of the rainbow.

    Use the foam or construction paper to cut out a pot shape and glue it to the bottom portion of the rainbow.

    Twist the pipe cleaner to form a spring shape and glue it at the top of the pot. 

    Your rainbow pot of gold is complete!  

    St. Patrick's Day Preschool Activities St Patrick's
    Printable St. Patrick’s Day Preschool Activities

    St Patricks Day Coloring Pages  St Patricks Day Coloring Book
    St. Patrick’s Day Coloring Pages


    Pot of Gold Rainbow Popsicle Stick Craft

    Pot of Gold Rainbow Popsicle Stick Craft

    Materials

    • Colored Craft Sticks
    • 2 small Craft Sticks
    • Gold Sparkly Pipe Cleaner
    • 2 Cotton Balls
    • Black Foam or Construction Paper
    • Hot Glue
    • Scissors

    Instructions

    Line up colored craft sticks in the following order: red, orange, yellow, green, blue, and purple.

    Run a line of hot glue across the sticks near the top and press on one of the small sticks as shown.

    Repeat the process along the bottom. 

    Position the rainbow vertically with the red on the left.

    Glue the cotton balls on the top portion of the rainbow.

    Use the foam or construction paper to cut out a pot shape and glue it to the bottom portion of the rainbow.

    Twist the pipe cleaner to form a spring shape and glue it at the top of the pot. 

    Your rainbow pot of gold is complete!  

  • Sheep Paper Plate Craft

    Sheep Paper Plate Craft

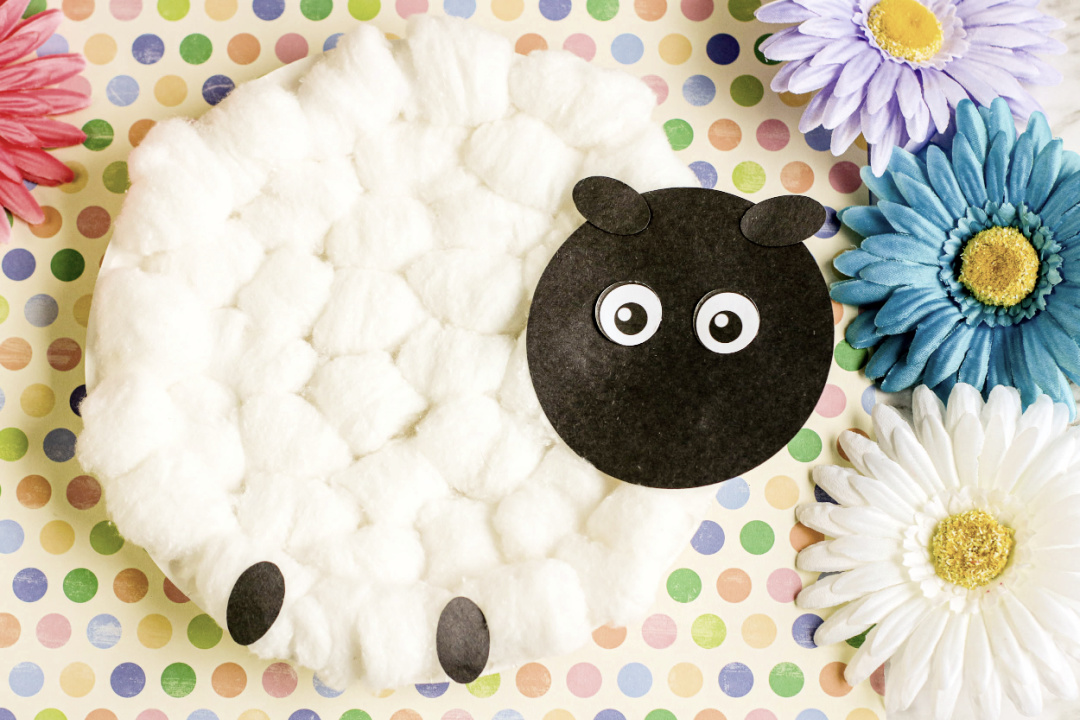
    Create this Sheep Paper Plate Craft with cotton balls and a paper plate! Enjoy a free printable template, too!

    Sheep paper plate craft

    Paper plate crafts are fun and simple to make! With a little creativity and a few art supplies, you can turn a paper plate into just about anything!

    Animal Paper Plate Crafts

    Today, I’m sharing a lamb paper plate craft with you! This is a fun art activity to supplement lessons on farm or spring animals.

    Kids will enjoy putting this simple craft together to display in their home this spring!

    Spring Placemat Activity Pack

    More Paper Plate Animal Crafts:

    Let’s get started!

    Sheep Paper Plate Craft

    Supplies:

    • paper plate
    • black paper
    • cotton balls
    • quick dry tacky glue or school glue
    • free spring sheep templates below

    Get the free sheep template!

      We respect your privacy. Unsubscribe at anytime.

      lamb paper plate craft supplies

      Directions:

      Print the spring sheep eyes, face, ears, and feet below.

      Allow children to create the spring sheep by gluing cotton balls to the paper plate.

      lamb paper plate craft cotton balls

      Then, add the paper layers to create the ears and face, and feet. 

      lamb paper plate craft
      sheep paper plate craft

      Sheep Paper Plate Craft

      Sheep Paper Plate Craft

      Materials

      • Paper plate
      • Black paper
      • Cotton balls
      • Quick dry tacky glue or school glue
      • Spring Sheep Template File

      Instructions

      Print the Spring Sheep Template file.

      Allow children to create the Spring Sheep by gluing cotton balls to the paper plate. Then, add the paper layers to create the ears and face.

    • Blue Bird Popsicle Stick Craft

      Blue Bird Popsicle Stick Craft

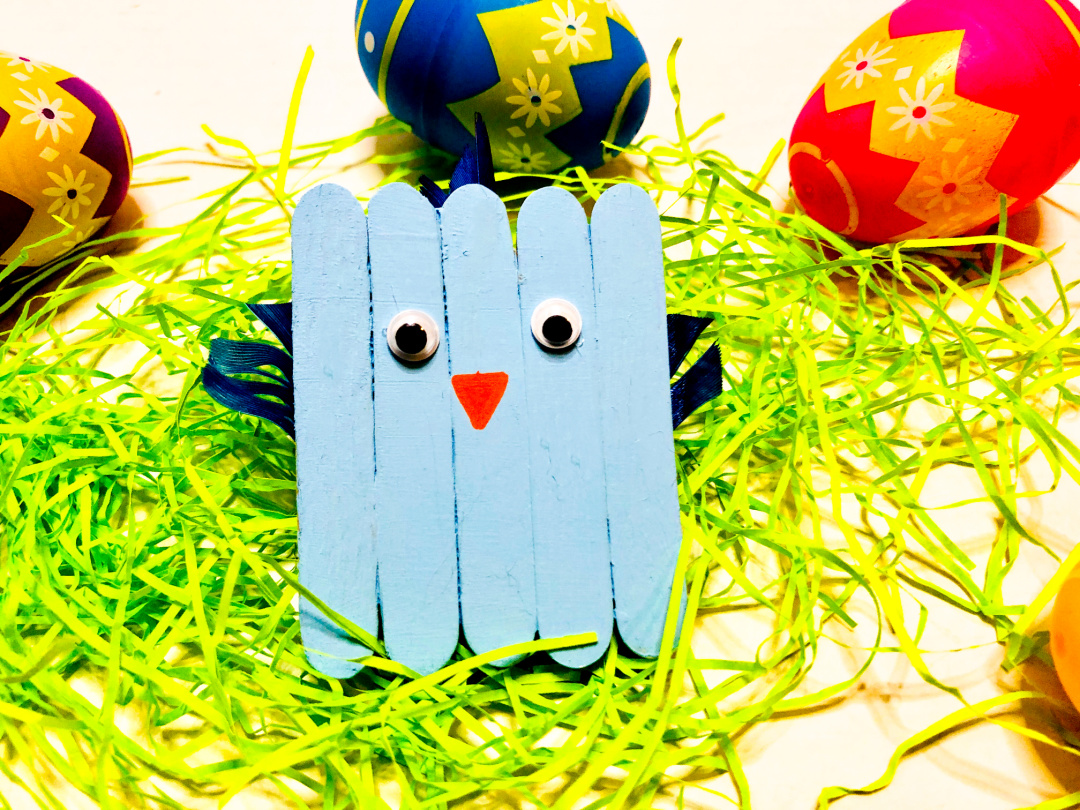
      Create this adorable Blue Bird Popsicle Stick Craft with the kids this spring season using popsicle sticks and feathers!

      Blue Bird Popsicle Stick Craft

      Popsicle crafts are a lot of fun to make! You can make many crafts using popsicle sticks, including birds.

      Today I’ll be sharing a tutorial for how to make a blue bird out of popsicle sticks! This is a fun spring or Easter craft to enjoy with the kids.

      You can create a variety of different birds – just change the colors of the paint and/or feathers!

      Blue Bird Paper Plate Craft

      Bird Coloring Pages

      Find FREE Bird printables in my free printable library including a Bird Watching Journal and two Eggs and Nest Math Activity packs!

      >> CLICK HERE TO SIGN UP FOR MY EMAIL LIST AND GET ACCESS TO FREE Bird Printables!

      Grab the following art supplies below and have fun putting together this adorable blue bird craft!

      Birds Printable Collection Montessori Inspired Animal
      Printable Bird Activities


      Beautiful Birds Learning Pack
      Beautiful Birds Learning Pack


      Blue Bird Popsicle Stick Craft

      Supplies:

      Blue Bird Popsicle Stick Craft Supplies

      Directions:

      Evenly line up 5 craft sticks in a vertical row.

      Cut one craft stick in half. 

      Glue one whole craft stick and the two half sticks diagonally onto the 5 vertical sticks as shown – flip over to solid side to continue. 

      popsicle sticks glued together
      popsicle sticks glue together

      Paint the entire board with an even layer of light blue paint. Set aside to dry. 

      light blue painted popsicle sticks

      Glue on craft eyes near the top of the board. Use paint pen or marker to draw on the beak. 

      blue bird popsicle stick craft face

      Cut small portions of crafts feathers for the head and wings and glue them on from the back of the board as shown. 

      popsicle stick blue bird

      Your Easter chick is complete!  

      popsicle stick blue bird

      Blue Bird Popsicle Stick Craft

      Blue Bird Popsicle Stick Craft

      Materials

      • 7 small craft sticks
      • Paint & paint brush
      • Paint pens or markers
      • Craft feathers
      • Craft eyes
      • Hot glue

      Instructions

      Evenly line up 5 craft sticks in a vertical row.

      Cut one craft stick in half. 

      Glue one whole craft stick and the two half sticks diagonally onto the 5 vertical sticks as shown – flip over to solid side to continue. 

      Paint the entire board with an even layer or paint – any color you choose – let dry. 

      Glue on craft eyes near the top of the board. 

      Use paint pen or marker to draw on the beak. 

      Cut small portions of crafts feathers for the head and wings and glue them on from the back of the board as shown. 

      Your Easter chick is complete! 

      Bird Coloring Pages for Kids  Birds Instant Download
      Bird Coloring Pages for Kids


      KDP Interior 50 Bird Coloring Pages  8.5 X 11
      50 Bird Coloring Pages


      Bird Life Cycle Birds All About Birds Instant Download
      Bird Life Cycle Printable


    • Kite Popsicle Stick Craft

      Kite Popsicle Stick Craft

      Kids will love making their own Kite Popsicle Stick Craft this spring season! Check out this easy tutorial to learn how to make them.

      Kite Popsicle Stick Craft

      The spring season is here and we are already spending a lot of time outdoors!

      My son loves flying kites. He takes his kite and runs up and down the street with it! It’s adorable to watch.

      Today, I’m sharing this kite craft made with popsicle sticks to make with your child or students and display at home or in the classroom!

      You may also like:

      Printable Design a Kite

      Buy now on Etsy | Teachers Pay Teachers

      Printable Kite Activity Pack

      Buy now on Etsy | Teachers Pay Teachers

      Read on to find out how you can make an easy kite using popsicle sticks and a few other basic supplies!

      Kite Popsicle Stick Craft

      Supplies:

      • 4 Jumbo Craft Sticks 
      • Streamers 
      • Pipe Cleaners 
      • Scissors 
      • Hot Glue Gun and Hot Glue Sticks
      • Kite Material – party napkins, gift wrap, plastic tablecloth, tissue paper, or your own artwork
      kite popsicle stick craft supplies

      Directions:

      Glue each end of the 4 craft sticks together in the shape of a kite – diamond shape as shown – to form the kite frame. 

      kite popsicle stick craft

      Use the frame to measure the kite material, cut to size and glue face down to one side of the frame, turn over to view the front of the kite. 

      kite craft
      kite craft
      kite craft
      kite craft

      Cut two pieces of streamer approximately 16 inches long, then cut both in half vertically to form four streamers. 

      kite craft streamers

      Glue the four streamers together at one end and attach to the bottom of the kite from the back side. 

      kite craft streamers
      kite craft

      For the finger loop, cut the pipe cleaner in half and glue one piece to the top of the kite from the back side as shown.

      kite craft

      Your kite is now complete! Hang your craft outdoors if you’d like!

      Kite Popsicle Stick Craft

      Kite Popsicle Stick Craft

      Materials

      • 4 Jumbo Craft Sticks
      • Streamers
      • Pipe Cleaners
      • Scissors
      • Hot Glue
      • Kite Material – napkins, gift wrap, plastic tablecloth, tissue paper, or your own artwork

      Instructions

      Glue each end of the 4 craft sticks together in the shape of a kite – diamond shape as shown – to form the kite frame. 

      Use the frame to measure the kite material, cut to size and glue face down to one side of the frame, turn over to view the front of the kite. 

      Cut two pieces of streamer approximately 16 inches long, then cut both in half vertically to form four streamers. 

      Glue the four streamers together at one end and attach to the bottom of the kite from the back side. 

      For the finger loop, cut the pipe cleaner in half and glue one piece to the top of the kite from the back side as shown.

      Your kite is now complete! 

    • Love Bug Popsicle Stick Craft

      Popsicle stick crafts are fun and simple to make! Create this adorable Love Bug Popsicle Stick Craft for Valentine’s Day this year.

      Love Bug Popsicle Stick Craft

      Get out your craft supplies and create this adorable Love Bug Popsicle Stick Craft with the kids this February to display in your home or classroom.

      Or, have your child wrap this as a gift and give it to someone you love this Valentine’s Day!

      Create this cute Puppy Dog Popsicle Stick Craft for Valentine’s Day, too! Check out these super cute Arctic animals made with popsicle sticks.

      Love Bug Toilet Paper Roll Craft

      Enjoy this tutorial and have fun creating this wonderful little love bug.

      Here are a few cute coloring pages that you can print for the kids, too!

      Printable Love Bug Valentine's Day Coloring Pages For Kids
      Printable Love Bug Valentine’s Day Coloring Pages For Kids


      Valentines Day Activity Valentines Day Printable Valentines
      Love Bug Valentine’s Day Activities for Kids


      Love Bug Popsicle Stick Craft

      Supplies:

      craft supplies

      Directions:

      Note: I am sharing two different options below for your love bug!

      Evenly line up 7 regular size popsicle sticks.

      popsicle sticks

      Using hot glue gun, run a line of hot glue the entire length of a small popsicle stick & press it horizontally onto one end of the 7 sticks – repeat this step on the other end as well.

      Flip the newly made board over and coat with an even layer of white paint, let dry. 

      love bug craft

      If you choose to do the pink love bug, paint your popsicle sticks pink.

      Glue the eyes in place.

      love bug craft

      Use paint pen or marker to draw on hairline, heart shaped nose and mouth.

      Use paint pen or marker to add hearts to body.

      love bug craft

      For the antennae, cut the pipe cleaner in half and attach from the back of the board – if desired, add craft poms to the end of each. 

      Using the construction paper, cut out 2 heart shaped pieces for the wings and decorate as desired.

      love bug craft

      Attach the wings with glue from the back of the board.

      love bug craft

      Your Love Bug is now complete! 

      Love Bug Popsicle Stick Craft
      Love Bug Popsicle Stick Craft

      Love Bug Crafts for Kids Fun Valentine's Day Craft
      Love Bug Crafts for Kids Fun Valentine’s Day Craft

      Love Bug Valentines  DIY Printable Valentines  8 per Page
      Love Bug Valentines


      Love Bug Popsicle Stick Craft

      Love Bug Popsicle Stick Craft

      Materials

      • Regular size popsicle sticks
      • Small popsicle sticks
      • White or pink craft paint & paint brush
      • Red or pink paint pen or marker
      • Craft eyes
      • Craft pom poms
      • Construction paper
      • Pipe cleaner
      • Hot glue

      Instructions

      Evenly line up 7 regular size popsicle sticks. 

      Using hot glue gun, run a line of hot glue the entire length of a small popsicle stick & press it horizontally onto one end of the 7 sticks – repeat this step on the other end as well.

      Flip the newly made board over and coat with an even layer of white or pink paint, let dry. 

      Glue the eyes in place.

      Use paint pen or marker to draw on hairline, heart shaped nose and mouth.

      Use paint pen or marker to add hearts to body.

      For the antennae, cut the pipe cleaner in half and attach from the back of the board – if desired, add craft poms to the end of each. 

      Using the construction paper, cut out 2 heart shaped pieces for the wings and decorate as desired.

      Attach the wings with glue from the back of the board.

      Your Love Bug is now complete!  

      Love Bug Toilet Paper Roll Craft

      Puppy Dog Popsicle Stick Craft

      Valentine’s Day Q-Tip Painting Activity (10-Pages)

      FREE Valentine’s Day Math Activities

      More Valentine’s Day Activities for Kids:

      6 Valentines Day Games  Printable Activity for Class Party
      6 Valentines Day Games Printable Activity for Class Party


      Valentine's Day Activity Set  Printable Activities For
      Valentine’s Day Activity Set Printable Activities For


      Kids Valentine coloring sheets  instant download
      Kids Valentine coloring sheets instant download


      Valentine's Day Activities Valentine's Day Bingo
      Valentine’s Day Activities Valentine’s Day Bingo


      Valentine's Day Coloring Pages Printable Coloring Pages
      Valentine’s Day Coloring Pages Printable Coloring Pages


      The Ultimate Valentine's Day Games & Activities Printable
      The Ultimate Valentine’s Day Games & Activities Printable


      Girls Valentine Coloring Pages  instant download
      Girls Valentine Coloring Pages instant download


      Valentine's Day Games Bundle Valentine's Day Fun
      Valentine’s Day Games Bundle Valentine’s Day Fun


      Valentine's Day Coloring Pages Printable Coloring Pages
      Valentine’s Day Coloring Pages Printable Coloring Pages