Spring Sun Handprint Craft Printable
Buy now on: Etsy | Teachers Pay Teachers

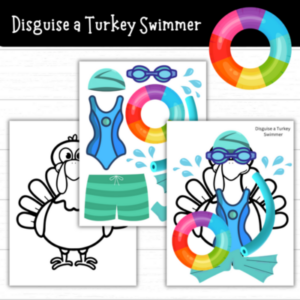
Printable Disguise a Turkey Swimmer
Buy now on: Etsy | Teachers Pay Teachers
Disguise a Turkey Swimmer Printable for Kids
If you’re helping your child with a Disguise a Turkey Project this fall and you want something unique, creative, and fun—look no further than this Disguise a Turkey Swimmer Printable Set!
Whether you’re a mom searching for easy turkey disguise ideas for kids, a teacher prepping a classroom activity, or a homeschool parent planning themed learning fun, this swimmer turkey craft brings a splash of summertime creativity to November.
Instead of the typical pilgrim or superhero disguise, this swimmer-themed turkey takes the Thanksgiving project in a new and exciting direction that your child will love. And better yet?
It’s a cut and paste turkey disguise activity that helps with fine motor skills, creativity, and seasonal fun!
For more ideas:
🦃 What’s Included in This Digital Download?
When & Where Can This Be Used?
This printable is perfect for:
You can use it at the kitchen table, on a lap tray during screen-free time, or even as a last-minute school project!
Why Moms Love It
Busy moms need simple solutions, and this printable delivers:
This is especially great if your child is a swimmer, loves the water, or enjoys pool time during summer. Let them showcase their personality in their school project!
How to Use It
Get Creative! Outside-the-Box Tips
Great if You’re Looking for:
🧠 Helpful Tips and Tricks for Busy Moms:
Print your Swimmer Turkey Disguise Printable today and help your child make a big splash with their classroom project this Thanksgiving!
Printable Disguise a Turkey Swimmer
Buy now on: Etsy | Teachers Pay Teachers


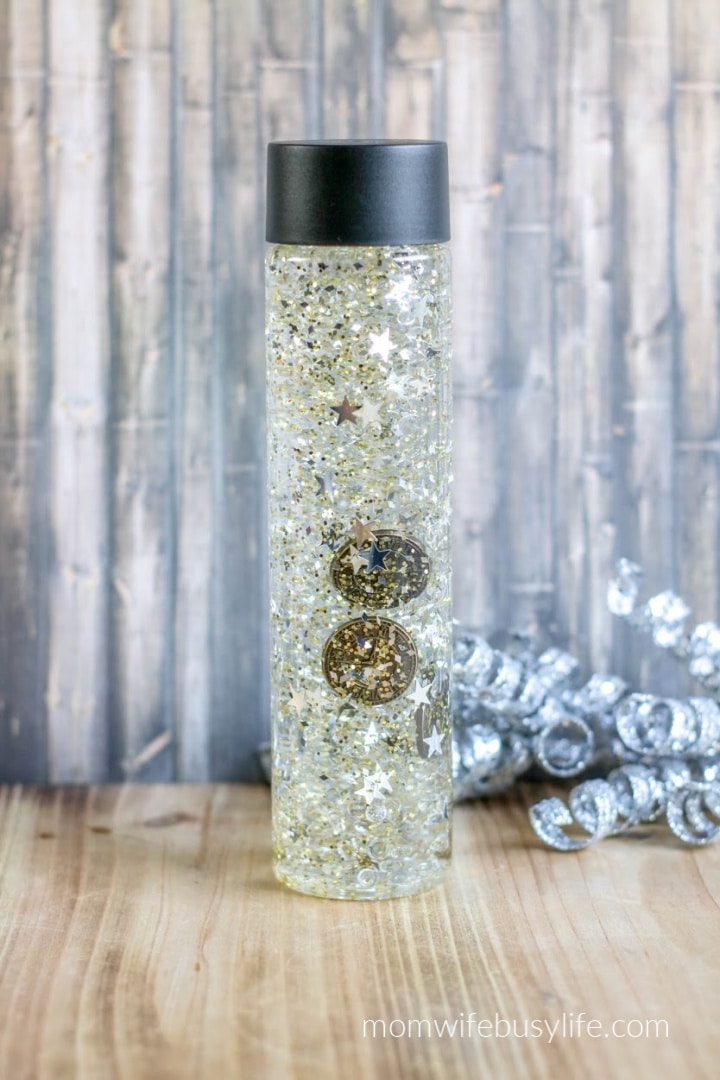
Keep your kids entertained and engaged this New Year’s Eve with a sparkling DIY New Year’s sensory bottle!
This simple, festive, and calming craft is perfect for kids of all ages. Plus, it doubles as a memorable keepsake to celebrate the countdown to the new year.
You may also like:
Sensory bottles are a hit with kids because they’re:
For New Year’s, a sensory bottle can mimic fireworks, shimmer like confetti, and even tie into countdown excitement with creative elements like clock buttons or sequins.
Sensory bottles are highly customizable. Here are a few ideas:
Sensory bottles aren’t just for New Year’s—they can be adapted for birthdays, holidays, or anytime your kids need a fun, calming activity.
Even after the New Year’s celebration, these bottles can be used as:
Q: What if I don’t have a sensory bottle?
A: Use a clean plastic water bottle or mason jar with a tight lid.
Q: How long does it take to make a sensory bottle?
A: Most bottles can be made in 10–15 minutes, depending on decorations.
Q: Are sensory bottles safe for kids?
A: Yes, as long as they are supervised and the bottle is securely sealed.
Q: Can I make this for a New Year’s party?
A: Absolutely! Set up a craft table and let kids make their own bottles as party favors.
Start the New Year with sparkle and fun! This DIY New Year’s sensory bottle is a simple, memorable craft that keeps kids entertained, creates lasting memories, and adds a touch of magic to your holiday celebration.

Supplies:

Empty one bottle of glue into bottle.
Fill the empty glue bottle about half full with warm water (about ¼ cup) and seal with the lid. Shake well to combine the remaining glue with the water. Pour into jar with glue and shake or stir to combine.
If you are adding glitter or toys, add part of the glitter and toys into the glue mixture.

Seal the jar and shake well. If the glitter or confetti does not move easily, add more warm water.
If the glitter or confetti moves too quickly, add additional glue. Continuing adding in layers with the glitter and toys until you achieve your desired effect.
When the contents of the bottle move according to your preference, seal the bottle and glue the lid closed to avoid spills.


If desired, cover the lid with duct tape or additional decorations.

Empty one bottle of glue into bottle.
Fill the empty glue bottle about half full with warm water (about ¼ cup) and seal with the lid. Shake well to combine the remaining glue with the water. Pour into jar with glue and shake or stir to combine.
If you are adding glitter or toys, add part of the glitter and toys into the glue mixture.
Seal the jar and shake well. If the glitter or confetti does not move easily, add more warm water. If the glitter or confetti moves to quickly, add additional glue. Continuing adding in layers with the glitter and toys until you achieve your desired effect.
When the contents of the bottle move according to your preference, seal the bottle and glue the lid closed to avoid spills.
If desired, cover the lid with duct tape or additional decorations.

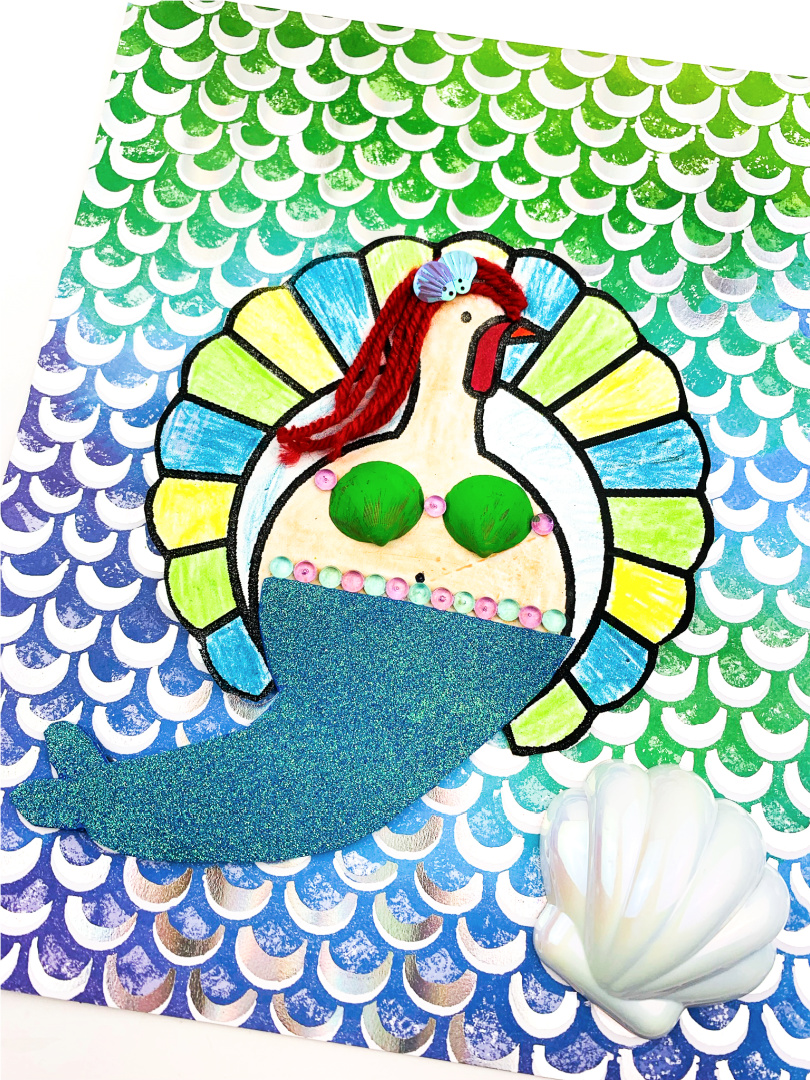
Does your child love mermaids? Create this Disguise a Turkey Mermaid this year during the fall season!

100+ Disguise a Turkey Ideas (+ FREE Printable Project Sheets)
Prefer a printable Disguise a Turkey mermaid activity? You can purchase this set in my shop!

Disguise a Turkey Mermaid Printable Pack
Buy Now on Etsy | Teachers Pay Teachers
Have you ever disguised a turkey? There are several different ways to disguise your turkey! If your child loves Ariel from Disney’s The Little Mermaid, then this turkey disguise is great for you!
The Disguise a Turkey idea comes from the book, Turkey Trouble.
Turkey is in trouble. Bad trouble. The kind of trouble where it’s almost Thanksgiving . . . and you’re the main course. But Turkey has an idea–what if he doesn’t look like a turkey? What if he looks like another animal instead? After many hilarious attempts, Turkey comes up with the perfect disguise to make this Thanksgiving the best ever!
Do you need a Disguise a Turkey Project printable set? Get yours today!

Disguise a Turkey Project Printable Pack
Buy now on Etsy | Teachers Pay Teachers
This Thanksgiving holiday, disguise a turkey as a mermaid with this easy craft.
This project is perfect to keep your little ones entertained while you try to finish up the last-minute cooking preparations.
This craft also is popular in schools as a fun at home project that kids can create and bring back to share with the class.
Supplies:
Directions:
Print a turkey template.
Cut out the turkey. Color if desired.
Paint the shells with desired color and set aside to dry.
Cut a mermaid tail out of the foam paper. Glue to the turkey body.
Color the feathers of the turkey a desired color to match the mermaid.
Glue yarn pieces to the turkey’s head to represent the mermaid’s hair. Add seashell confetti.
Place beads above the mermaid tail for added decoration.
Glue seashells on the turkey’s body to represent the mermaid’s top. Set aside and allow to dry completely.
Display when complete!


These Milk Jug Pumpkins are fun to make and great to display for Halloween! Create this easy craft with the kids this year.

Last week, I posted about making these adorable and easy Milk Jug Ghosts.
This week, I wanted to tell you about the Milk Jug Pumpkins we made!
When I made the ghosts last week, I purchased flameless tea lights thinking they were white. When I got home and tried them out, my Milk Jug Ghosts were orange. I didn’t like that and thought that the light would look better in pumpkin milk jugs.
We saved more empty water jugs (you can use clean milk jugs, too) as well as empty laundry detergent pod containers and made these adorable Jack-o-Lanterns!
>>> Creative Pumpkin Crafts <<<
I ended up finding some white flameless LED votive candles after all, so now I have a mix of Milk Jug Ghosts and Milk Jug Pumpkins!
Draw a pumpkin face on the side of the milk jug with a marker. (If you need ideas, go here!)
*Parents only! Cut out a square in the bottom of the back of the milk jug with an X-ACTO knife.
Place the flameless LED candle inside and display at night!


Create these Milk Jug Ghosts to display with your Milk Jug Pumpkins above!
Print this FREE Printable Pumpkin Activity Pack! Design a pumpkin, trace the pumpkin, cut and rearrange the pumpkin, connect the dots, complete a maze, and work on a puzzle!
Print our free pumpkin template for this fun Pumpkin Counting 1-10 activity!
Create Jack-o-Lantern Oranges to display this Halloween!

Create this mason jar pumpkin craft this fall season. Place a flameless LED candle inside and watch it light up!
Looking for more pumpkin crafts? Don’t forget to check out our list of 10+ Creative Pumpkin Crafts to create this year.
Kids will enjoy creating Vampire Blood in a Bottle! Draw fun faces on your bottle and display these at your home this Halloween!
Create a Spooky Spider out of black pipe cleaners! These adorable spiders with googly eyes are great to set around your home (or stick in sticky spider web for decoration!)
These Vampire Doughnuts are great for a school Halloween party or a tasty morning treat on Halloween for the kids!
Do your kids love making slime as much as mine do? Try this orange crunchy Halloween Slime Recipe Without Borax.
Pumpkin Shaped Pizza Pockets are fun to make a tasty! Allow the kids to help with this fun recipe this year.
If you are having a classroom party this year, here are a few Halloween Party Favor Ideas to give to the kids!
Looking for the perfect costume for a girl this year? Dress as a princess! Here are Princess Halloween Costumes for Girls that are worth investing in this Halloween.

Did you know that you can create art with fresh fruit and paint?! Lemon Painting is a fun paint activity for the kids to try this summer!

Lemon Painting Fun: An Engaging Activity for Kids
Looking for a fun and engaging activity that your kids will love?
Try lemon painting! This art project not only keeps the little ones entertained but also stimulates their creativity and fine motor skills.
Plus, it’s super easy to set up and can be done almost anywhere. Here’s why lemon painting is the perfect activity for your kids.
You may also like:

Printable Lemonade Stand Dramatic Play Kit
Why Lemon Painting is Popular with Kids
Lemon painting is a unique and exciting way for kids to explore their artistic side.
Using real lemons to paint provides a sensory experience that traditional paintbrushes just can’t match.
The texture of the lemon, the scent of the citrus, and the vibrant yellow color all come together to create a multi-sensory activity that engages children on multiple levels.
Versatile and Convenient
One of the best things about lemon painting is its versatility. This activity can be done indoors or outdoors, making it perfect for any weather.
Set up a painting station in the kitchen or take it to the backyard for some outdoor fun.
The cleanup is minimal, especially if you use washable paint, so you can enjoy this activity without worrying about a huge mess.
When and Where to Enjoy Lemon Painting
Lemon painting is a fantastic activity for various occasions. Here are some ideas:
Tips for a Smooth Painting Session
To ensure a successful lemon painting session, here are a few helpful tips:
Creative Uses for Lemon Paintings
Once your kids have finished their lemon masterpieces, there are plenty of ways to use their artwork:
Lemon painting is an easy, affordable, and incredibly fun activity that your kids will love. It’s perfect for busy moms looking to keep their children engaged and creative.
So, grab some lemons, paint, and paper, and let the artistic adventures begin!
Happy painting!
Supplies:

Directions:
Cut the lemon in half.
Gently dab the lemon half that you will be using to paint with on a paper towel to remove excess juice. It will be ok to get some juice on the paper when painting – it will dry.
Pour paint onto the paper plate. Shake the plate gently to try to even out the paint.

Dip the lemon half into the paint. There may be excess paint on the lemon half. You can use the paper plate to dab some of the excess paint off.

Gently press the lemon half onto the paper.

Remove and repeat the process above, stamping the lemon half onto the paper desired amount of times.


Allow painting plenty of time to dry before displaying!
Cut lemon in half.
Gently dab the lemon half that you will be using to paint with on a paper towel to remove excess juice. It will be ok to get some juice on the paper when painting – it will dry.
Pour paint onto the paper plate. Shake the plate gently to try to even out the paint.
Dip the lemon half into the paint. There may be excess paint on the lemon half. You can use the paper plate to dab some of the excess paint off.
Gently press the lemon half onto the paper.
Remove and repeat the process above, stamping the lemon half onto the paper desired amount of times.
Allow painting plenty of time to dry before displaying!


Printable Donut Shop Dramatic Play Kit
Buy Now on: Etsy
Transform Your Home into a Fun Donut Shop with This Printable Play Set!
As a busy mom, finding activities that are both entertaining and educational for your kids can be a challenge.
That’s why I’m excited to share this fantastic Printable Donut Shop Dramatic Pretend Play Set!
With 28 pages of interactive fun, this set is perfect for sparking creativity and providing hours of enjoyment.
Whether it’s a rainy day or you need a fun activity for a playdate, this printable play set is a must-have.
Why You’ll Love This Donut Shop Play Set:
When and Where to Use:
How to Use This Printable Play Set:
Extra Tips for Enhanced Fun:
This Printable Donut Shop Dramatic Pretend Play Set is a wonderful way to keep your kids engaged, learning, and having fun.
It’s easy to set up, versatile for various occasions, and perfect for busy moms looking for creative and educational activities.
Download the set today and watch your child’s imagination take flight!
Download your Printable Donut Shop Play Set now and start creating unforgettable memories with your kids!
Buy Now on: Etsy