Category: DIY

  • Easter Bunny Treat Cups

    Easter Bunny Treat Cups

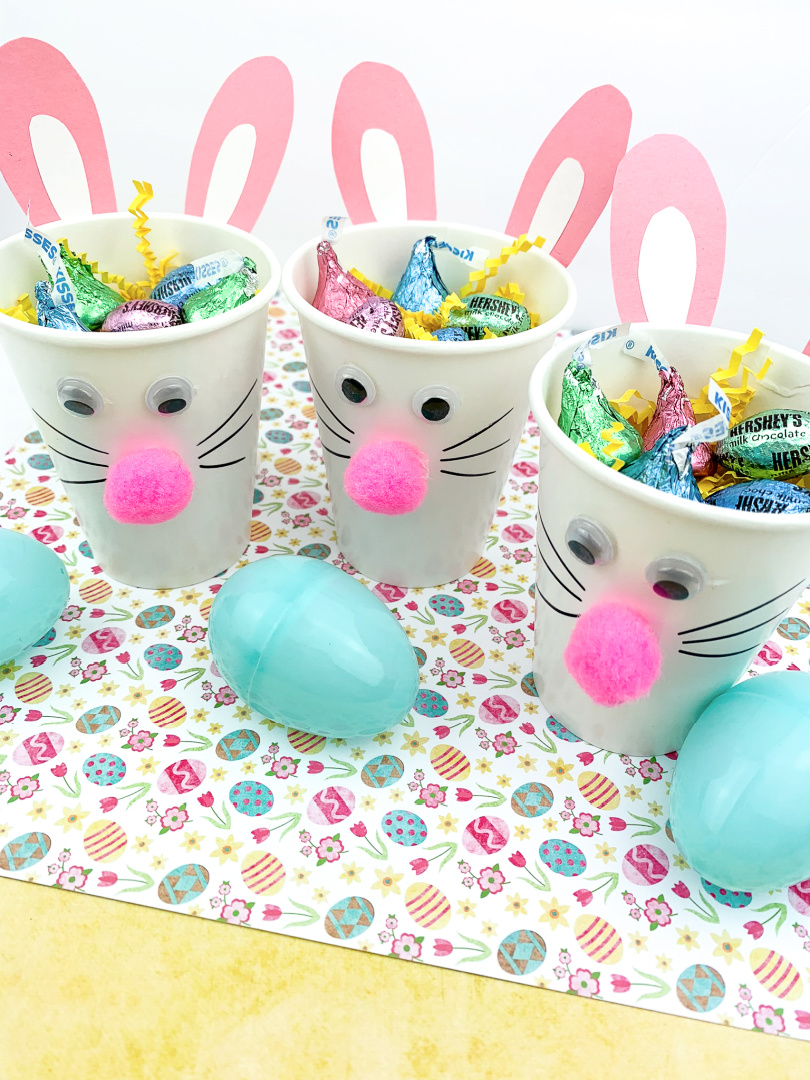
    What could be more fun than getting together with your friends to make Easter bunny treat cups?

    Are you on the hunt for a hassle-free Easter activity to enjoy with your kids? Dive into the joy of crafting with these simple Bunny Treat Cups, perfect for busy moms like you.

    These Bunny Treat Cups are quick, easy, and guaranteed to bring smiles to your little ones’ faces.

    Easter Bunny Treat Jars

    Easter Bunny Paper Plate Craft

    Easter Bunny Toilet Paper Roll Craft

    Crafting Made Simple

    Get ready to create adorable Bunny Treat Cups with minimal effort and maximum fun! These charming cups are sure to add an extra sprinkle of joy to your Easter celebrations.

    Easter Bunny Magic

    Transform ordinary paper cups into adorable bunnies with just a few simple steps. Your kids will love watching their bunny cups come to life!

    Tail-End Cuteness

    Add the finishing touch to your Bunny Treat Cups with a fluffy cotton ball tail. It’s the little details that make these cups extra special!

    Fill with Joy

    Once your Bunny Treat Cups are ready, fill them with Easter goodies and watch your kids’ faces light up with excitement. It’s a sweet surprise they won’t soon forget!

    Crafting Bunny Treat Cups is a wonderful way to bond with your kids and create lasting memories together. So why wait? Grab your supplies and get ready to hop into Easter crafting fun with these adorable Bunny Treat Cups!

    Easter Bunny Treat Cups

    Supplies:

    • White paper cups
    • Googly eyes
    • Pink pom poms 
    • Cotton balls
    • Pink and white construction paper 
    • Sharpie marker
    • Glue or glue gun 
    • Treats
    • Pencil  
    • Scissors 
    • Easter grass or paper shred

    Directions: 

    Fold the pink construction paper in half. Draw ears on the construction paper. Cut out. (When folding the paper, you’ll be able to cut out one set per bunny. For this project, I created three sets of ears with the construction paper.) 

    Fold the white construction paper in half. Draw smaller sets of ears. Then, glue the white pieces in the center of the pink ears. Set aside. 

    Glue the pink nose on the cup. Then, glue the googly eyes above the nose.

    Draw whiskers on the bunny using the marker. 

    Place glue on the bottom of the ears and glue to the back of the cup. 

    Glue a cotton ball onto the bottom of the cup in the back. 

    Your treat cups are ready to be filled with Easter grass, paper shred, and treats! 

    Easter Bunny Treat Cups

    Easter Bunny Treat Cups

    Materials

    • White paper cups
    • Googly eyes
    • Pink pom poms 
    • Cotton balls
    • Pink and white construction paper 
    • Sharpie marker
    • Glue or glue gun 
    • Treats
    • Pencil  
    • Scissors 
    • Easter grass or paper shred

    Instructions

    Fold the pink construction paper in half. Draw ears on the construction paper. Cut out. (When folding the paper, you’ll be able to cut out one set per bunny. For this project, I created three sets of ears with the construction paper.) 
    Fold the white construction paper in half. Draw smaller sets of ears. Then, glue the white pieces in the center of the pink ears. Set aside. 


    Glue the pink nose on the cup. Then, glue the googly eyes above the nose.

    Draw whiskers on the bunny using the marker. 

    Place glue on the bottom of the ears and glue to the back of the cup. 

    Glue a cotton ball onto the bottom of the cup in the back. 

    Your treat cups are ready to be filled with Easter grass, paper shred, and treats! 

    Frequently Asked Questions About Bunny Treat Cups

    Are these Bunny Treat Cups suitable for kids of all ages?

    Bunny Treat Cups are a fun and simple craft that can be enjoyed by children of all ages, with supervision for younger ones who may need assistance with cutting and gluing.

    Can I customize the Bunny Treat Cups with different colors or decorations?

    You can get creative and personalize your Bunny Treat Cups however you like! Experiment with different colors, patterns, and decorations to make each cup unique.

    How long does it take to make Bunny Treat Cups?

    Bunny Treat Cups are a quick and easy craft that can be completed in around 15-20 minutes, making them perfect for busy moms and energetic kids alike.

    What can I fill the Bunny Treat Cups with?

    You can fill your Bunny Treat Cups with a variety of Easter goodies such as candies, chocolates, small toys, or even stickers. Get creative and fill them with whatever treats your kids love!

    Are the materials for making Bunny Treat Cups easy to find?

    The materials needed for Bunny Treat Cups are commonly found at craft stores, dollar stores, or even in your own home. They are affordable and easy to come by.

    Can Bunny Treat Cups be made ahead of time for Easter gatherings or parties?

    You can prepare Bunny Treat Cups in advance and store them in a safe place until Easter. Just make sure to fill them with treats right before your gathering to keep them fresh.

    Are Bunny Treat Cups reusable or are they for one-time use only?

    While Bunny Treat Cups are designed for one-time use, you can certainly save them as keepsakes or decorations for future Easter celebrations if they are handled with care.

    Can Bunny Treat Cups be used for other occasions besides Easter?

    Bunny Treat Cups can be adapted for other occasions such as birthday parties, baby showers, or spring-themed events. Simply change up the decorations and fillings to suit the occasion.

    Can I involve my kids in making Bunny Treat Cups even if they’re very young?

    Crafting Bunny Treat Cups is a great way to engage children of all ages in a fun and creative activity. Younger children can help with simple tasks like decorating and filling the cups under adult supervision.

    Can I share my Bunny Treat Cup creations on social media?

    We would love to see your Bunny Treat Cup creations. Feel free to share your photos on social media and tag us so we can admire your crafty skills!

  • Coffee Container Bird Feeder House

    Coffee Container Bird Feeder House

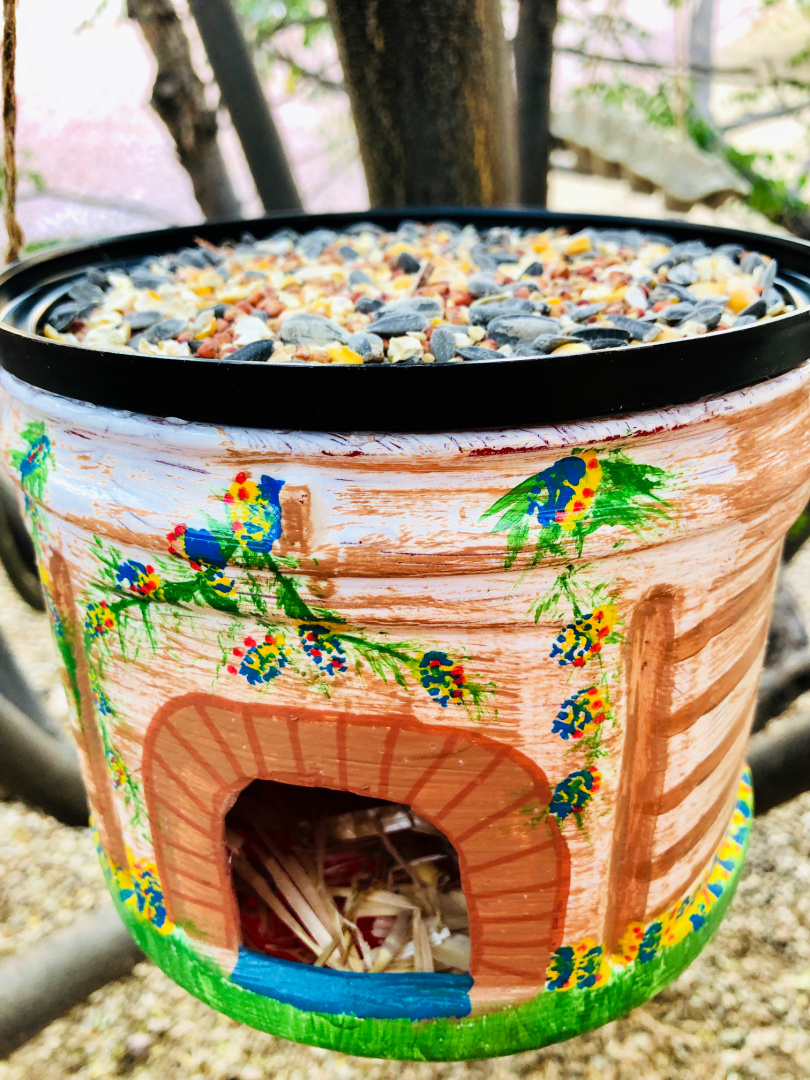
    Learn how to create this adorable Coffee Container Bird Feeder House for your backyard birds this spring season!

    Coffee Container Bird Feeder House

    Creating our own bird feeders is a family activity that we enjoy working on together. We currently feed a variety of backyard birds!

    Due to the amount of birds that we have visiting our yard on daily basis, we’ve created a variety of different bird feeders to hang in our backyard! Here’s the full list of bird feeders:

    Bird Feeders for Children to Make (this list includes an apple, orange, pine cone, gelatin, sugar cone, egg carton, and toilet paper roll bird feeder!)

    These DIY bird feeders attract birds like cardinals, blue jays, woodpeckers, mourning doves, chickadees, and more! They are easy to make a lot of fun to observe when bird watching.

    Today I’m sharing a simple bird feeder AND house combination that I think you’ll enjoy making.

    Save your empty coffee containers and have fun making this Coffee Container Bird Feeder House!

    Coffee Container Bird Feeder House

    Supplies:

    • empty coffee container, washed & dried 
    • craft paint
    • paint brushes 
    • jute cord
    • hot glue gun and hot glue
    • natural nesting material – hay, moss, dry leaves 
    • bird seed

    Directions:

    Paint the container with a solid coat of white paint, let dry. 

    painted coffee container

    Now use the paint to create any desired theme or design, let dry. 

    painted coffee container

    Cut a section of jute cord for the hanger and glue to either side of the top of the container. 

    Place a small amount of nesting material in the bottom of the container. 

    nesting material

    Glue the container lid, upside down (to form a feeding tray), on the top of the container – make sure the lid is completely & securely sealed with glue. 

    Pour birdseed in the lid/tray.

    bird seed
    coffee container bird house

    Hang outdoors and watch the birds enjoy!  

    Coffee Container Bird Feeder House

    Coffee Container Bird Feeder House

    Coffee Container Bird Feeder House

    Materials

    • Empty coffee container, washed & dried
    • Paint and paint brushes
    • Jute cord
    • Hot glue
    • Natural nesting material – hay, moss, dry leaves
    • Bird seed

    Instructions

    Paint the container with a solid coat of white paint, let dry. 

    Now use the paint to create any desired theme or design, let dry.

    Cut a section of jute cord for the hanger and glue to either side of the top of the container. 

    Place a small amount of nesting material in the bottom of the container. 

    Glue the container lid, upside down (to form a feeding tray), on the top of the container – make sure the lid is completely & securely sealed with glue. 

    Pour birdseed in the lid/tray.

    Hang outdoors and watch the birds enjoy!  

    Frequently Asked Questions

    What supplies do I need to make a Coffee Container Bird Feeder House?

    You will need an empty coffee container (washed and dried), craft paint, paint brushes, jute cord, hot glue gun with hot glue sticks, natural nesting material such as hay, moss, or dry leaves, and birdseed.

    Can I use any type of coffee container?

    Yes, any clean and dry coffee container will work for this project. Make sure it’s sturdy enough to hold the birdseed and withstand outdoor conditions.

    What type of paint should I use?

    You can use any craft paint of your choice. Acrylic paint works well and is durable for outdoor use.

    How do I prepare the coffee container for painting?

    Start by applying a solid coat of white paint to the container and allow it to dry completely before adding any designs or themes.

    Can I customize the design of the bird feeder?

    Use the craft paint to create any desired theme or design on the container. Let your creativity flow!

    How do I hang the bird feeder?

    Cut a section of jute cord and glue it to either side of the top of the container to create a hanger. Ensure it’s securely attached before hanging outdoors.

    What should I put inside the container for nesting material?

    Place a small amount of natural nesting material such as hay, moss, or dry leaves in the bottom of the container. This provides a cozy spot for birds to rest.

    How do I create the feeding tray?

    Glue the container lid upside down onto the top of the container to form a feeding tray. Make sure to seal it securely with glue to prevent any spills.

    Can I use any type of birdseed?

    You can use any type of birdseed that attracts the birds you want to see in your yard. Popular options include sunflower seeds, millet, and cracked corn.

    Where should I hang the bird feeder?

    Hang the bird feeder outdoors in a safe and visible location where birds can easily access it. Avoid placing it too close to windows to prevent bird collisions.

    How do I maintain the bird feeder?

    Regularly clean the feeder and refill it with fresh birdseed to keep attracting birds to your yard. Check for any damage or wear and repair as needed.

  • Toilet Paper Roll Bird Feeder

    Toilet Paper Roll Bird Feeder

    Save your empty toilet paper rolls to create this Toilet Paper Roll Bird Feeder craft for your backyard!

    Bird watching has become a hobby of ours since we recently moved back home to the South!

    We recently invested in a bird feeder, bird bath, and quality bird seed to create a pretty amazing little sanctuary for our backyard birds and forest creatures like squirrels and rabbits.

    How to Make a Pine Cone Bird Feeder

    Best DIY Bird Feeder Kits for Kids

    We have our main bird feeder placed in a location close to our back patio.

    We do have a few visitors daily to this bird feeder, but I wanted to create a few bird feeders to place in and around the trees behind the fence in our backyard.

    This gives the birds a safer location to perch and have a tasty snack!

    I’m able to save money by re-using toilet paper rolls to create new feeders for our birds vs. purchasing new feeders to place around.

    Plus, the kids get to take part in a fun craft, so it’s a win-win for everyone!

    Save your empty toilet paper roll tubes and get creative with your bird feeders! You can use a variety of different types of bird seed to attract different species of birds.

    Toilet Paper Roll Bird Feeder

    Supplies:

    • toilet paper roll
    • small bowl of natural peanut butter
    • plastic knife
    • thick string (about 12” long)
    • paper plate
    • small bowl of bird seeds 
    • scissors 

    Directions: 

    Set the toilet paper roll in a vertical position on a paper plate.

    Using the plastic knife, spread a thick layer of peanut butter onto the toilet paper roll. If the peanut butter is too thin, the seeds will not stick well.

    (Note: The toilet paper roll may absorb some of the oils from the peanut butter. This is normal and ok.) 

    Pour the bird seeds onto the paper plate and spread the seeds out.

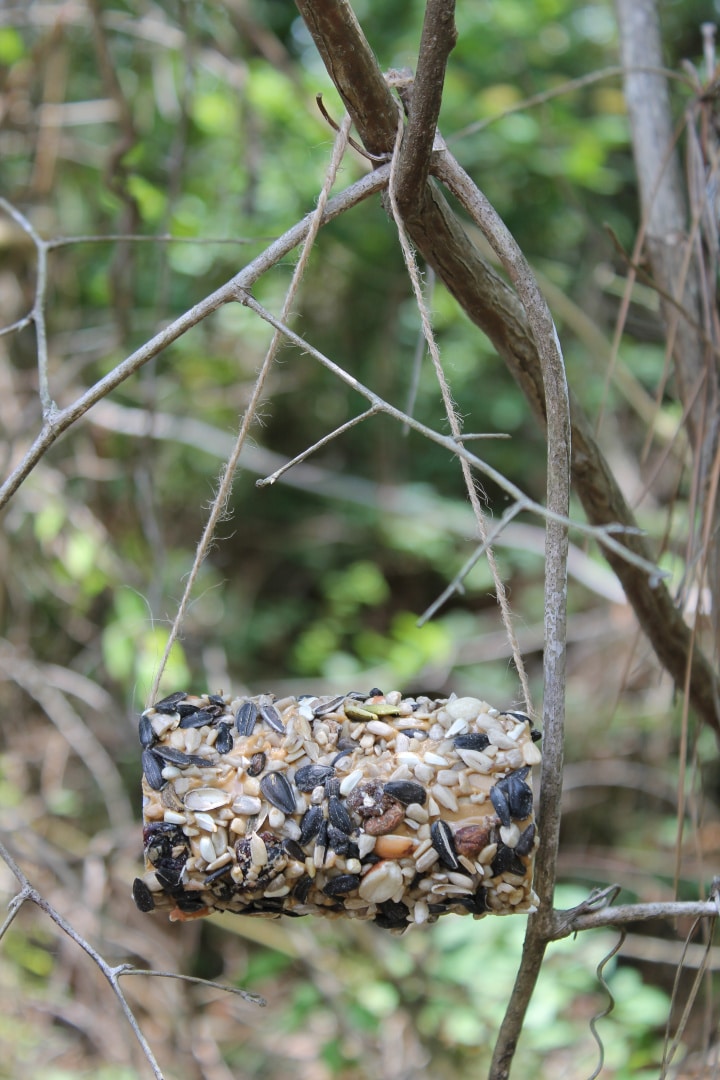
    Gently roll the toilet paper roll tube around in the seeds and try to get as many as you can to stick to the peanut butter.

    Use your hands to pick up and place seeds onto areas that don’t get covered well. If you need to add more peanut butter to get seeds to stick, you can add more.

    Run a string through the holes of the toilet paper tube. Bring the two ends together at the top and tie the string into a knot. 

    Your bird feeder is ready to be placed out in a safe location for the birds! Consider placing your feeder in/near branches of a tree.

    Sit back and observe your bird feeder to see what types of birds your feeder attracts!

    Toilet Paper Roll Bird Feeder

    Toilet Paper Roll Bird Feeder

    Materials

    • toilet paper roll
    • small bowl of natural peanut butter
    • plastic knife
    • thick string (about 12” long)
    • paper plate
    • small bowl of bird seeds 
    • scissors

    Instructions

    Set the toilet paper roll in a vertical position on a paper plate.

    Using the plastic knife, spread a thick layer of peanut butter onto the toilet paper roll. If the peanut butter is too thin, the seeds will not stick well.

    (Note: The toilet paper roll may absorb some of the oils from the peanut butter. This is normal and ok.) 

    Pour the bird seeds onto the paper plate and spread the seeds out.

    Gently roll the toilet paper roll tube around in the seeds and try to get as many as you can to stick to the peanut butter.

    Use your hands to pick up and place seeds onto areas that don’t get covered well. If you need to add more peanut butter to get seeds to stick, you can add more.

    Run a string through the holes of the toilet paper tube. Bring the two ends together at the top and tie the string into a knot. 

    Your bird feeder is ready to be placed out in a safe location for the birds! Consider placing your feeder in/near branches of a tree.

    Sit back and observe your bird feeder to see what types of birds your feeder attracts!

    Frequently Asked Questions (FAQs) for DIY Toilet Paper Roll Bird Feeder Craft

    What materials do I need for this craft?

    You will need a toilet paper roll, a small bowl of natural peanut butter, a plastic knife, a thick string (about 12” long), a paper plate, a small bowl of bird seeds, and scissors.

    How do I prepare the toilet paper roll for the bird feeder?

    Set the toilet paper roll in a vertical position on a paper plate.

    What do I do with the peanut butter and bird seeds?

    Using the plastic knife, spread a thick layer of peanut butter onto the toilet paper roll. Then, pour the bird seeds onto the paper plate and spread them out.

    What if the peanut butter is too thin?

    If the peanut butter is too thin, the seeds may not stick well. It’s important to ensure the peanut butter is thick enough for proper adherence.

    Is it normal for the toilet paper roll to absorb some of the peanut butter?

    Yes, the toilet paper roll may absorb some of the oils from the peanut butter. This is normal and won’t affect the effectiveness of the feeder.

    How do I get the seeds to stick to the toilet paper roll?

    Gently roll the toilet paper roll tube around in the seeds, trying to get as many seeds as possible to stick to the peanut butter. Use your hands to add seeds to areas that don’t get covered well.

    What if I need to add more peanut butter or seeds?

    If necessary, add more peanut butter to help the seeds stick, and continue rolling the toilet paper roll in the seeds until well-covered.

    How do I hang the bird feeder?

    Run a string through the holes of the toilet paper tube. Bring the two ends together at the top and tie the string into a knot.

    Where should I place the bird feeder?

    Consider placing your feeder in or near branches of a tree in a safe location for the birds.

    What should I do after hanging the feeder?

    Sit back and observe your bird feeder to see what types of birds it attracts! Enjoy the birdwatching experience.

  • Leprechaun Hat Popsicle Stick Craft

    Create this fun and festive Leprechaun Hat Popsicle Stick Craft for St. Patrick’s Day this year!

    Celebrate St. Patrick’s Day with a few fun crafts for the kids!

    Today, I’m sharing my Leprechaun Hat Popsicle Stick Craft tutorial with you! Get out your craft supplies and enjoy creating this hat to display this year in your home or classroom.

    More St. Patrick’s Day Crafts:

    Build a Leprechaun Hat Printable Craft  St. Patrick's Day
    Build a Leprechaun Hat Printable Craft


    Leprechaun Hat Paper Crown Headband St Patrick's Day Party
    Leprechaun Hat Paper Crown Headband


    Lucky Leprechaun Hat  Printable St Patrick's Day Craft
    Lucky Leprechaun Hat


    St. Patrick's Cut and Paste Printable  st. PATRICKS
    Build A Leprechaun Cut and Paste Printable


    Leprechaun Hat Popsicle Stick Craft

    Supplies:

    St. Patricks Day Coloring Page Set  Instant Download  Saint
    St. Patrick’s Day Coloring Page Set


    Directions:

    Evenly line up 7 regular size popsicle sticks. 

    Using hot glue gun, run a line of hot glue the entire length of a small popsicle stick & press it horizontally onto one end of the 7 sticks as shown – repeat this step on the other end as well. 

    Flip the newly made board over and glue a stick along the bottom for the brim and coat with an even layer of green paint. Allow to dry.  

    Use the foam or construction paper to cut a hat band and glue it on just above the brim of the hat. 

    Cut a small piece of pipe cleaner and bend it to form a square shape for the band buckle and attach with glue to the center of the band.

    Glue on shamrocks if desired.

    Your Leprechaun Hat is now complete! Display this cute craft in your home or classroom this year.

    Leprechaun Hat Popsicle Stick Craft

    Leprechaun Hat Popsicle Stick Craft

    Materials

    • 8 Regular Size Popsicle Sticks
    • 2 Small Popsicle Sticks
    • Paint & Paint Brush
    • Paint Pens or Markers
    • Foam Construction Paper
    • Pipe Cleaner
    • Shamrock Stickers or Confetti
    • Hot Glue Gun and Glue Sticks

    Instructions

    Evenly line up 7 regular size popsicle sticks. 

    Using hot glue gun, run a line of hot glue the entire length of a small popsicle stick & press it horizontally onto one end of the 7 sticks as shown – repeat this step on the other end as well. 

    Flip the newly made board over and glue a stick along the bottom for the brim and coat with an even layer of paint, let dry. 

    Use the foam or construction paper to cut a hat band and glue it on just above the brim of the hat. 

    Cut a small piece of pipe cleaner and bend it to form a square shape for the band buckle and attach with glue to the center of the band.

    Glue on shamrocks if desired.

    Your Leprechaun Hat is now complete!  

    Leprechaun Paper Bag Puppet Template for St. Patrick's
    Leprechaun Paper Bag Puppet


    Leprechaun Paper Bag Puppet  St Patrick's Day Activity
    Leprechaun Paper Bag Puppet


  • Leprechaun Lookers

    Leprechaun Lookers

    Looking for a fun way to celebrate St. Patrick’s Day with your kids?

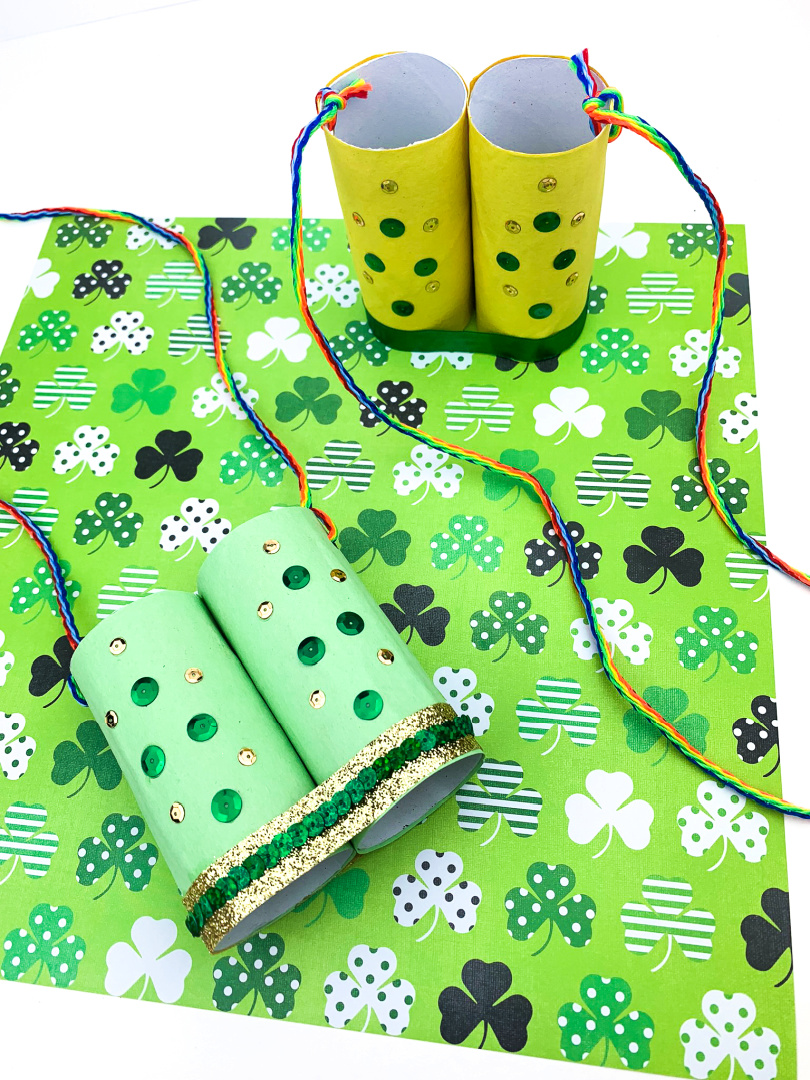
    Why not try out some Leprechaun Lookers! Your child will have a blast looking for the leprechaun with their own personalized set of lookers.

    Leprechaun Lookers

    These simple homemade binoculars are easy and quick to make, and your little ones will love getting into the spirit of the holiday.

    All you need is some basic materials like construction paper, scissors, glue, and tape. Let the crafting begin!

    Read on for instructions on how to create your own leprechaun lookers.

    St. Patrick's Day Preschool Activities St Patrick's
    Printable St. Patrick’s Day Preschool Activity Bundle


    St Patricks Day Coloring Pages  St Patricks Day Coloring Book
    St. Patrick’s Day Coloring Pages


    Leprechaun Lookers

    Supplies:

    Leprechaun Lookers

    Directions:

    Measure and cut the construction paper to fit the toilet paper roll. (Use a pencil to help mark your measurements if desired.) 

    Glue the paper around the roll. Repeat this step for each roll. 

    Place a strip of glue on the side of one of the rolls. Press against the other roll and attach the two tubes together, forming the binoculars. Set aside and allow time to dry. 

    Once dry, punch a hole on both sides of the set at the top. Insert the string, tie on both sides to make a strap for the binoculars. 

    Time to decorate! 

    Glue ribbon around the front part of the binoculars. 

    Glue sequins or other decorative objects on the binoculars. Allow plenty of time to dry before allowing the kids to pretend play with their binoculars!

    Leprechaun Lookers
  • Butterfly Popsicle Stick Craft

    Butterfly Popsicle Stick Craft

    Create this bright and beautiful Butterfly Popsicle Stick Craft made with popsicle sticks and a doily. Decorate your butterfly!

    Butterfly Popsicle Stick Craft

    Are you doing a lesson or unit on butterflies this spring season?

    Do you want to make a craft to celebrate the warmer months? Create this adorable Butterfly Popsicle Stick Craft!

    Butterflies are fun to watch fly around! Have your child look for butterflies the next time you are spending time outdoors! Notice the colors, the size, patterns, where they like to land, etc.

    While you are here, enjoy this FREE Printable Butterfly Activity Pack! In this pack, you can find a butterfly life cycle, cutting practice, tracing numbers, letters, and lines, coloring, symmetry, and a Q-tip painting sheet!

    Get this free printable butterfly activity pack!

      We respect your privacy. Unsubscribe at anytime.

      Enjoy learning about butterflies this year! Have fun making this butterfly craft, too!

      Butterfly Popsicle Stick Craft

      Supplies:

      • 1 paper doily 
      • 1 jumbo popsicle stick 
      • googly eyes 
      • pipe cleaner 
      • craft paint & paint brush 
      • paint pens or markers 
      • hot glue gun and hot glue sticks

      Directions:

      Paint craft stick any color desired, let dry. 

      Fold the doily in half and cut a wing shape, leave the fold intact so when you unfold you will have a full set of wings. 

      Glue the craft eyes on the craft stick, near the top. 

      Use a paint pen or marker to draw on a nose and mouth and to decorate the wings and body of the craft stick. 

      Glue the wings on from the back of the body, decoration facing front.

      Cut pipe cleaner into 2 – two inch long pieces. 

      Fold one end of each piece slightly and glue them to the top of the stick from behind as shown. 

      Your butterfly is complete!

      Butterfly Popsicle Stick Craft

      Butterfly Popsicle Stick Craft

      Materials

      • 1 paper doily
      • 1 jumbo craft stick
      • Craft eyes
      • Pipe cleaner
      • Paint & paint brush
      • Paint pens or markers
      • Hot Glue

      Instructions

      Paint craft stick any color desired, let dry.

      Fold the doily in half and cut a wing shape, leave the fold intact so when you unfold you will have a full set of wings.

      Glue the craft eyes on the craft stick, near the top.

      Use a paint pen or marker to draw on a nose and mouth and to decorate the wings and body of the craft stick.

      Glue the wings on from the back of the body, decoration facing front.

      Cut pipe cleaner into 2 – two inch long pieces.

      Fold one end of each piece slightly and glue them to the top of the stick from behind as shown.


      Your butterfly is complete!

    • Love Bug Toilet Paper Roll Craft

      Love Bug Toilet Paper Roll Craft

      Create this adorable Love Bug Toilet Paper Roll Craft to display in your home or classroom for Valentine’s Day!

      Valentine’s Day is approaching! This is a great time to gather all of your craft supplies and create fun crafts with the kids to celebrate this fun holiday.

      Today I’m sharing my Love Bug Toilet Paper Roll Craft idea with you so that you can make this at home with your kids or complete as an art project with your students.

      Love Bug Popsicle Stick Craft

      You only need a few supplies that you may already have around your home. If desired, give this special love bug to someone you love as a Valentine’s Day gift this year.

      While you here, print these cute love bug coloring pages and activities for the kids!

      Printable Love Bug Valentine's Day Coloring Pages For Kids
      Printable Love Bug Valentine’s Day Coloring Pages For Kids


      Valentines Day Activity Valentines Day Printable Valentines
      Love Bug Activities for Kids


      Love Bug Toilet Paper Roll Craft

      Supplies:

      • toilet paper polls (buy craft rolls in bulk
      • construction paper
      • googly eyes
      • pipe cleaner
      • paint pens or markers
      • glue gun and hot glue sticks

      Instructions:

      Size and cut construction paper & wrap and glue around entire roll.

      Glue on craft eyes near the top of the tube.

      Using paint pens or markers, draw on heart shaped nose & mouth and decorate the body of your bug. If desired, cut out pink hearts to decorate the body.

      Use desired color construction paper to cut out 2 heart shapes for the wings Decorate wings with paint pens or markers, as desired,  and attach with glue from the back of your love bug. (design facing front)

      For the antennae –  cut the pipe cleaner in half, curl the top and attach with glue to the inside front of the tube.

      Your Love Bug is complete!  

      Love Bug Toilet Paper Roll Craft

      Love Bug Toilet Paper Roll Craft

      Materials

      • Empty Toilet Paper Rolls
      • Construction Paper
      • Craft Eyes
      • Pipe Cleaner
      • Paint Pens or Markers
      • Hot Glue

      Instructions

      Size and cut construction paper & wrap and glue around entire roll.  

      Use desired color construction paper to cut out 2 heart shapes for the wings Decorate wings with paint pens or markers, as desired,  and attach with glue from the back of your love bug (design facing front).

      Glue on craft eyes near the top of the tube.

      Using paint pens or markers, draw on heart shaped nose & mouth and decorate the body of your bug. 

      For the antennae –  cut the pipe cleaner in half, curl the top and attach with glue to the inside front of the tube.

      Your Love Bug is complete!