Category: DIY

  • Valentine’s Day Chocolate Covered Spoons

    Valentine’s Day Chocolate Covered Spoons

    Valentine's Day Chocolate Covered Spoons

    Valentine’s Day Chocolate-Covered Spoons: A Sweet and Simple Treat for Moms

    Valentine’s Day is a special occasion that calls for a little extra love and sweetness. As a busy mom, finding the time to create elaborate treats might be challenging, but don’t worry!

    Making chocolate-covered spoons is not only easy but also a fun activity to involve your kids in the kitchen.

    Chocolate Covered Strawberries

    Chocolate Covered Pretzels

    Valentine’s Day Marshmallow Pops

    Here’s how, when, where, and why these adorable Valentine’s Day gifts are perfect for you.

    Why Make Chocolate-Covered Spoons?

    Perfect for Hot Drinks

    These spoons, dipped in melted chocolate, transform a simple cup of coffee or hot cocoa mix into a delightful experience.

    Imagine stirring your morning coffee with a spoon that slowly melts, releasing a rich chocolate flavor.

    Fun and Easy

    Using items like a plastic spoon, parchment paper, and your choice of chocolate (white chocolate chips or milk chocolate), this simple food craft doesn’t require professional skills.

    It’s a great way to introduce your kids to cooking and enjoy quality time together.

    Versatile for Gifting

    Wrapped in little cellophane bags or placed in mason jars, these spoons make adorable Valentine’s Day gifts or DIY gifts.

    They add a thoughtful touch to a homemade gift basket or can be a standalone present for teachers, friends, or family.

    How to Make Them

    You don’t need a fancy spoon mold; any kind of spoons, like plastic or wooden spoons, will do.

    Melt your choice of chocolate – white chocolate candy melts, dark chocolate, or even peanut butter chips – in a heat-safe bowl.

    You can use a double boiler or a microwave-safe bowl, heating in 30-second intervals.

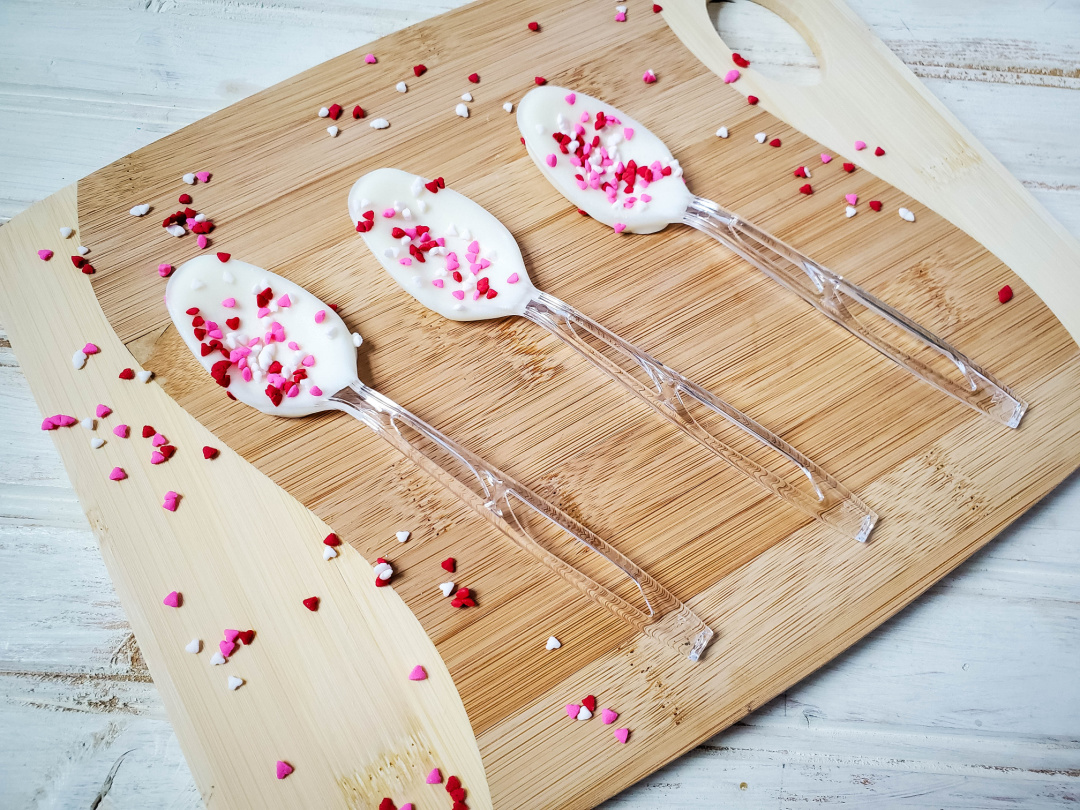
    Once the chocolate is melted to a smooth consistency, dip the spoon in, ensuring the well of the spoon is fully coated.

    Here’s where you can get creative: sprinkle some Valentine sprinkles, crushed candy cane, or mini marshmallows on top of the chocolate.

    Let them set on a cookie sheet lined with parchment or wax paper in a cool dry place.

    When to Make Them

    Prepare these a few days in advance of Valentine’s Day to ensure they’re ready for gifting or enjoying.

    They store well in an airtight container in a cool place, away from moisture.

    Where to Make Them

    Your kitchen is the perfect spot for this activity.

    Lay out all your ingredients and decorations on the kitchen table for easy access. This way, kids can join in the fun of dipping and decorating.

    Additional Tips

    • Flavor Variations: Experiment with various flavors like adding coffee beans for a coffee spoon or using different types of chocolate melts for a variety of tastes.
    • Decoration Ideas: Get creative with fun toppings or dip the front of the spoons in different types of chocolate for a layered effect.
    • Packaging: For an extra special touch, pack them in pretty Valentine’s Day bags or tie them with a ribbon for a perfect gift presentation.

    In conclusion, creating these chocolate-covered spoons is not just about making a delicious treat; it’s about spending time with your loved ones and creating memories.

    They’re a perfect example of a thoughtful gift that’s easy, fun, and heartwarming – everything Valentine’s Day should be about.

    Happy Valentine’s Day, and enjoy the sweet moments!

    Valentine’s Day Chocolate Covered Spoons

    Supplies:

    • white chocolate baking chips (or substitute milk chocolate chips)
    • plastic spoons
    • Valentine’s sprinkles
    • parchment paper

    Directions:

    Line a baking sheet or tray with parchment paper.

    Melt your white chocolate in a double boiler. Place the chocolate in a Pyrex heat safe bowl and place over a saucepan with 2 inches of water in it.

    Heat over low-medium heat stirring the sides often, until chocolate is fully melted. 

    Dip a spoon into the chocolate, using another spoon to get chocolate all around, if needed.

    Place chocolate dipped spoon on parchment paper, and add sprinkles.

    Repeat steps 3 and 4 until all of your spoons are dipped. 

    Refrigerate for 30-60 minutes to allow chocolate to set.

    White Chocolate Spoons

    White Chocolate Spoons

    Ingredients

    • White chocolate baking chips
    • plastic spoons
    • Valentine’s sprinkles
    • Parchment paper

    Instructions

    Line a baking sheet or tray with parchment paper.

    Melt your white chocolate in a double boiler. Place the chocolate in a heatsafe bowl and place over a saucepan with 2 inches of water in it. Heat over low-medium heat stirring the sides often, until chocolate is fully melted. 

    Dip a spoon into the chocolate, using another spoon to get chocolate all around, if needed.

    Place chocolate dipped spoon on parchment paper, and add sprinkles.

    Repeat steps 3 and 4 until all of your spoons are dipped. 

    Refrigerate for 30-60 minutes to allow chocolate to set.

    Frequently Asked Questions about Chocolate Covered Spoons

    Can I use dark chocolate instead of white or milk chocolate?

    Dark chocolate can be a delicious alternative. Just make sure to adjust the melting time as different chocolates have varying melting points.

    How long do these chocolate-covered spoons last?

    If stored in an airtight container in a cool, dry place, they can last up to two weeks. Refrigeration is not necessary but can be used if your kitchen is particularly warm.

    Are these spoons only for hot chocolate?

    While they are perfect for stirring into hot chocolate or coffee, they’re also delightful on their own as a treat!

    Can I use real silverware instead of plastic spoons?

    Yes, you can use real spoons. They add an elegant touch, especially if you’re gifting them. Just ensure they are thoroughly cleaned and dried before use.

    How can I prevent the chocolate from clumping while melting?

    The key is to melt the chocolate slowly and stir it frequently. Using a double boiler helps maintain a consistent temperature, preventing the chocolate from burning or clumping.

    Can I add other toppings besides sprinkles?

    Feel free to get creative. Crushed nuts, mini marshmallows, or even a drizzle of a different type of chocolate can add an extra special touch.

    What’s the best way to package these spoons for gifts?

    You can place them in cellophane bags and tie them with a festive ribbon, or arrange them in a decorative box with some tissue paper for a more elaborate presentation.

    How do I make these allergen-friendly?

    Look for allergen-free chocolate chips, and ensure all your utensils and surfaces are clean to avoid cross-contamination. There are many allergy-friendly sprinkle options available as well.

    Remember, the most important part of this activity is the fun and love shared while making these delightful treats. Happy Valentine’s Day crafting!

  • Valentine’s Day Ribbon Tree Decoration

    Create this beautiful Valentine’s Day Ribbon Tree Decoration to display in your home or classroom this year!

    If you are looking for a fun Valentine’s Day craft to do with you tween or teenager, this craft is perfect!

    Kids will love creating this Valentine’s Day Ribbon Tree using a variety of different ribbon choices!

    Valentine’s Day Wreaths

    The best part about this craft is that you can actually personalize it any way you want and mix things up a bit by choosing any types of ribbon.

    Today I’m sharing our ribbon tree with you as an idea for a fun craft to make with your older children.

    Valentine’s Day Ribbon Tree Decoration

    Supplies:

    Get creative with ribbon! Shop Valentine’s Day Ribbon if you want to try different ribbon choices! So many great selections to choose from for your tree.

    Directions:

    (Note: Use caution if you have young kids completing this activity since sharp pins are used. Adult supervision encouraged.)

    Cut the red, white, pink, and black ribbon into 4 inch. strips. 

    Start with the red ribbon first. Bring the ends of the ribbon together to create a loop. Place a pin towards the top part where the ends meet.

    Pin the ribbon onto the styrofoam about one inch above the bottom of the tree.

    Complete this step all the way around the bottom of the cone. 

    Repeat this step with the white ribbon and go all the way around the cone. Tip: Place the ribbon directly above the ribbon below it to cover the pin top slightly.  

    Continue this until you cover the whole tree with ribbon.

    Add the pink and the black and white polka dotted ribbon in between the ribbon layers as desired.

    Once you get to the top, pin the heart buttons on.

    Display this tree in your home or classroom! 

    Valentine's Day Ribbon Tree Decoration

    Valentine's Day Ribbon Tree Decoration

    Materials

    • 10 inch tall styrofoam cone
    • Red ribbon (5/8 in.)
    • White ribbon (5/8 in.)
    • Pink ribbon (3/8 in.)
    • Black and white polka dot ribbon (3/8 in.)
    • Petite pearlized pins (3/4 in.)
    • Heart buttons
    • Ruler
    • Scissors

    Instructions

    (Note: Use caution if you have kids completing this activity since sharp pins are used. Adult supervision encouraged.)

    Cut the red, white, pink, and black ribbon into 4 inch. strips. 

    Start with the red ribbon first. Bring the ends of the ribbon together to create a loop. Place a pin towards the top part where the ends meet. Pin the ribbon onto the styrofoam about one inch above the bottom of the tree. Complete this step all the way around the bottom of the cone. 

    Repeat this step with the white ribbon and go all the way around the cone. Tip: Place the ribbon directly above the ribbon below it to cover the pin top slightly.  

    Continue this until you cover the whole tree with ribbon, including the pink and the black. Once you get to the top, pin the heart buttons on.

    Display this tree in your home or classroom!

  • Fall Leaf Turkey Craft

    Fall Leaf Turkey Craft

    Create this simple and colorful Fall Leaf Turkey Craft this season!

    If you are looking for fun fall crafts to make this season with these kids, create these adorable leaf turkeys!

    This turkey craft is a great option for an activity to complete for homeschooling this year or to supplement lessons on the fall season, Thanksgiving holiday, or turkeys!

    Dry Leaves Crafts

    If you need a fun craft to keep the kids entertained and engaged with while you are in the kitchen cooking Thanksgiving dinner, this craft is perfect to complete during that time.

    While you are here, we have more turkey crafts to enjoy as well including:

    Fall Leaf Turkey Craft

    Supplies:

    Instructions:

    Paint the turkey ornaments the desired color.

    Fall Leaf Turkey Craft

    When the paint is dry, glue the leaves to the side of the turkey as the feathers.

    fall leaf turkey craft

    Layer the leaves as you’d like, using different color combinations.

    fall leaf turkey craft

    Set the turkeys aside to dry completely. Then display during the fall season!

    Fall Leaf Turkey Craft

    Fall Leaf Turkey Craft

    Ingredients

    • Wood turkey ornaments
    • Faux Fall leaves
    • Craft Paint
    • Paintbrush
    • Glue

    Instructions

    Paint the turkey ornaments the desired color.

    When the paint is dry, glue the leaves to the side of the turkey as the feathers.

    Layer the leaves as you’d like, using different color combinations.

    Set the turkeys aside to dry completely. Then display during the fall season!

  • 10+ Thanksgiving Sensory Bin Ideas

    Pine Cone Thanksgiving Sensory Bin

    Thanksgiving Sensory Bin Ideas for Busy Moms

    Ah, Thanksgiving! A time for family, gratitude, and, let’s admit it, a fair share of chaos.

    Amidst the hustle and bustle of preparing for the holiday, it’s important to keep our little learners engaged and entertained.

    Fall Playdough Kits

    And what better way to do so than with a fun Thanksgiving activity?

    Sensory bin ideas for Thanksgiving can be a fantastic fun way for your children to explore different textures, develop their fine motor skills, and indulge in imaginative play.

    Plus, for the busy mom, they can be a lifesaver.

    Harvest Sensory Bin Fall Sensory Bin Fall Harvest Autumn
    Harvest Sensory Bin


    Why Thanksgiving Sensory Bins?

    Sensory bins are a great way to offer children a rich sensory experience.

    As the name suggests, these are bins filled with sensory materials that children can touch, feel, and sometimes even smell.

    Fall Sensory Bin Loose Parts Tinker Tray Montessori Toy
    Fall Sensory Bin


    By engaging in this kind of play, kids can enhance their hand-eye coordination, language skills, and even cognitive development.

    During the fall season, the options for a themed sensory bin are endless.

    With the vivid fall colors and the variety of textures, it’s the perfect time for fun sensory bin activities.

    From the soft touch of silk leaves to the rough texture of pine cones, a simple sensory bin can offer so much fun and learning for your child.

    Montessori Fall Sensory Bin Play Kit Sensory Materials
    Fall Sensory Bin


    Dive into the Thanksgiving Theme

    1. The Pumpkin Patch Sensory Bin:

    Mini pumpkins are not just for decoration; they can be a major attraction in a sensory bin.

    You can create a pumpkin patch theme with dry corn kernels serving as the base filler, and then place the pumpkins on top. It’s a great activity for hand-eye coordination.

    Pumpkin Patch Sensory Bin KIT
    Pumpkin Patch Sensory Bin


    2. The Harvest Festival Sensory Tub:

    A harvest sensory bin can include cinnamon sticks, Indian corn, and popcorn kernels.

    This sensory tub will not just be a treat for the touch but also for the nose with the aromatic cinnamon.

    Harvest Sensory Play Bin
    Harvest Sensory Play Bin


    3. Dive into Indian Corn Sensory Ideas:

    Indian corn can be a fantastic addition, with its different textures from the husk to the kernels, offering a myriad of sensory experiences.

    4. The Turkey Sensory Bin:

    Thinking about a Thanksgiving turkey, aren’t we? Use colorful feathers and playdough for the turkey include small items like googly eyes and felt for the beak.

    Here’s a fun sensory kit that you can use along side of a bin that’s fun, too!

    Make Your Own Turkey Playdough Sensory Kit
    Make Your Own Turkey Playdough Sensory Kit


    A turkey sensory bin is a fantastic fun way for younger toddlers to familiarize themselves with the star of Thanksgiving Day.

    Safety First

    For younger toddlers, always ensure adult supervision when they’re playing with the sensory bin.

    Small items can be a choking hazard, so always be cautious about what you include in the bin, especially with little ones around.

    DIY or Buy?

    For those creative moms out there, the dollar store can be your best friend. It’s a perfect place to pick up sensory bin materials, from pom poms to plastic tubs.

    DIY Thanksgiving Sensory Bin

    Supplies:

    • 1 basket or sensory bin
    • Faux fall leaves
    • Pine cones (real – baked to remove bugs – or faux)
    • Pumpkins (real or faux)
    • decorative corn (real or faux)
    • Other fall items
    • Spoons, tongs, scoops, small bowls and/or boxes

    Directions:

    Place leaves in the basket.

    Arrange the pine cones, basket, pumpkins, animal toys, and more over the leaves.

    Allow your child to engage with this fun sensory bin!

    However, for the super-busy mom or for those who feel they might not nail the sensory table ideas they find online, there’s another option.

    Etsy offers a plethora of sensory bin ideas that are ready-made.

    Purchasing a pre-made sensory bin can be a great idea because it saves time, guarantees a good sensory bin experience, and often includes sensory items that might not be readily available at your local stores.

    Fall Sensory Bin Fall Sensory Taste Safe Montessori
    Fall Sensory Bin


    Think about it – no need to run from store to store collecting materials; simply click, order, and have it delivered to your doorstep.

    It’s a perfect way for busy moms to ensure their children get a fun Thanksgiving activity without the added stress of DIY.

    Pumpkin Sensory Bin/fall Sensory Bin/sensory
    Pumpkin Sensory Bin


    Engaging Older Kids

    While sensory bins are often associated with toddlers, let’s not forget our older kids.

    Including academic activities in the sensory bin, like counting popcorn kernels or sorting items by fall colors, can be a fantastic fun way for older children to engage and learn.

    Incorporating small world play into your sensory bin activity is another method to intrigue older kids.

    Maybe they can recreate the first Thanksgiving or set up a harvest festival scenario.

    Pumpkin Sensory Bin Fall Sensory Kit Kids Fall Activity
    Pumpkin Sensory Bin


    The Added Perks

    One of the great ideas behind sensory bins is skill development.

    While it may look like they are just having fun, children are working on language skills, fine motor skills, and even some basic math concepts.

    It’s a fun way to learn, making it a win-win for both moms and kids.

    The benefits of sensory play are immense, from aiding in skill development to providing a calming experience for overstimulated kids.

    And with Thanksgiving around the corner, what can be a better time for a fun sensory bin with a Thanksgiving theme?

    Fall Play Kit Fall Sensory Bin Toddler Activities
    Fall Play Kit Sensory Bin


    In Conclusion

    Thanksgiving is a time of gratitude, and while we express our thanks for the big things in life, let’s also be grateful for the small moments – like watching your little guy or gal having a ball with a simple Thanksgiving sensory bin.

    Fall Sensory Bin/forest Sensory Bin/sensory Kit/sensory
    Thanksgiving Sensory Bin


    With options to DIY or buy, sensory bins are an easy sensory bin solution for busy moms looking for great activity ideas for their children.

    Whether it’s the sensory experience of a turkey sensory bin or the imaginative play from a pumpkin patch, sensory bins promise hours of engagement and learning.

    Happy Thanksgiving!

    Fall Sensory Bin Sensory Bin Farm Sensory Bin Pumpkin
    Thanksgiving Sensory Bin


    Frequently Asked Questions (FAQs) about Thanksgiving Sensory Bins

    1. What is a sensory bin?
    A sensory bin is a container filled with materials and objects designed to stimulate the senses. It offers children a hands-on, interactive way to explore, discover, and learn.

    2. Why are sensory bins beneficial?
    Sensory bins promote various forms of development in children, including fine motor skills, hand-eye coordination, cognitive growth, language development, and imaginative play. They also offer a calming experience for children who might be overstimulated.

    3. Are sensory bins suitable for all age groups?
    While sensory bins are often associated with toddlers and preschoolers, they can be tailored for older kids as well. For older children, you can incorporate academic challenges, story narration, or more complex sensory materials.

    4. What should I be cautious about when setting up a sensory bin?
    For younger children, be cautious of choking hazards. Ensure that all items are large enough not to be swallowed. Always supervise children while they are playing with their sensory bins.

    5. Can sensory bins be messy?
    Yes, they can be, especially ones with smaller sensory materials like dry corn kernels or water. It’s a good idea to place a mat or towel under the bin or use it in an area where cleanup is easy.

    6. How often should I change the contents of the sensory bin?
    It depends on your child’s interest and the materials used. Some bins, especially those with organic materials, might need frequent changes, while others can last for weeks. It’s always a good idea to refresh and introduce new elements to keep your child’s interest.

    7. Can I incorporate smells into the sensory bin?
    Absolutely! Incorporating smells, like cinnamon sticks during Thanksgiving, can enhance the sensory experience. Just ensure that all materials are safe and non-toxic for children.

    8. Where can I find materials for sensory bins?
    You can source materials from a variety of places, including your home, nature, dollar stores, or craft shops. If you’re looking for ready-made solutions, platforms like Etsy offer pre-made sensory bins.

    9. Is it expensive to create a sensory bin?
    Not necessarily. Many sensory bins use household items or materials that can be sourced inexpensively from dollar stores or nature. The cost can vary based on the complexity and the materials you choose.

    10. What other themes can I explore after Thanksgiving?
    The possibilities are endless! After Thanksgiving, you could explore Christmas, winter, ocean, farm, space, or any other theme your child shows interest in.

    11. How do I store my sensory bin materials after use?
    You can use ziplock bags, containers, or jars to store different sensory materials separately. Ensure they’re stored in a dry place to avoid any mold or fungus growth, especially for organic materials.

    12. Can sensory bins help children with sensory processing issues?
    Yes, sensory bins can be beneficial for children with sensory processing challenges. It offers them a controlled environment to explore textures and materials at their own pace. Always consult with a therapist or specialist to tailor the bin to your child’s specific needs.

    Remember, sensory bins are all about exploration and fun. Tailor them to suit your child’s interests and enjoy the learning process together!

  • Candy Corn Playdough Sensory Activity

    Candy Corn Playdough Sensory Activity

    This is a very simple Candy Corn Playdoh Sensory Activity suitable for preschool and kindergarten-aged children.

    Creating crafts with Playdoh is perfect for helping young kids strengthen the muscles in their little hands!

    Candy Corn Halloween Craft

    Rolling out Playdoh and cutting it with a plastic knife helps young kids strengthen their fine motor skills and enhances their hand-eye coordination. 

    Adding small items like buttons, perler beads and pom poms will help your child with focus, concentration and hand-eye coordination. Not to mention, it’s just FUN to play with! 

    Candy Corn Playdough Sensory Activity

    Supplies:

    Candy Corn Halloween Craft supplies

    Directions:

    Remove the white Playdoh from the can. Using a mini rolling pin, roll the dough out flat. 

    Candy Corn Halloween Craft rolling pin

    With a plastic knife, cut out a large triangle shape out of the flattened Playdoh. Place the extra pieces of Playdoh back inside the can. 

    Candy Corn Halloween Craft

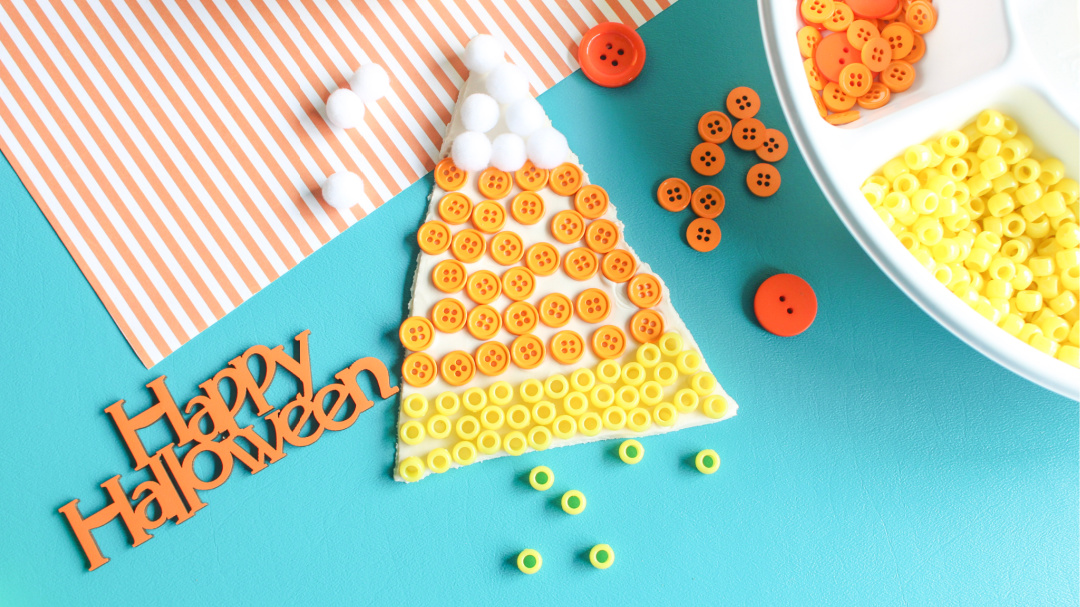
    Have your child start at the base of the triangle and add yellow perler beads all along the bottom on the candy corn piece.


    Candy Corn Halloween Craft

    Fill the middle of the candy corn with orange buttons.

    Candy Corn Halloween Craft

    Place the white pom poms at the tip of the candy corn. 

    Candy Corn Halloween Craft

  • Candy Corn Painted Rocks

    Painting rocks is a fun activity for kids of all ages, and it’s a great way to get into the Halloween spirit! Check out these amazing Candy Corn Painted Rocks below!

    Candy corn is one of our favorite themes to use for this project. All you need is some rocks, orange paint, yellow paint, white paint, and black paint.

    Paint pens are great to use, too!

    The results are always so pretty – and your little ones will have a blast doing it!

    Here are some Candy Corn Painted Rock ideas from Etsy available for purchase. Or, try to create some on your own to display or give as gifts this holiday season.

    You can even hide them around your area locally for others to find!

    15+ Candy Corn Crafts

    Candy Corn Guessing Game

    Candy Corn Painted Rocks

    Halloween Painted Rocks Candy Corn Set of 3 Silly Faces
    Candy Corn Painted Rocks


    Halloween Painted Rocks
    Candy Corn Painted Rocks


    Candy Corn Painted Rocks Halloween Tiered Tray Decor Fall
    Candy Corn Painted Rocks


    Halloween Hand Painted Rocks Candy Corn Stone Art Rock
    Candy Corn Painted Rocks


    Set of 6 Halloween Candy Corn Rocks Halloween Decor Garden
    Candy Corn Rocks


    5 Hand Painted CANDY CORN Rocks/ Fall Decor/ Tiered Trays
    Candy Corn Painted Rocks


    Hand Painted Candy Corn Stones Perfect Home Decoration
    Candy Corn Rocks


    Candy Corn Decor Hand Painted Rocks set of 3 Halloween
    Candy Corn Hand Painted Rocks


    Halloween Painted Rockpainted Rockpainted Stonerock
    Halloween Painted Rocks


    FAQs About Candy Corn Hand-Painted Rocks

    What are candy corn hand-painted rocks?

    These are small rocks or pebbles that are painted to resemble candy corn, a popular Halloween candy. They’re often used as decorations during the fall season or given as cute gifts.

    What materials do I need to create these rocks?

    You’ll need smooth, flat rocks, acrylic paint (white, orange, and yellow), paintbrushes, a sealant (like Mod Podge), and possibly a pencil or chalk to sketch your design.

    How do I paint a rock to look like candy corn?

    Start by cleaning the rock and drying it. Sketch a candy corn shape or simply paint three sections: white at the tip, orange in the middle, and yellow at the base. Let each color dry before applying the next. Once dry, seal with a protective coating.

    How long do the painted rocks last?

    With a good sealant and proper care, the painted rocks can last for years. However, their longevity can be affected by weather if left outside.

    Are the painted rocks safe to eat?

    No, they’re not edible. They are meant for decorative purposes only. Keep them away from young children who might be tempted to put them in their mouths.

    Can I use the rocks outdoors?

    Yes, but make sure to use a weatherproof sealant to protect your design from rain and other elements.

    Where can I get ideas or inspiration for candy corn rock designs?

    Pinterest, crafting blogs, and art websites are great resources to find designs and inspiration.

    Can I sell my candy corn hand-painted rocks?

    Many artists and hobbyists sell their hand-painted rocks at craft fairs, online marketplaces like Etsy, or local shops.

    How can I make the colors on my rocks vibrant and long-lasting?

    Use high-quality acrylic paints and apply multiple thin coats, allowing each to dry in between. Sealing with a clear, UV-protectant sealant can also help preserve the vibrancy.

    Why are my painted rocks chipping or losing color?

    This could be due to several reasons like not cleaning the rocks properly before painting, not using a sealant, or using low-quality paints. Ensure you follow the steps correctly for best results.

    Remember, these FAQs are general in nature. Depending on specific brands of paints or sealants, there might be additional considerations or steps to take.

    Always refer to manufacturer’s instructions when using specific products.

  • Pumpkin Popsicle Stick Craft

    Get creative with popsicle sticks! Create this simple Pumpkin Popsicle Stick Craft to display this fall season.

    Pumpkin Popsicle Stick Craft

    Pumpkin Popsicle Stick Craft

    Supplies:

    • 3 orange popsicle sticks
    • 1 green popsicle stick
    • 1 green faux leaf
    • Orange scrapbook paper
    • Glue
    • Scissors

    Directions:

    Cut each of the popsicle sticks in half.

    Place one piece on a flat surface. Glue one stick on each end at a slight angle. Glue one piece to the end of the angled pieces, angling them slightly inward. Attach the remaining stick to the bottom of the pumpkin.

    Trace the outside of the pumpkin on the back of the orange scrapbook paper. Cut out the shape with scissors.

    Glue the scrapbook paper shape to the back of the popsicle sticks.

    Glue the green popsicle stick to the back of the paper to make a stem.

    Cut the green faux leaf into three pieces and glue them to the top of the pumpkin.

    pumpkin popsicle stick craft