Category: Family

  • Angel Nutter Butter Cookies

    Angel Nutter Butter Cookies

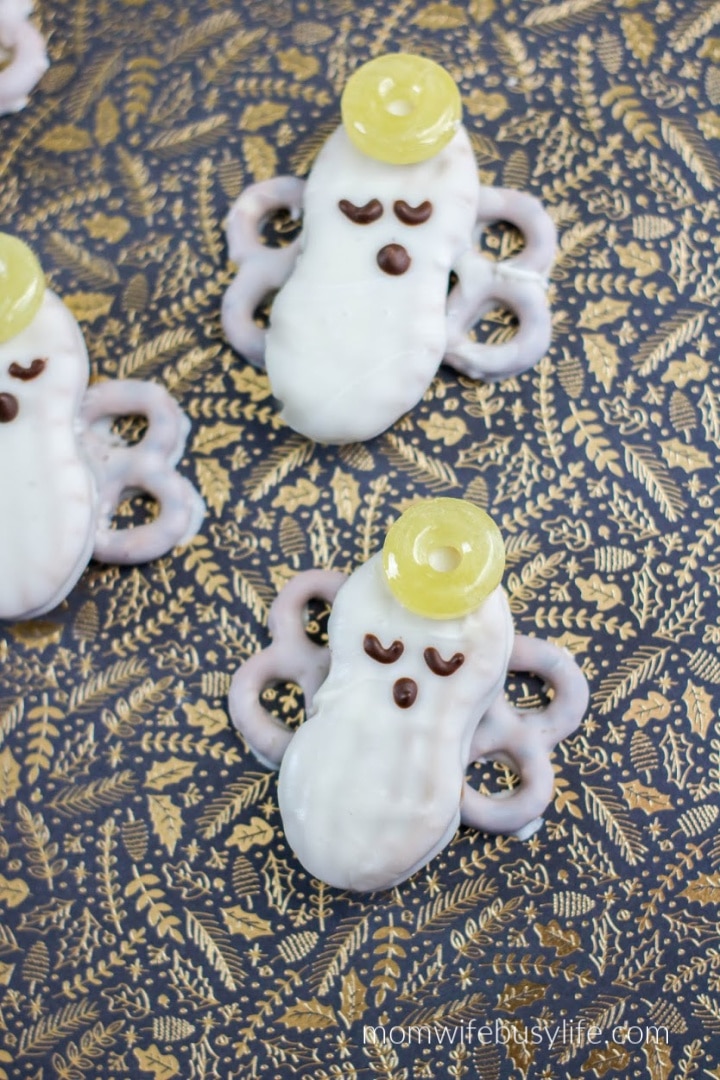
    Create these adorable and delicious Angel Nutter Butter Cookies to enjoy this holiday season!

    Angel Nutter Butter Cookies

    If you are looking for a unique, adorable, and delicious holiday recipe idea, THIS recipe is for you!

    These Angel Nutter Butter Cookies are the perfect addition to your holiday gathering or event!

    You’ll have everyone talking about how CUTE these are. These cookies are simple to make.

    Call the kids into the kitchen to help you make these Angel Nutter Butter Cookies! I think they will love adding the details to the angels.

    Angel Nutter Butter Cookies

    Ingredients:

    You will also need:

    Instructions:

    Line a baking sheet with waxed paper.

    Melt white candy according to package directions making sure not to overheat. If the candy gets too hot, it will seize. If desired, add 1 teaspoon vegetable shortening or coconut oil to make the melted candy pourable.

    Dip the pretzel twists in melted candy, allowing excess to drip back into the bowl. Place the pretzels on waxed paper until dry. Rearrange the pretzels into pairs for wings.

    Dip Nutter Butter cookies in melted candy, allowing excess to drip back into the bowl.

    Place the cookie on the pretzel wings and immediately add the Lifesaver candy as a halo. Allow to dry completely.

    Melt chocolate candy according to package directions making sure not to overheat. If the candy gets too hot, it will seize. If desired, add 1 teaspoon vegetable shortening or coconut oil to make the melted candy pourable.

    Using a toothpick, draw two half circles on the uncoated portion of each cookies to be the eyes and a larger dot as the mouth. Allow to dry completely.

    Angel Nutter Butter Cookies
    Angel Nutter Butter Cookies
    Angel Nutter Butters

    Angel Nutter Butter Cookies

    Angel Nutter Butter Cookies

    Ingredients

    • 12 Nutter Butter cookies
    • 24 pretzel twists (2 for each cookie)
    • 12 pineapple-flavored Lifesaver candies (1 for each cookie)
    • White candy melts or vanilla flavored almond bark
    • Chocolate candy melts or chocolate flavored almond bark
    • You will also need:
    • Large open star tip (Wilton 1M Open Star Piping Tip)
    • Piping bags
    • Toothpick

    Instructions

    Line a baking sheet with waxed paper.

    Melt white candy according to package directions making sure not to overheat. If the candy gets too hot, it will seize. If desired, add 1 teaspoon vegetable shortening or coconut oil to make the melted candy pourable.

    Dip the pretzel twists in melted candy, allowing excess to drip back into the bowl. Place the pretzels on waxed paper until dry. Rearrange the pretzels into pairs for wings.

    Dip Nutter Butter cookies in melted candy, allowing excess to drip back into the bowl. Place the cookie on the pretzel wings and immediately add the Lifesaver candy as a halo. Allow to dry completely.

    Melt chocolate candy according to package directions making sure not to overheat. If the candy gets too hot, it will seize. If desired, add 1 teaspoon vegetable shortening or coconut oil to make the melted candy pourable.

    Using a toothpick, draw two half circles on the uncoated portion of each cookies to be the eyes and a larger dot as the mouth. Allow to dry completely.

    Pin to Pinterest:

    Angel Nutter Butters Sample 1-3 (1) (1)
    Angel Nutter Butters
  • Halloween Treat Ideas for Cats

    Halloween Treat Ideas for Cats

    Your cat will love you this Halloween! Here are a few Halloween Treat Ideas for Cats. Give these treats to your cat this season.

    Muse® Natural Cat Food

    Halloween is approaching this month and the stores are getting creative with their Halloween displays and decor. I walked into a grocery store recently and saw bats and ghost decorations hanging from the ceiling along with shelves and bins full of Halloween candy. I love the fall season and my family loves to participate in trick-or-treating on Halloween as well as other fun fall events such as festivals, hay-rides, pumpkin patches, corn mazes, costume parties, and more.

    It’s fun to celebrate the holiday season with family and friends, but sometimes we overlook our furry little friends! They want to be included in the fun, too! That’s why I decided to create a fun treat for my cat, Candie, to enjoy this Halloween. Treat baskets are easy to make and fun to fill. You can get very creative with your treat basket for your pet this Halloween and add a variety of treats inside!

    Muse® Natural Cat Food

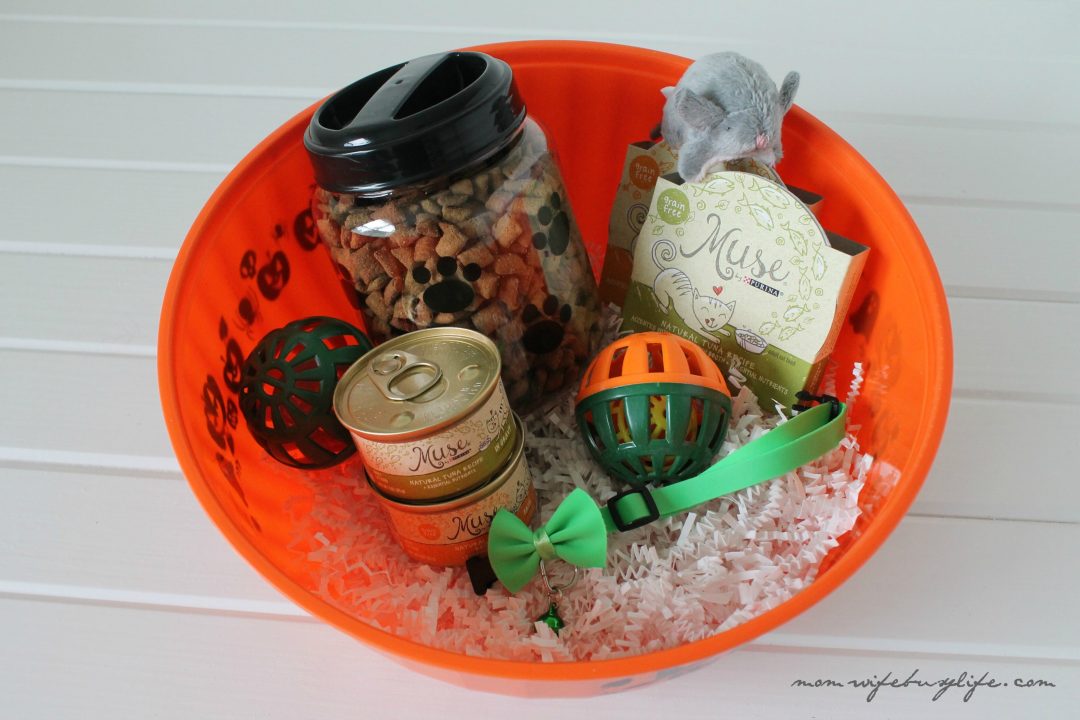
    I included the following items in Candie’s basket this year:

    • Toy mouse
    • Jingle Balls
    • Collar
    • Cat Food
    • Treats in a Decorative Container
    Muse® Natural Cat Food

    Candie needs a bit of exercise, so I’m hoping the jingle balls and the toy mouse encourage her to move a bit. The collar will be fun to wear on Halloween night when trick-or-treaters arrive.

    Muse® Natural Cat Food

    I surprised Candie with the cat food early. She was laying outside lounging on our back porch and I called her in for her treat. As you can see below, she was happy to enjoy an early surprise.

    Muse® Natural Cat Food
    Muse® Natural Cat Food

    Putting together a Halloween treat basket for your cat this Halloween is a great idea! You can also create a fun ghost craft with the cat food containers since they have a white lid!

    Muse® Natural Cat Food

    Here’s how to make these ghosts:

    Supplies:

    • Cat Food Containers with white lid
    • Permanent marker

    Directions: 

    Using a permanent marker, draw a silly ghost face on each container. *Parental guidance recommended with younger children when using permanent markers.

    Set these silly ghosts around as Halloween decor during the month of October until you are ready to feed them to your cat.

    Muse® Natural Cat Food
  • Halloween Floam Slime Recipe (Without Borax)

    Halloween Floam Slime Recipe (Without Borax)

    halloween slime

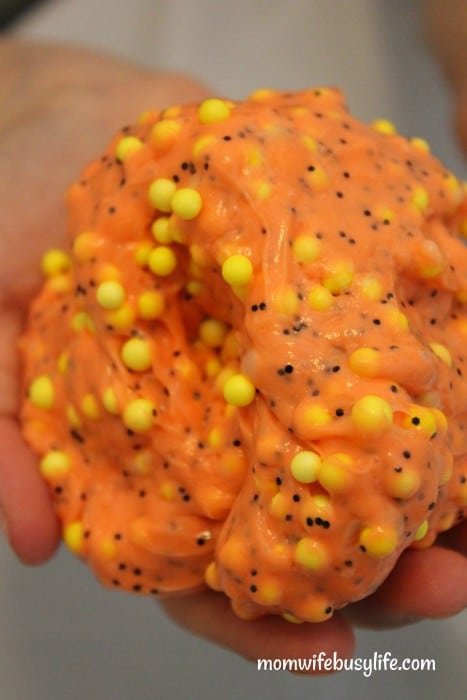
    My girls have been begging me to make slime. It’s like a daily thing around here. “Mom, do we have this? Do we have that?” They love watching YouTube videos of kids making slime and always want to try the different recipes and ingredients. Recently, we stumbled upon an easy slime recipe to create that doesn’t require Borax. We changed the recipe up to make this our own and were very pleased with our batch. I think the batch we made is perfect for two children to play with. This recipe wasn’t too sticky for the kids and they loved the texture. We added foam slime balls and glitter to our slime for added fun.

    We did use Borax in our green slime recipe and our pink and blue slime recipes.

    halloween slime 2

    If you are looking for an easy slime recipe for the kids this Halloween, I recommend this recipe below!

    ingredients

    Easy Halloween Slime Recipe (Without Borax)

    1. Pour the glue in a mixing bowl.
    2. Add baking soda, food coloring, and contact solution.
    3. Add glitter and foam balls.
    4. Mix well until slime forms.

    Here’s a video if you’d like to see how we made our Halloween slime:

    slime

    stretchy

    More Halloween Related Posts:

    Milk Jug Ghosts
    Vampire Blood in a Bottle
    Spooky Spider
    Vampire Doughnuts
    Pumpkin Shaped Pizza Pockets
    Halloween Party Favor Ideas
    Princess Halloween Costumes for Girls

  • How to Keep the Cat Litter Area Clean and Tidy

    How to Keep the Cat Litter Area Clean and Tidy

    Do you have a cat that is litter box trained? Read our tips for How to Keep the Cat Litter Area Clean and Tidy!

    how to keep the litter box area clean and tidy

    Having a cat is a major responsibility.

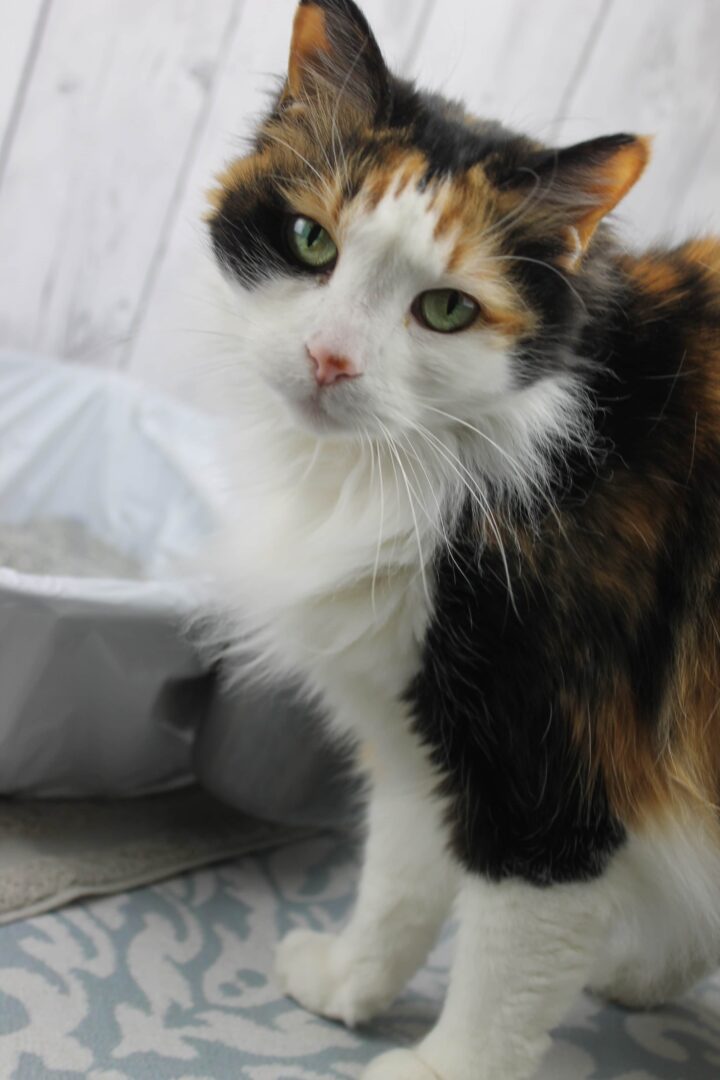
    Even though cats seem easy to take care of, they do require daily feedings, clean water, regular vet appointments, and regular snuggle time (which usually consists of Candie cat laying on my head every night and taking up half of my pillow!)

    There’s also the dreaded litter box cleanings that must take place regularly to keep your cat happy and healthy!

    >> CLICK HERE TO SIGN UP FOR MY EMAIL LIST AND GET ACCESS TO MY FREE PRINTABLE LIBRARY!

    Before we get started, let’s answer these two important questions:

    How Often Should I Scoop My Cat’s Litter Box?

    Litter boxes should be scooped out at least once or twice a day. If you can scoop the box after each use, that’s even better for your cat.

    How Often Should I Clean My Cat’s Litter Box?

    It’s best to replace the cat litter and clean out the box with soap and warm water at least once a week.

    NOTE: If you keep your litter box in a location that’s hard to be seen on a daily basis, it may be easy to forget to keep an eye on it! Post a reminder somewhere in your home to make sure you remember to scoop and clean the litter box regularly!

    (In Memory of Calico Candie 7/6/2021. You can find her on Instagram!)

    How to Keep the Cat Litter Area Clean and Tidy

    Cleaning the cat litter area doesn’t have to be a dreadful task.

    In fact, over the last few years, I’ve developed a system that works for me when it comes to tidying up my cat’s litter box area.

    When you have all of the right litter box cleaning supplies nearby, cleaning the litter box area can be a simple task!

    Below, I’ve put together tips on how I keep my cat litter area clean and tidy. I’m including my must-have litter box supplies that make cleaning up a cat litter area a breeze!

    How to Keep the Cat Litter Area Clean and Tidy

    How to Keep the Cat Litter Area Clean and Tidy

    1. Select a piece of litter box furniture that fits in with your home decor.

    Did you know there are cute furniture options to place and/or hide cat litter boxes?

    If you are looking for a better way to store your cat’s litter box, consider selecting furniture that fits in with your home decor for a better overall look.

    Shop Hidden Cat Litter Box Furniture at Amazon!

    If you don’t have a good location for a litter box, you can hide your cat’s box in these beautiful pieces of furniture! Here are my favorite options:


    BIRDROCK Home Decorative Cat House & Side Table


    PAWLAND Cat Litter Box Enclosure


    unipaws Designer Cat Washroom Storage Bench


    New Age Pet ecoFLEX Habitat N’ Home Litter Loo


    Cat Washroom Bench


    Good Pet Stuff Hidden Litter Litter Box

    2. Keep a scoop and a small trash can nearby.

    It’s a good idea to scoop your cat’s litter box at least once daily with a high quality litter scoop.

    I keep a small trash can lined with these scented trash bags next to Candie’s litter box. When it’s time to scoop Candie’s litter, I simply scoop and toss the contents into the bag.

    Then, I throw the bag away in the in the garbage can outside and line the trash can with a new liner.

    You can also use these pet waste bags to dispose of your pet’s mess!


    DuraScoop Jumbo Cat Litter Scoop

    3. Choose a high quality litter box with a lid.

    We do keep our litter box covered with a lid (not pictured above.) Here are a few examples of litter boxes with lids.

    We made the mistake of not using the lid once in an old rental house and had to pay $200 in damages because she missed the box every now and then and it soaked into the baseboards. (Yuck, I know!)

    Shop for a litter box that is right for your cat’s needs.


    Amazon Basics No-Mess Hooded Cat Litter Box

    Automatic Self-Cleaning Litter Box

    Have you heard of an automatic self-cleaning litter box?

    This may be a good option to try! I personally have not tried a self-cleaning litter box, so read reviews before purchasing if you are interested.


    PetSafe ScoopFree Automatic Self Cleaning Cat Litter Box

    4. Use litter box liners.

    Litter box liners are super helpful for keeping Candie’s litter box clean.

    I prefer these Jonny Cat jumbo liners!


    JONNY CAT Jumbo Liners

    I do like the bags made specifically for litter boxes because they are thick and Candie can’t tear her claws through them as easily!

    When I’m ready to change her dirty litter to fresh cat litter, I’m able to dispose of the bag of litter easily.

    How to Keep the Cat Litter Area Clean and Tidy

    5. Place a mat in front of the litter box.

    A cat litter mat can help catch any litter that may be left on your cat’s paws.

    When you are ready to clean your cat’s litter box area, gently shake the contents of the mat into the trash can.


    Gorilla Grip Thick Cat Litter Trapping Mat

    6. Use a small broom and dust pan for messes.

    A small broom and dust pan set comes in handy to sweep up small messes, like litter tracking.


    Broom and Dustpan Combo

    How to Keep the Cat Litter Area Clean and Tidy

    7. Choose a low tracking litter.

    Nothing is more annoying than stepping on cat litter in your home or seeing it tracked all over your freshly mopped floors.

    One of the reasons I implemented a cat litter cleaning routine is because I was tired of stepping on cat litter!

    We invest in low tracking litter to help cut down on litter tracking.

    This litter helps keep Candie’s paws clean (and my home clean!) This low dust formula also helps to keep our surfaces cleaner!


    Fresh Step Advanced Clumping Cat Litter

    How to Keep the Cat Litter Area Clean and Tidy

    Today I shared with you tips on how to keep the cat litter area clean and tidy.  Candie is an important part of our family. I like to keep her happy by keeping her space neat for her.

    cat feeding station

    Do you want to create a cute space for your cat to eat and drink? Check out How to Create a Cute Cat Feeding Station.

    tips for traveling with a cat

    Traveling with your cat soon? These 8 Tips for Traveling With a Cat can help you prepare for the adventure!

    introducing your pet and new baby

    Having a baby soon? Read tips for Introducing Your Pet and New Baby.

    reasons why pets are good for kids

    Don’t have a cat but interested in adopting one? Read our Reasons Why Pets are Good for Kids.

    Halloween Treat Ideas for cats

    Cats deserve treats, too! Consider gifting your cat treats for Halloween! See our Halloween Treat Ideas for Cats.

    How do you keep your cat litter area clean and tidy? Please leave your tips below!

  • How to Untangle American Girl Doll Hair

    How to Untangle American Girl Doll Hair

    Does your American Girl Doll have tangled hair? Learn How to Untangle American Girl Doll Hair with these tips!

    How to Untangle American Girl Doll Hair

    My girls have recently expressed interest with American Girl dolls. If you know anything about American Girl Dolls, you know these dolls have a pretty price tag, with most dolls averaging around $100 or more.

    They love to play with their dolls with the neighborhood friends and it’s fun to see how excited they get with doll pretend play.

    How I Found Our American Girl Dolls

    I love thrift store shopping and try to find most items for my household at local thrift stores before paying full retail price for items.

    I’ve been doing this since college to try to save money. Many would say I’m crazy, why not just pay full price? But thrifting is a hobby of mine and I enjoy it. I always will!

    During a thrift store shopping trip several weeks ago, my daughter found an American Girl doll complete with the outfit for $10!

    The doll was in excellent shape. The doll she found is here on the far left.

    Keep reading to see how I fix American Girl Doll hair!

    She used her allowance earnings to pay for the doll and has had fun with it ever since we found her. I was able to find 18 inch doll clothes at a great price that she could use with her doll.

    Mom, Can I Have a Doll, Too?

    When my youngest daughter found this great find, my oldest daughter started expressing interest in her own doll.

    However, I knew I didn’t want to pay the money for a brand new doll, and the dolls on Ebay were still a pretty price.

    I was considering purchasing one for her upcoming birthday from Ebay, but was on the fence about paying the money for it.

    During my most recent thrift store trip, I checked the doll bin for dolls. I didn’t expect to find anything that great since this doll bin included mostly dolls that were well loved!

    The majority of dolls were missing their outfits and had tangled, matted, and frizzy hair.

    I did thumb through the selections and noticed what I thought looked like an American Girl doll! I pulled the doll out, searched for the tag and sure enough, she was an American Girl.

    She was priced at only $3!

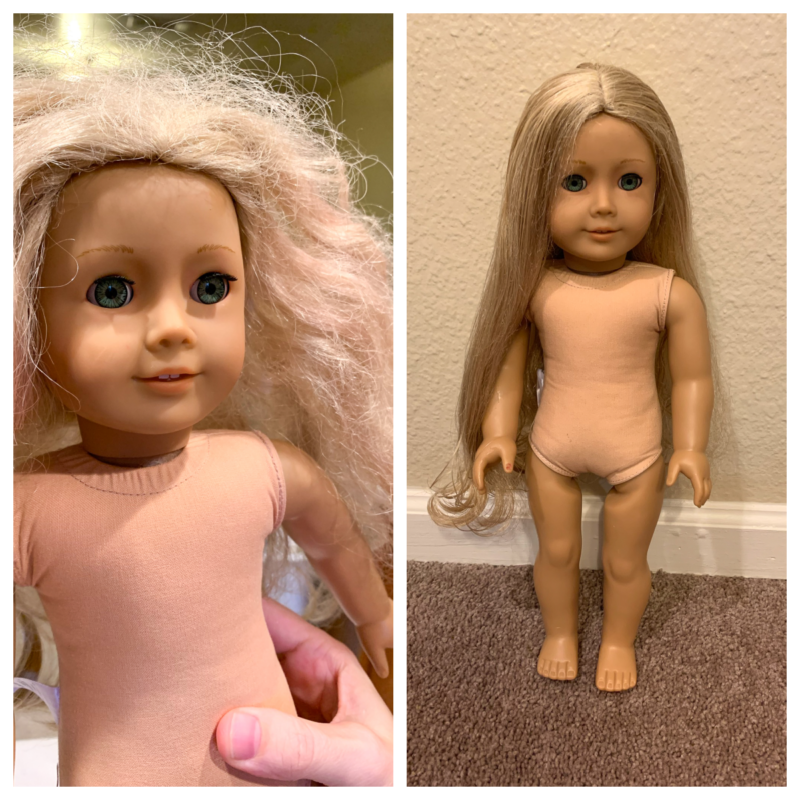
    But her HAIR!

    What a mess! Creepy?!

    Now keep in mind, there’s a good reason most people overlooked this doll.

    The hair was a mess and you can tell that the little girl that owned her practiced with makeup around her eyes, maybe even toothpaste around her teeth.

    It looked like there were shades of makeup in her hair. That was all easy to clean off with a wet towel.

    How to Untangle American Girl Doll Hair

    I won’t lie, the doll just looked a bit creepy. My goal was to take a well loved doll that was discarded and in need of restoration, and make her beautiful. This became a project and I really just wanted to practice to see if I could complete this task.

    I have a friend that was able to give me a few great tips to help me along the way before I sat down and attempted restoring the doll.

    If you have a doll with tangled or frizzy hair, try these tips below to see if they work for your doll, too!

    Here’s what you’ll need:

    • doll with tangled hair
    • plastic grocery store bag
    • small cloth
    • waterproof tape
    • high quality shampoo
    • high quality smoothing conditioner
    • detangling brush (other options: wide tooth comb or a wig brush)
    • Patience!!!

    (Note: When I say ‘high quality’ shampoo or conditioner, I don’t mean the kinds that are cheap or watered down. I used Dove conditioner for this doll.)

    I had no idea how this would turn out, but I am very pleased with the results. I think and hope you will agree!

    How to Untangle American Girl Doll Hair

    Create a Work Space

    I laid a towel down on the table so that I could have enough space to work with the doll as I was brushing out the tangles.

    Prepare the Doll

    Securely wrap the doll’s body in a plastic bag. This will keep any water from getting the cloth material on the doll wet. The arms and legs are vinyl, so if these parts get wet, it’s not really a big deal. Just dry them off with a towel.

    Cover the eyes of the American Girl doll with cloth. Secure the cloth with waterproof tape. This will keep water from entering the dolls eyes. (Tip: I actually used a small piece of gauze and waterproof first aid tape for this part!)

    Can you Wash American Girl Doll Hair

    The answer is yes! You can wash American girl doll hair. Keep reading below to find out how.

    How to Wash American Girl Doll Hair

    Make sure you read the steps above to learn how to prepare your doll before you wash the hair.

    Once prepared, start by washing the dolls hair at the sink with a high quality shampoo and warm water.

    Rinse the shampoo out.

    We aren’t finished yet! Below you’ll see how I condition the hair. The conditioner will need to be rinsed out once finished.

    How to Brush American Girl Doll Hair

    Add a high quality smoothing conditioner to the dolls hair. Keep in mind, for this particular doll, I used a generous amount of conditioner so that I could work a detangling brush or wig brush through the dolls hair easily afterwards. A wide tooth comb or wig brush works well, too. Do not rinse yet.

    NOTE: For this part below, I’d like to mention that if I had another doll to restore, I’d try starting at the bottom and work my way towards the top to prevent hair breakage. While the method below worked for me, you may want to try the bottom to top method!

    Starting at the top of the hair and scalp area, work the brush through the hair. Avoid brushing the bottom of the hair until you have worked all of the tangles out at the top first.

    Once these tangles are brushed, start working towards the bottom of the dolls hair. Add more conditioner along the way if desired. For this doll, I used about one half of a bottle of conditioner to get her hair tangle free.

    Important Note: Don’t give up too quickly! At one point when I was brushing the hair, I thought I’d never be able to get it to work out, but my secret was, MORE conditioner!

    Hair Falling Out?

    Depending on how bad the dolls hair is tangled, you may notice that hair falls out while you are brushing the tangles out.

    This was totally normal for me during this process. I just discarded any hair that fell out and continued brushing until I was able to get the dolls hair straight. She still had a ton of hair left when I completed the entire process!

    Allow the Hair to Dry

    Once the doll’s hair is straight and tangle free, rinse the conditioner out and continue brushing the hair to keep the hair tangle free as it dries.

    Once the hair is completely dry, style the dolls hair as desired!

    How to Defrizz American Girl Doll Hair

    Brush the hair

    Start by brushing the hair carefully and thoroughly to remove any tangles or knots.

    Apply defrizzing serum

    Apply a small amount of defrizzing serum to the hair, and distribute it evenly.

    Comb the hair

    Use a wide-tooth comb to gently comb through the hair, starting at the tips and working your way up.

    Use heat protectant spray

    Hold the hair in one hand and use a small amount of heat protectant spray with the other hand.

    Blow dry the hair

    Gently blow dry the hair, using low heat.

    Be careful not to overheat the hair, as this can damage it.

    Style the hair

    Once the hair is completely dry, use a brush to style it into your desired look.

    With these simple steps, you can have beautiful, frizz-free American Girl doll hair!

    I added a little side braid. This was the hair style I gave the doll before revealing the results to my daughter!

    Heating Products

    I do not recommend using heating products for your dolls. If you MUST use a heating device to dry the hair, use a blow dryer on the lowest setting. Do not use a curling iron on the doll’s hair. The dolls hair can melt if high heat is used.

    How Long Did This Process Take?

    This process from start to finish took me a little over an hour to complete. Overall, I enjoyed seeing the before and after results of this doll.

    When I picked up my girls from school that day, as a joke, I told my girls I found an American Girl Doll and shared the before photo with them that you can see at the beginning of the post. The looks on their faces! Then I told them I restored her and showed them the after picture. They both started arguing over who was going to get her!

    When my oldest daughter came home, she immediately dressed up the doll and fixed her hair the way she wanted it! You can see her new hair style below.

    After this project, I had a thought in my mind that maybe I should go back and save all of the dolls I can, restore them, and pass them onto someone that could love them as much as they were once loved. (Just another crazy idea, I don’t think I’ll have time to really do that!)

    I’m sure these tips will work with any dolls hair! You just have to try it out and see!

  • How to Get Organized This School Year

    Organization is important for a successful school year! Read how to get organized this school year!

    how to get organized this school year

    Back-to-school season is very exciting, but it can be quite hectic and messy too. There are books to keep track of, lunches to make and 100 different dates and activities to keep track of. This year, make life easier on yourself with these six easy ways to get organized this school year.

    How to Get Organized This School Year

    1. Organize Your Time: Create a Routine

    Do your kids dilly dally when it is time to get ready for school in the morning or fight you when it is time to do their homework? Make routine tasks easier on everyone by establishing routines. For example, you could make a picture list that shows your young children all the steps they need to do to get ready in the morning. You could also make an after-school routine of snacks and then homework before dinner to help keep your older kids on track with their homework.

    2. Organize Your School Supplies: A Place for Everything

    School books and supplies have a way of wandering off. Prevent this by designating a certain spot to do homework as well as certain spots they put their shoes, lunch boxes and library books. When your kids get into the habit of always leaving their items in their spots, things are far less likely to get lost. Here are a few great entryway organizers that would be a great way to organize belongings. A shoe organizer is a MUST in my house!

    Related: Create a Homework Station – Kids’ Desks for Back-to-School

    30+ Books for Back to School

    3. Organize The Papers: Don’t Be Afraid to Recycle

    Kids bring home an insane number of papers each week. Don’t feel like you have to keep them all. Have your child select the papers he or she is most proud of to display those on the fridge and then recycle the rest. If you truly can’t bear to part with projects, take pictures of them to use for a scrapbook page before recycling them.

    4. Organize the Forms: Use a Wall-mounted File Sorter

    In addition to all of your kids’ school papers, you will undoubtedly have several forms, permission slips and important newsletters to keep track of. Organize them with a wall-mounted file sorter and colored folders for each child. Put all essential papers straight into the sorter, and do your best to get important papers on their way quickly. This way, you are never hunting for a permission slip or important paper at the last minute.

    5. Organize Your Schedule: Use the Right Calendar

    Between work, school, sports, extracurriculars, church and family activities, your family has a lot on its plate. Keep track of all important dates by writing everything down on a large desk calendar. You can use a large paper or white board calendar in your kitchen or an online synchable calendar on your computer or phone. Write everything down, and you are far less likely to forget a date or double book yourself.


    Consider a planner to help you get your schedule organized!

    Related: Back-to-School Shopping Made Easy With Bundles

    6. Organize Your Lunch Supplies: Create a Lunch Supply Bin

    Packing school lunches can be quite tiresome when you have to figure out what to make each morning. Instead of constantly searching through your cupboards to see what you can throw together, create a school lunch bin. This is a great place to put individually portioned fruits, veggies and crackers. Then, every morning you can just pull out what you need. In fact, if you get really organized, the kids may be able to make their lunches themselves, saving you lots of time and hassle!

    Shop Back to School:

    School items can get lost easily! Don’t forget to label all of your school items! Get FREE shipping on super cute labels.

    Have a Disney fan in the family? Here’s a list of Disney Lunch Boxes for Back to School to choose from for school lunches this year.

    Include Cute Lunch Box Notes for Back to School in your child’s lunch box! There are a variety of notes to choose from to help brighten your child’s day.

    Skip the fountains this year and send your child to school with a reusable water bottle to use during the day. Here’s our choice for Best Reusable Water Bottles for Back to School.

    Does your child love unicorns? Head back to school in style with these Back to School Unicorn Backpacks.

    It’s Back to School Shopping Made Easy with Bundles! Choose from a variety of school supply bundles for your child or children.

    Shop more back to school lunchboxes now!

    Do you have any back to school organization tips? 

  • How to Make Melted Crayons

    How to Make Melted Crayons

    Save your old and broken crayons! Learn How to Make Melted Crayons.

    How to Make Melted Crayons

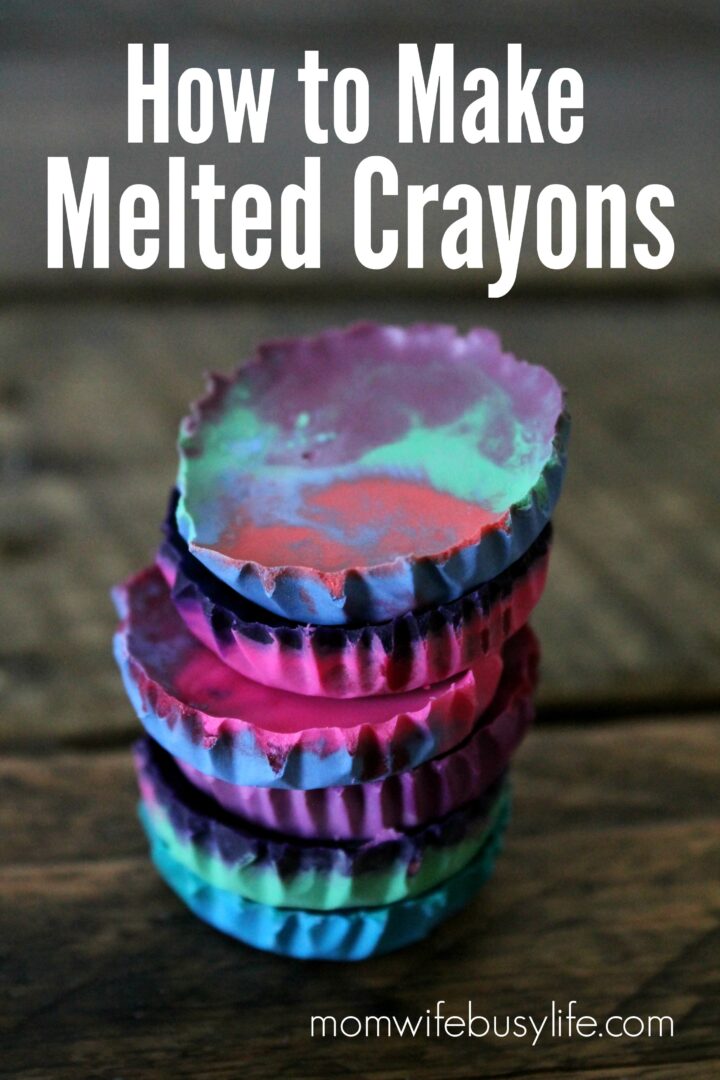
    Do you have a bunch of broken or old crayons around the house? Instead of tossing them, consider making melted crayons with the crayons! My girls saw a video about making melted crayons on YouTube Kids and we went to our art shelf and pulled out as many broken crayons as we could find. Then, we broke them down into even smaller pieces and melted them into these beautiful crayons! This activity is perfect for kids to help out with – breaking the crayons, placing the small cupcake liners in the pan, and even removing the crayons once they’ve cooled and finally, coloring with them!

    ***Warning: Moms, you’ll want to make sure you take care of all of the oven work if your child isn’t old enough to use an oven!***

    How to Make Melted Crayons

    Here’s what you’ll need:

    How to Make Melted Crayons

    Directions:

    1. Preheat oven to 250 degrees.
    2. Line muffin pan with mini cupcake liners.
    3. Break up crayons into small pieces. Make sure all paper is removed from crayons.
    4. Place about 6 small pieces of broken crayon into each cup. Allow your child to get creative with color choices!
    5. Once all liners are filled, place the pan into the oven for 10-15 minutes.
    6. Take the pan out and let the crayons cool completely.
    7. Remove the cooled crayons from the liners.
    8. The crayons are ready for your child to color with!
    How to Make Melted Crayons
    How to Make Melted Crayons

    While you are here, check out more kids crafts and activities!